19 min to read
Infrastructure as code with Azure DevOps – Part 5: Parameters and variables

Before we get started on how we can dynamically configure builds and releases, it’s important to understand the role that parameters and variables play in the deployment of Azure Resources.
What are ARM parameters, and why do I need them
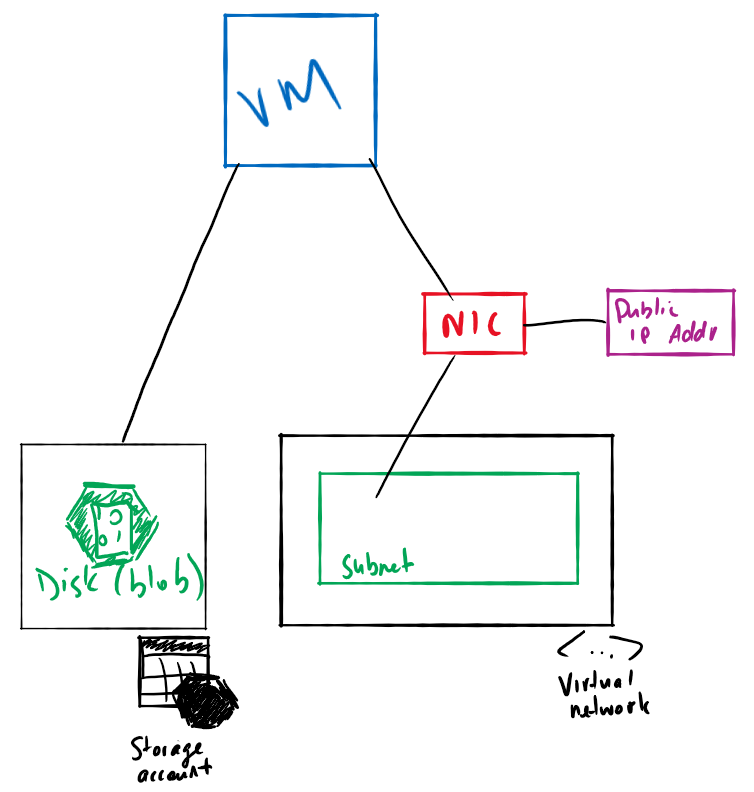
When deploying infrastructure using ARM templates, they can usually be broken down into two main components.
- The definition of the infrastructure to be deployed (the things)
- The parameters that make those things unique (the names or specific configurations of the things)
As a general rule of thumb, it is good practice to never define any parameters statically within templates. If things such as server names, network names, account names, secrets or other Azure resource names are hard-coded into the template, then the template is only usable in a very specific, single use case. You should always aim to make your code as flexible and reusable as possible.
Using the example above, let’s say a request comes through from the Dev team to provision a new virtual machine into the development environment called devVM1. I quickly throw together an ARM template that looks like this and deploy it. Job done, everyone’s happy!
{
  "$schema": "https://schema.management.azure.com/schemas/2015-01-01/deploymentTemplate.json#",
  "contentVersion": "1.0.0.0",
  "parameters": {},
  "variables": {},
  "resources": [
    {
      "name": "[toLower('devVM1storage')]",
      "type": "Microsoft.Storage/storageAccounts",
      "apiVersion": "2015-06-15",
      "location": "[resourceGroup().location]",
      "properties": {
        "accountType": "Standard_LRS"
      }
    },
    {
      "name": "devVM1-PublicIP",
      "type": "Microsoft.Network/publicIPAddresses",
      "apiVersion": "2018-08-01",
      "location": "[resourceGroup().location]",
      "properties": {
        "publicIPAllocationMethod": "Dynamic",
        "dnsSettings": {
          "domainNameLabel": "[toLower('devVM1')]"
        }
      }
    },
    {
      "name": "devVM1-VirtualNetwork",
      "type": "Microsoft.Network/virtualNetworks",
      "apiVersion": "2018-08-01",
      "location": "[resourceGroup().location]",
      "properties": {
        "addressSpace": {
          "addressPrefixes": ["10.0.0.0/16"]
        },
        "subnets": [
          {
            "name": "devVM1-VirtualNetwork-Subnet",
            "properties": {
              "addressPrefix": "10.0.0.0/24"
            }
          }
        ]
      }
    },
    {
      "name": "devVM1-NetworkInterface",
      "type": "Microsoft.Network/networkInterfaces",
      "apiVersion": "2018-08-01",
      "location": "[resourceGroup().location]",
      "dependsOn": [
        "[resourceId('Microsoft.Network/publicIPAddresses', 'devVM1-PublicIP')]",
        "[resourceId('Microsoft.Network/virtualNetworks', 'devVM1-VirtualNetwork')]"
      ],
      "properties": {
        "ipConfigurations": [
          {
            "name": "ipConfig1",
            "properties": {
              "privateIPAllocationMethod": "Dynamic",
              "publicIPAddress": {
                "id": "[resourceId('Microsoft.Network/publicIPAddresses', 'devVM1-PublicIP')]"
              },
              "subnet": {
                "id": "[resourceId('Microsoft.Network/virtualNetworks/subnets', 'devVM1-VirtualNetwork', 'devVM1-VirtualNetwork-Subnet')]"
              }
            }
          }
        ]
      }
    },
    {
      "name": "devVM1",
      "type": "Microsoft.Compute/virtualMachines",
      "apiVersion": "2017-03-30",
      "location": "[resourceGroup().location]",
      "dependsOn": [
        "[resourceId('Microsoft.Storage/storageAccounts', toLower('devVM1storage'))]",
        "[resourceId('Microsoft.Network/networkInterfaces', 'devVM1-NetworkInterface')]"
      ],
      "properties": {
        "hardwareProfile": {
          "vmSize": "Standard_A2"
        },
        "osProfile": {
          "computerName": "devVM1",
          "adminUsername": "adminUsername",
          "adminPassword": "adminPassword"
        },
        "storageProfile": {
          "imageReference": {
            "publisher": "MicrosoftWindowsServer",
            "offer": "WindowsServer",
            "sku": "2012-R2-Datacenter",
            "version": "latest"
          },
          "osDisk": {
            "name": "devVM1OSDisk",
            "caching": "ReadWrite",
            "createOption": "FromImage"
          }
        },
        "networkProfile": {
          "networkInterfaces": [
            {
              "id": "[resourceId('Microsoft.Network/networkInterfaces', 'devVM1-NetworkInterface')]"
            }
          ]
        }
      }
    }
  ],
  "outputs": {}
}
A few weeks pass. The development guys have done their development and a request comes through to redeploy the VM into the testing environment. Oh-oh! Now I’m in a bit of trouble. I need to modify all those values in the ARM template to match my naming conventions in the testing environment.
You may be thinking “easy fix! Just find -> replace devVM1 with tstVM1 and redeploy!”. While yes, that will work, but you’ve also just lost your entire definition of the development environment! You now have no way to redeploy if someone trashes the VM, you’ve got no documentation on how the dev environment was configured/deployed, and you’ve got no way to alter the development environment as the needs of the developers change.
So just copy the template and modify for the new environment, right? Wrong! If you do it this way, you’ve just doubled your problems. You’ve doubled the code, doubled your required effort to maintain that code and worse; fragmented your deployment strategy.
“So Casey, you handsome beast of a man” I hear you ask, “how do I avoid those problems and be considerate to my colleagues who may need to build on my work sometime in the future?” Parameters!
Through the use of parameters in templates, we can create a single template that defines the infrastructure across its multiple deployment stages. The parameters within the template act as locations of varying information that can be substituted with literal values at deployment time.
Development, Test, Staging, QA and Production environments can all use the same template, and we just change the parameters that the template uses each time we deploy.
Template parameters
Now that we understand the why, let’s take a look at the how.
In it’s simplest structure, an ARM template has the following elements:
{
  "$schema": "https://schema.management.azure.com/schemas/2015-01-01/deploymentTemplate.json#",
  "contentVersion": "",
  "parameters": {},
  "variables": {},
  "resources": [],
  "outputs": {}
}
In the parameters section of the template, you specify which values you can input when deploying the resources. These parameter values enable you to customize the deployment by providing values that are tailored for a particular environment (such as dev, test, prod).
The following example shows how to define a parameter.
"parameters": {
  "environment": {
    "type": "string",
    "allowedValues": [
      "Development",
      "Test",
      "Production"
    ],
    "defaultValue": "Development",
    "metadata": {
      "description": "The environment in which the resources will be deployed
    }
  }
}
A bit is going on here so let’s break it down.
- environment: The name of the variable - Line 2
- type: The data type of the variable (string, int, array) - Line 3
- allowedValues: (optional) A array of values permitted to be passed into this parameter - Lines 4-8
- defaultValue: (optional) The default value to set if a value is not specified - Line 9
- description: (optional) A simple explanation of the variable’s intent. Be kind to your colleagues, always enter a description. -Line 11
Template Variables
In the variables section, you can construct dynamic values to be reused throughout later parts of the template. Template variables are optional, but they often simplify your template by reducing the use of complex expressions.
For example, if I’m using the name of a storage account multiple times throughout the deployment of my template, I may want to define how the name of the storage account is constructed in a variable (all the complex stuff), and then just reference the variable where it’s needed in the resources section.
Let’s look at an example
When it comes to naming storage accounts, there’s a few mandatory requirements:
- It must be globally unique (no one in Azure land can have the same name as you)
- It must be lower case
Let’s say I want to name my storage account according to the following naming convention:
<Project Name> + "dev"
We will also need to add some random entropy to fulfil the global uniqueness requirement and ensure that it’s lowercase so the deployment won’t fail if a capital letter finds its way into the parameter value. We can handle all these things within the template itself with the help of a few template functions.
In my parameters section, I define a parameter for the name of the application.
...
"parameters": {
  "projectName": {
    "type": "string",
    "defaultValue": "PhoenixProject",
    "metadata": {
        "description": "The name of the application to be deployed"
    }
  }
},
...
In my variables section, I generate the storage account name.
...
"variables": {
    "storageAccountName": "[concat(toLower(parameters('projectName')), 'dev', take(uniqueString(resourceGroup().id),4))]"
}
...
Now whenever I need to reference the name of the storage account in the resources section of the template, I don’t need to enter that whole monstrosity of a function every time. I simply reference the variable name like this [variables('storageAccountName')].
A complete template looks like this:
{
  "$schema": "https://schema.management.azure.com/schemas/2015-01-01/deploymentTemplate.json#",
  "contentVersion": "1.0.0.0",
  "parameters": {
    "projectName": {
      "type": "string",
      "metadata": {
        "description": "The name of the project"
      },
      "defaultValue": "projectphoenix"
    }
  },
  "variables": {
    "storageAccountName": "[toLower(concat(parameters('environmentPrefix'), parameters('projectName'), take(uniqueString(resourceGroup().id),4)))]"
  },
  "resources": [
    {
      "type": "Microsoft.Storage/storageAccounts",
      "name": "[variables('storageAccountName')]",
      "location": "[resourceGroup().location]",
      "apiVersion": "2018-07-01",
      "sku": {
        "name": "Standard_LRS"
      },
      "kind": "StorageV2",
      "properties": {}
    }
  ],
  "outputs": {}
}
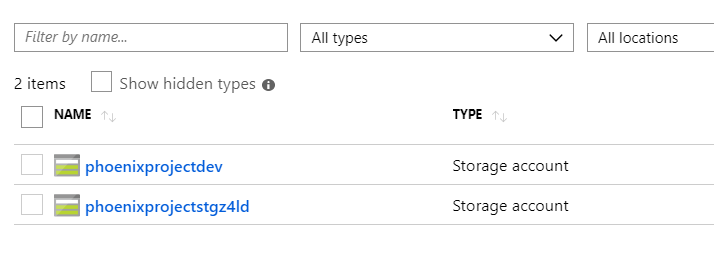
After manually deploying the template, I have a new storage account that meets all the criteria.
Azure DevOps Pipeline variables
Leading on from the concepts above, Azure DevOps also allows you to set variables in your build and release pipelines. When used in conjunction with parameters defined in an ARM template, it provides an easy way to configure deployments to multiple environments without having to modify the template. Pretty neat!
To give ourselves some parameters to work with, we’ll update the azuredeploy.json template.
Let’s add an environmentPrefix parameter with some strictly typed allowed values.
We’ll also create a projectName parameter that we’ll replace with a variable from a variable group.
And lastly, we’ll use a template variable called storageAccountName to construct the name of the storage account from the input parameters, adding four characters of random entropy just to make sure it’s globally unique.
{
  "$schema": "https://schema.management.azure.com/schemas/2015-01-01/deploymentTemplate.json#",
  "contentVersion": "1.0.0.0",
  "parameters": {
    "environmentPrefix": {
      "type": "string",
      "metadata": {
        "description": "The abbreviated prefix of the environment to which the resources are deployed"
      },
      "allowedValues": ["dev", "prd"]
    },
    "projectName": {
      "type": "string",
      "metadata": {
        "description": "The name of the project"
      },
      "defaultValue": "projectphoenix"
    }
  },
  "variables": {
    "storageAccountName": "[toLower(concat(parameters('environmentPrefix'), parameters('projectName'), take(uniqueString(resourceGroup().id),4)))]"
  },
  "resources": [
    {
      "type": "Microsoft.Storage/storageAccounts",
      "name": "[variables('storageAccountName')]",
      "location": "[resourceGroup().location]",
      "apiVersion": "2018-07-01",
      "sku": {
        "name": "Standard_LRS"
      },
      "kind": "StorageV2",
      "properties": {}
    }
  ],
  "outputs": {}
}
Variable groups
Pipeline variables are created within a deployment pipeline, and are scoped to that pipeline only.
Variable groups allow you to store values that you want to be able to change and make available across multiple pipelines within the same Azure DevOps project.
For example, if I’m deploying infrastructure for a project across multiple environments (dev/test/prod), I can use a variable group for settings that apply to all environments (such as the project name, or an environment prefix) and set pipeline variables for settings that are specific to that environment (such as server names, IP addresses, or connection strings etc).
By using variables in deployments, it means that if anything were to change with my infrastructure, I just need to update the variable and all of my pipelines will get the new value automatically.
Create a production stage
To give us a good end-to-end example, let’s clone the Deployment stage to create a Production stage.
- Browse to Pipelines –> Releases
- Click the Infrastructure Deployment pipeline and click Edit
- Clone the Development stage
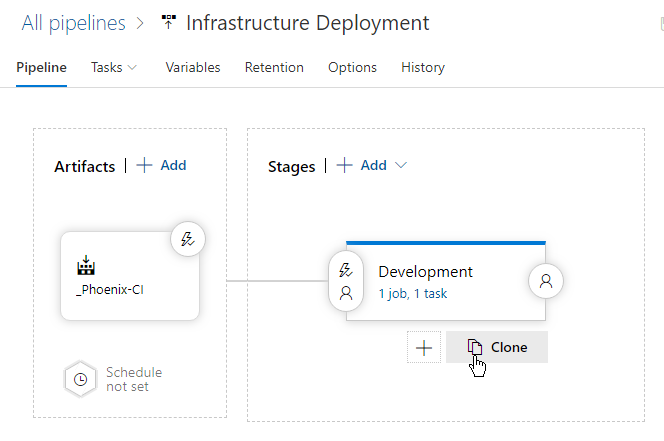
- Click the cloned stage and rename to
Production
Create a variable group
Next, we’ll create two variable groups that will be accessible to all of our release pipelines.
- Navigate to Pipelines –> Library
- Click Variable groups tab –> +Variable group to create a new variable group.
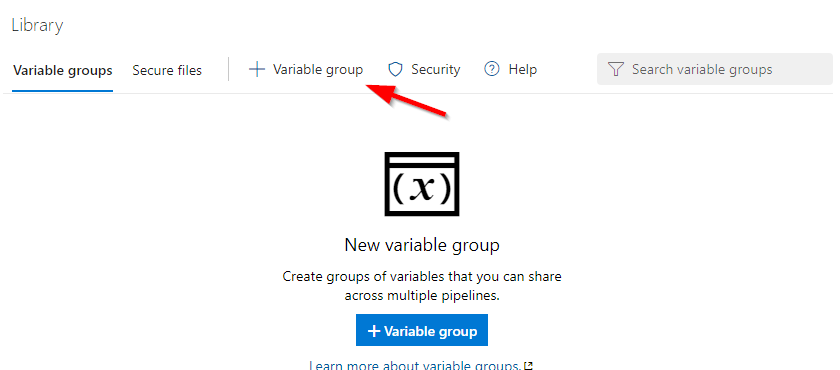
3.Name the variable group Project Details. This variable group will contain global variables that we will use across our entire project. 4.Create a variable called project-name and set the value to the name of your project.
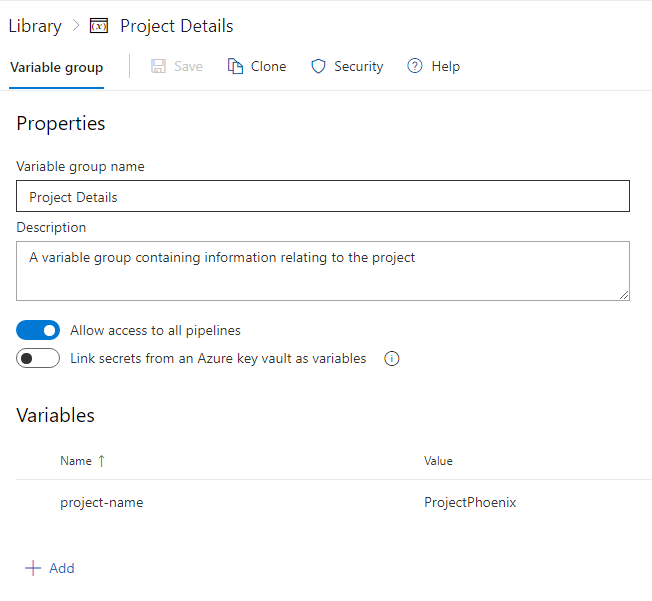
5.Click Save to save changes. 6.Create a new variable group called Environment Details. We will use this variable group to set variables that are specific to each environment. 7.Create two new variables that define the three-letter prefix values of each of our environments.
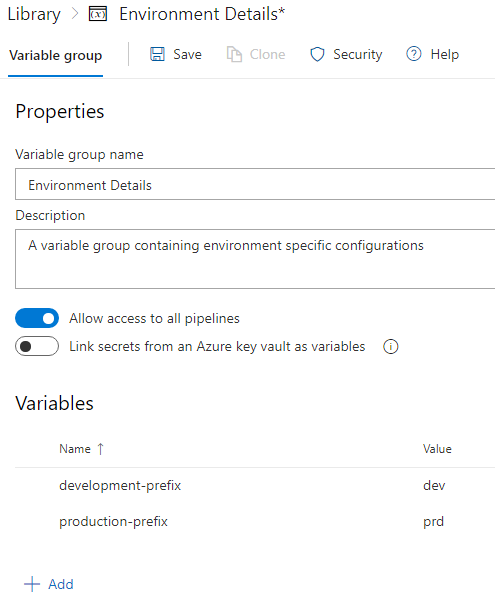
8.Click Save
Link a variable group to a release pipeline
For the variables to be available to a pipeline, we first need to link the variable group to the pipeline. In a release pipeline, you can link a variable group to the pipeline itself, or to a specific stage of the release pipeline.
- Navigate to Pipelines –> Releases
- Click the Infrastructure Deployment pipeline, and click Edit
- Click Variables tab –> Variable groups
- Click Link a variable group
- Click the variable group created earlier
- Click Link
- Click Save in the top right
- Repeat Step 4 - Step 7 for remaining variable groups
The variable groups should now be linked to the release pipeline.

Referencing pipeline variables in an ARM template deployment
In a nutshell, the Azure resource group deployment task deploys an ARM template using the same method used by the command line tools (azcli or powershell). Essentially, you give it the ARM template file, an optional parameters file, and a target resource group, and the task will submit that to the Azure Resource Manager and create a new deployment.
If we take a look at the deployment task, we can see those required values here:
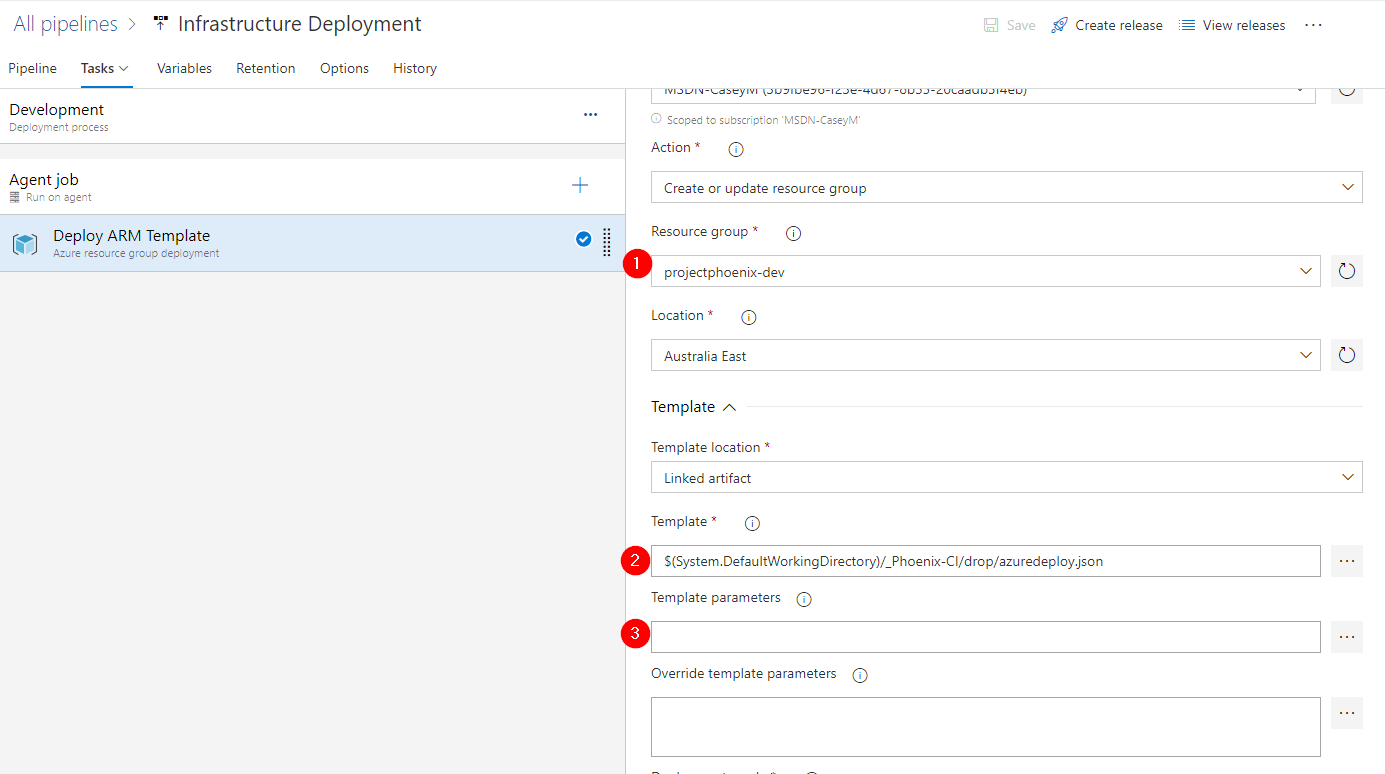
Just like a deployment initiated from the command line, you can overwrite parameters that are defined in your ARM template at deployment time by specifying them as command-line arguments. This is effectively how the variable substitution works in Azure DevOps.
You can access the value of variables in a linked variable group exactly the same was as variables you define within the pipeline itself.
- Click Pipelines –> Releases
- Select the Infrastructure Deployment pipeline and click Edit
- Click Tasks –> Development
- Click the Deploy ARM template agent task
- Set the resource group field to
$(development-prefix)-$(project-name)(This will generate dev-projectphoenix) - Click the elipses (…) next to Override template parameters
- Set the projectName parameter to
$(project-name) - Set the environmentPrefix parameter to
$(development-prefix)
- Click Save
- Click Tasks –> Production
- Repeat Step 4 –> Step 9 and specify the
$(production-prefix)variable in Step 5 and Step 8.
Let’s quickly review
So far we have:
- Modified the ARM template to require the
projectNameandenvironmentPrefixparameters. The ARM template will take the parameters to define a variable that constructs the storage account name. - Created two variable groups with the project and environment-specific values, and linked them to the release pipeline.
- Referenced the values of variables configured in the variable groups as input for the ARM template parameters
- Cloned the development stage to create a production stage
Let’s deploy!

After a successful deployment, I see two separate resource groups; one for each environment
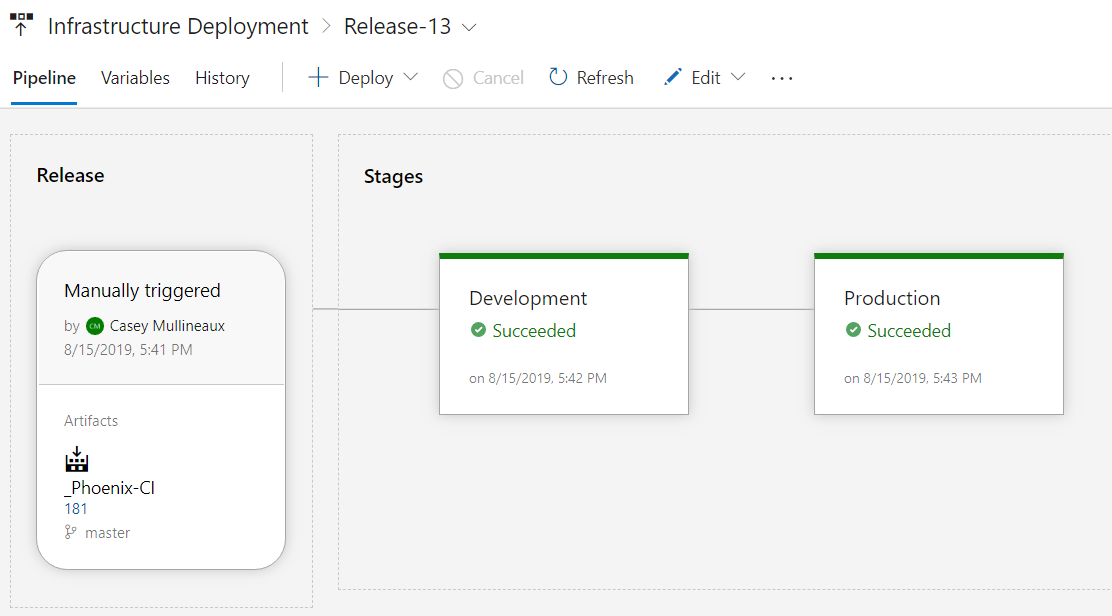
And inside those, a storage account to match.

The best part about all of this is that now we have separate development and production deployments that use the exact same ARM template!
Using variables has allowed us to achieve no hard-coded environment configurations, no duplication of code, and a single template that contains the infrastructure definition regardless of its stage during the deployment cycle.
Now you’re deploying things like a boss.
Continue to Part 6 - Testing the build with Pester (coming soon)
- Part 1 - Getting Started with Azure DevOps
- Part 2 - Source Control
- Part 3 - Creating a build pipeline
- Part 4 - Deploying infrastructure
- Part 5 - Parameter files and pipeline variables
- Part 6 - Testing the build with Pester (coming soon)
- Part 7 - Testing the release with Pester (coming soon)

Comments