8 min to read
Infrastructure as code with Azure DevOps - Part 2: Source Control

In Part 1 we setup a new Azure DevOps account. The next thing we are going to need is a source control repo to store the ARM templates.
A source control system, also called a version control system, allows developers to collaborate on code and track changes. It is an essential tool when working in a team. With Git, each developer has a copy of the source repository, including all branch and history information, on their dev machine. Each developer works directly with their own local repository. Changes are shared between repositories as a separate step.
Create a repo
To get started:
- Open the project in Azure DevOps and click Repos from the menu on the left.
- Now initialize the repo. This creates the necessary file and folder structure needed by git.
- Once initialized, you’ll be redirected to the files view of the newly initialized repo, that contains a single
README.mdfile.
Clone the repo
Next we need to clone the repo to our local machine so we can add and edit files in the repository.
Create a directory structure on your machine that will be the home of your code. In my case, i’ll be using C:\source\.
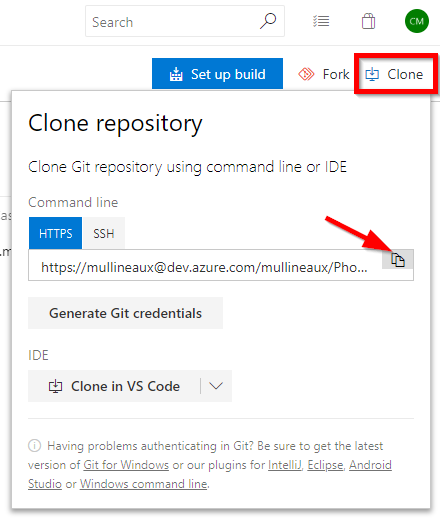
Back in Azure DevOps, click the Clone button in the top right hand corner, then click the Copy button to copy the URL of the repo to your clipboard.
In a command prompt, navigate to the directory you created earlier and clone the repo to your local machine. This will create a new directory with the name of the project inside the current directory.
C:\source>git clone https://[email protected]/mullineaux/Phoenix/_git/Phoenix
Cloning into 'Phoenix'...
remote: Azure Repos
remote: Found 6 objects to send. (67 ms)
Unpacking objects: 100% (6/6), done.

C:\source>dir
 Volume in drive C has no label.
 Volume Serial Number is DC2D-1D62

 Directory of C:\source

01/03/2019  06:32 PM    <DIR>          .
01/03/2019  06:32 PM    <DIR>          ..
01/03/2019  06:32 PM    <DIR>          Phoenix
               0 File(s)              0 bytes
               3 Dir(s)  29,011,558,400 bytes free

C:\source>
Pushing changes - the hard way
So why do something the hard way if there’s an easy way to do it?
Let’s create a new blank file called azuredeploy.json.
C:\source\Phoenix>type nul > azuredeploy.json

C:\source\Phoenix>dir
 Volume in drive C has no label.
 Volume Serial Number is DC2D-1D62

 Directory of C:\source\Phoenix

28/02/2019  08:12 AM    <DIR>          .
28/02/2019  08:12 AM    <DIR>          ..
28/02/2019  08:12 AM                0  azure-deploy.json
28/02/2019  08:04 AM               955 README.md
               2 File(s)            968 bytes
               2 Dir(s)  16,949,805,056 bytes free

C:\source\Phoenix>
The first step is to add the new file to the git repo so it can start tracking changes in the file.
C:\source\Phoenix>git add azuredeploy.json

C:\source\Phoenix>
Now if we run git status we can see that git is now tracking the new file, and we have one uncommitted change in the repo (the new file).
C:\source\Phoenix>git status
On branch master
Your branch is up to date with 'origin/master'.

Changes to be committed:
  (use "git reset HEAD <file>..." to unstage)

        new file:   azuredeploy.json


C:\source\Phoenix>
Next, using notepad (or your editor of choice) modify the file and add a basic ARM template scaffold.
C:\source\Phoenix>type azuredeploy.json
{
    "$schema": "https://schema.management.azure.com/schemas/2015-01-01/deploymentTemplate.json#",
    "contentVersion": "1.0.0.0",
    "parameters": {},
    "variables": {},
    "resources": [],
    "outputs": {}
}
C:\source\Phoenix>
If we run git status again, we can see it how now has two uncommitted changes. One for the addition of the new file, and one for the changes made to the file.
C:\source\Phoenix>git status
On branch master
Your branch is up to date with 'origin/master'.

Changes to be committed:
  (use "git reset HEAD <file>..." to unstage)

        new file:   azuredeploy.json

Changes not staged for commit:
  (use "git add <file>..." to update what will be committed)
  (use "git checkout -- <file>..." to discard changes in working directory)

        modified:   azuredeploy.json


C:\source\Phoenix>
As we are working with a local clone of the source repo from Azure DevOps, in order to push the changes back up to Azure DevOps we need to first commit the changes to the branch. Here we use the git commit command with a few switches.
- -a commit all changes
- -m the message associated with the commit
C:\source\Phoenix>git commit -a -m "initial commit"
[master b88ee38] initial commit
 1 file changed, 8 insertions(+)
 create mode 100644 azuredeploy.json
These changes are now considered staged.
And lastly, I push the staged changes back to the master branch with git push.
C:\source\Phoenix>git push
Enumerating objects: 4, done.
Counting objects: 100% (4/4), done.
Delta compression using up to 8 threads.
Compressing objects: 100% (3/3), done.
Writing objects: 100% (3/3), 435 bytes | 435.00 KiB/s, done.
Total 3 (delta 0), reused 0 (delta 0)
remote: Analyzing objects... (3/3) (6 ms)
remote: Storing packfile... done (170 ms)
remote: Storing index... done (120 ms)
To https://dev.azure.com/mullineaux/Phoenix/_git/Phoenix
   ef41909..b88ee38  master -> master

C:\source\Phoenix>
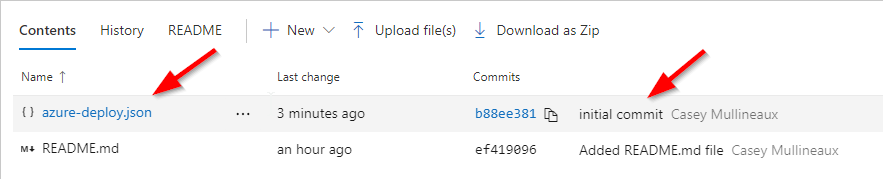
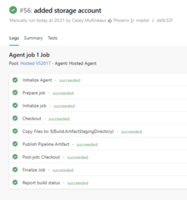
Back in Azure DevOps, refreshing the file view shows that the file has been added with the commit message we entered earlier.
Pushing changes - the easy way
VSCode has native support for Git built right in. All of the actions we completed on the command line are abstracted away with a few simple clicks. VSCode automatically knows about the repo from the files that were created during the repos initialization.
Fire up VSCode in the current directory.
C:\source\Phoenix>code .
Edit azuredeploy.json to deploy something simple, like a storage account.
{
  "$schema": "https://schema.management.azure.com/schemas/2015-01-01/deploymentTemplate.json#",
  "contentVersion": "1.0.0.0",
  "parameters": {},
  "variables": {},
  "resources": [
    {
      "type": "Microsoft.Storage/storageAccounts",
      "name": "phoenixprojectdev",
      "location": "[resourceGroup().location]",
      "apiVersion": "2018-07-01",
      "sku": {
        "name": "Standard_LRS"
      },
      "kind": "StorageV2",
      "properties": {}
    }
  ],
  "outputs": {}
}
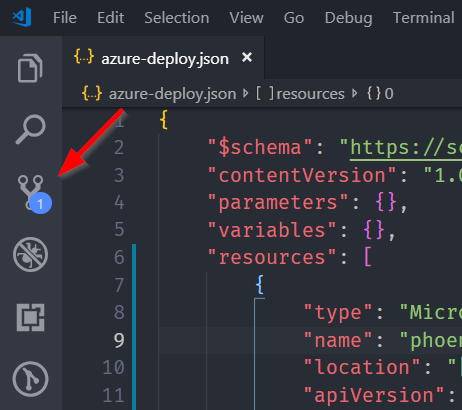
Notice the badge on the source control menu now indicates an uncommitted change.
Clicking on it opens the Source Control pane. Listed here are all files that have been changed since the last commit.
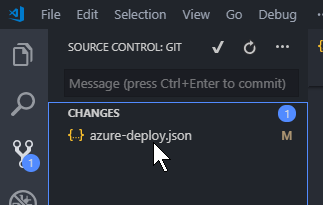
We can stage changes to individual files by hovering over the file name and clicking the + button.

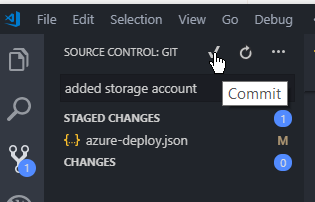
The changes can then be committed to the local repo by entering a commit message and clicking the commit icon. (Shortcut: CTRL + Enter)
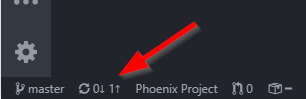
The status icon in the bottom toolbar now changes to show we have one outgoing change.
Finally, we can now push the changes up to Azure DevOps by clicking the ellipses (...) and selecting push from the drop down menu.
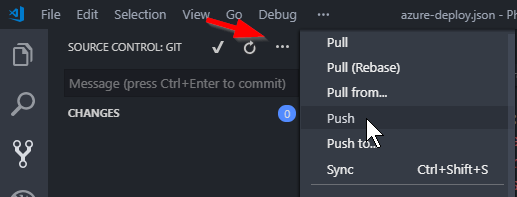
Alternatively, you can synchronize changes (simultaneous push and pull) by clicking the status icon in the bottom toolbar.

Continue to Part 3 - Creating a build pipeline
- Part 1 - Getting Started with Azure DevOps
- Part 2 - Source Control
- Part 3 - Creating a build pipeline
- Part 4 - Deploying infrastructure
- Part 5 - Parameter files and pipeline variables
- Part 6 - Testing the build with Pester (coming soon)
- Part 7 - Testing the release with Pester (coming soon)

Comments