9 min to read
Infrastructure as code with Azure DevOps - Part 4: Deploying infrastructure
Finally, it’s time to create some infrastructure!
A release pipeline defines the end-to-end process for an application to be deployed across various stages of testing and deployment. Much like the build phase, the release phase can also be used for testing. During the build phase we test code quality, however, in the release phase we test system quality.
Automating the deployment of code and testing of system quality is known as Continuous Deployment or “CD”.
What are we going to do
In this post, I will show you how to:
- Create a release pipeline
- Create a release stage
- Link a build artifact to a release
- Configure release agents, jobs and tasks to deploy an ARM template
- Configure a CD trigger to execute a release when a release completes
Create a release pipeline
- Click Pipelines –> Releases –> New pipeline
- On the
Select a templatepage, select Empty Job - A new stage is created automatically.
- Give the stage a name (such as
Development) - Give the release a name (such as
Infrastructure Deployment) - Click Save
- Enter a comment and click Save
Stages
Pipeline stages are the control points in the release pipeline, and within a stage, we can create tasks that are triggered. The critical thing to note about pipeline stages are:
- A stage cannot start unless all of its prerequisites have been fulfilled
- A stage cannot complete unless all of the tasks within it are complete
- Failures of any task usually result in the whole stage failing, and in turn, this usually fails the entire release.
In simple pipelines like the one we have created, stages can also be used to represent environments.
For example, your release pipeline might look like this:
Build –> [Dev] !–> [Test] !–> [Prod]
- A code change in the repo triggers an automatic build and release to the
Devenvironment. - ARM templates are constantly iterated upon and pushed to the repo until the requirements have been met.
- A manual trigger progresses the next stage of the release pipeline and deploys the ARM template to the
Testenvironment. - The end user deploys their application to the new infrastructure in the test environment and checks to make sure their application is running as expected. (This could also be done through a different team’s CI/CD pipeline!)
- One satisfied with testing, another manual trigger progress the ARM template to the
Productionenvironment.
Linking a build artifact
Before we can access the ARM template in our release tasks, we need to link the artifact from a build.
- Click Add an artifact
- Click Build as the source type
- Select the project containing the build
- Select the build pipeline containing the artifact as the source
- Set the default version to latest
- Click Add
Create a release task
- Click Tasks –> Development
- Add a new Azure Resource Group Deployment task
- Select the Azure subscription you would like to link to the deployment
- Click Authorize. A service connection is created, which in turn creates a service principal in the subscription with
contributorpermissions that is used for deploying resources - Select Create or update resource group as the action
- Enter the name of a new resource group to create, or select one from the list
- Select the Location for the resource group
- Select Linked Artifact as the Template location
- Select the ARM template from the linked artifact
- Select a Deployment mode
- Click Save
- Enter a comment and click Save
Create a new release
Time to test the deployment!
- Click Pipelines –> Releases
- Select the release and click Create a release
- Enter a release description and click Create
Clicking on the name of the release shows a summary of the overall progress of the release. Clicking on the stage shows a summary of each step of the release. Clicking on the deployment status shows the release logs
Release logs
The release logs show all the commands that are executed on the release agent in near real time.
Just like we did with the build logs, let’s remove a layer of abstraction and look at what’s happening under the hood.
Initialize agent
This step primes the agent to be ready for the work it will need to do.
Initialize Job
This step downloads all the task information needed for the jobs we configured and is passed onto the agent to execute.
Download artifact
Downloads and extracts the linked artifact to the agent’s local system
Azure Deployment: Create Or Update Resource Group
This is the work that is performed by the release agent to complete the task we created. Here we can see the agent executing a new Azure Resource Group Deployment using the settings we configured in the task, such as resource group name, location and ARM template.
The agent is using the ARM REST API behind the scenes to deploy the template. This outcome is the same if you were to create a manual deployment using AzCli or Powershell
AzCli:
az group create --name 'ProjectPhoenix-prd' --location 'Australia East'
az group deployment create --Name 'azuredeploy-20190316-053623-9778' --resource-group 'ProjectPhoenix-prd' --template-file 'azuredeploy.json'
Powershell
New-AzResourceGroup -Name 'ProjectPhoenix-prd' -Location 'Australia East'
New-AzResourceGroupDeployment -Name 'azuredeploy-20190316-053623-9778' -ResourceGroup 'ProjectPhoenix-prd' -TemplateFile 'azuredeploy.json'
Finalize Job
Another cleanup task relating to the processes running on the agent.
Create a CD trigger
Just like the CI trigger on our build, we can enable a CD trigger to start a release automatically.
- Click Pipelines –> Releases
- Select the release and click Edit
- Click the Trigger icon on the artifact
- Enable the continuous deployment trigger
- Click Save
- Enter a comment and click Save
Test the automated release
Now that the CD trigger is enabled, by updating our code we trigger a new build, that when completed, triggers a new release.
- In VSCode, update the comment in the ARM template to indicate the test of the CD trigger
{
  "$schema": "https://schema.management.azure.com/schemas/2015-01-01/deploymentTemplate.json#",
  "contentVersion": "1.0.0.0",
  "parameters": {},
  "variables": {},
  "resources": [
    {
      "comments": "Testing CD trigger on release pipeline",
      "type": "Microsoft.Storage/storageAccounts",
      "name": "phoenixprojectdev",
      "location": "[resourceGroup().location]",
      "apiVersion": "2018-07-01",
      "sku": {
        "name": "Standard_LRS"
      },
      "kind": "StorageV2",
      "properties": {}
    }
  ],
  "outputs": {}
}
- Commit the changes with the commit message ‘testing CD trigger’
- Push the change to the master branch
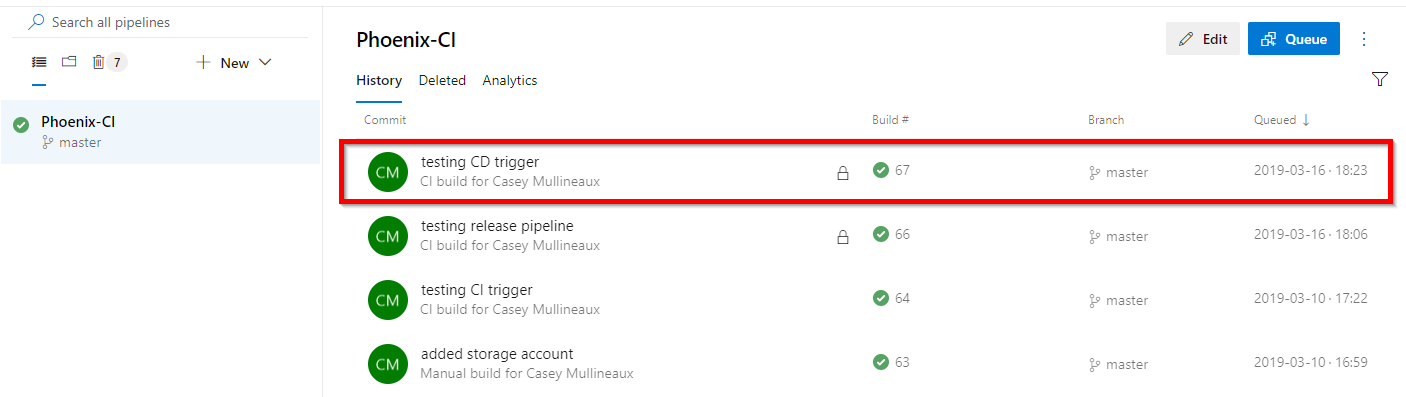
- Back in Azure DevOps, navigate to Pipelines –> Builds
- Notice a new build has started with the title of the commit message
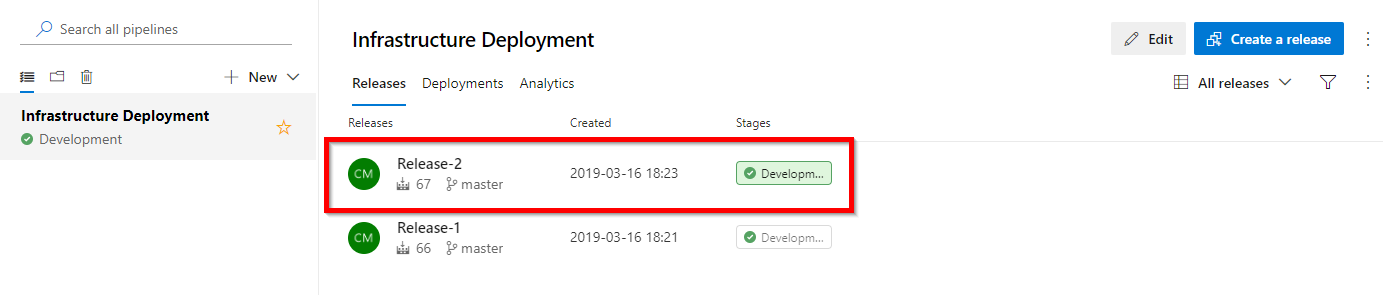
- When the build completes, navigate to Pipelines –> Releases
- Notice a new release has started.

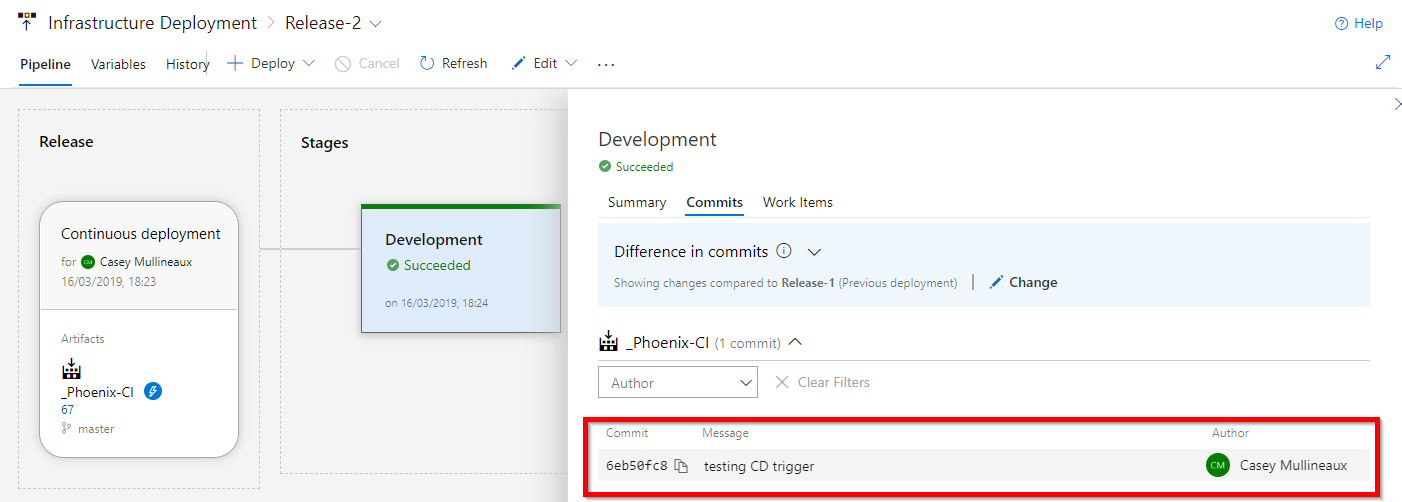
- Click the name of the release (Release-2)
- Click the Deployment stage and click the Commits tab
- Notice the commit message of the commit that triggered the release
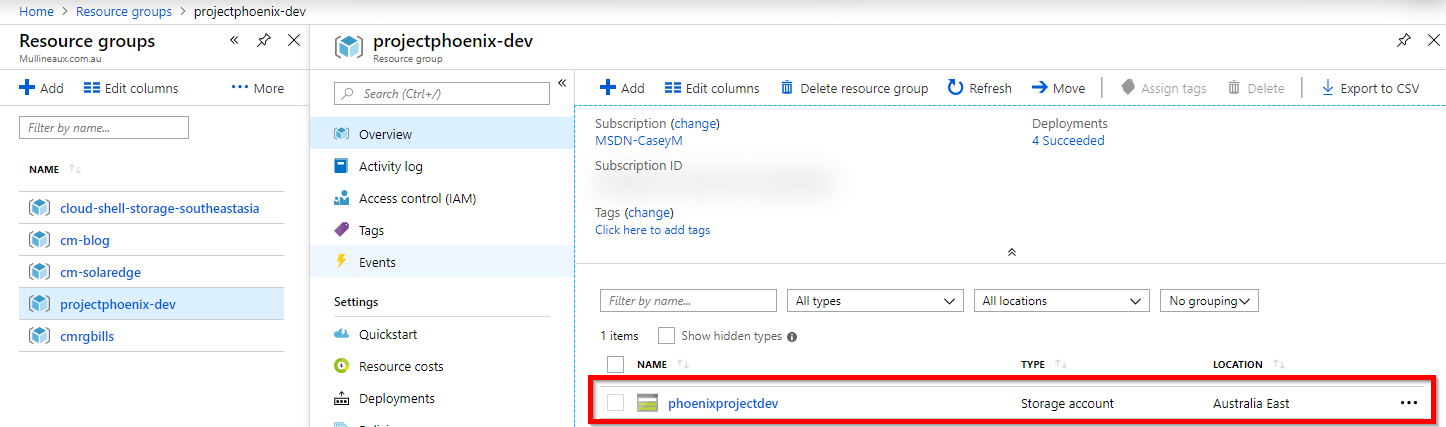
- In the Azure Portal, confirm the storage account has been deployed
Let’s take a second to look back on what we’ve accomplished so far.
We have our ARM templates version controlled in source control, that when changed, triggers an automatic build. When the build completes, a new release is triggered, and the resources defined in the ARM template automatically deploy into an Azure subscription.
From code change to resource deployment with zero clicks. Now we’re truly living the infrastructure-as-code dream.
Continue to Part 5 - Parameter files and pipeline variables where I’ll demonstrate how to customize releases for each stage
- Part 1 - Getting Started with Azure DevOps
- Part 2 - Source Control
- Part 3 - Creating a build pipeline
- Part 4 - Deploying infrastructure
- Part 5 - Parameter files and pipeline variables
- Part 6 - Testing the build with Pester (coming soon)
- Part 7 - Testing the release with Pester (coming soon)

Comments