20 min to read
Deploy a docker container to a RaspberryPi via Azure DevOps
What are we going to do
In this post I’ll show you how to:
- Build the container
- Deploy an image to Azure Container Registry
- Configure the RaspberryPi
- Deploy the container with Azure DevOps
- Conclusion
Build the container
The details of the container build are going to depend on your project and requirements. For this demonstration, I’m going to use an example that drove me to want to try this out. I wanted to see if I could get .net code running on my Pi.
So first things first. We’re going to need some .net code. Run the following command to create a new console app.
dotnet new console
Then we create a straightforward C# app to display some text on a 10-second loop.
using System;

namespace raspberryPi
{
    class Program
    {
        static void Main(string[] args)
        {
            while (true) {
                System.Console.WriteLine($"{DateTime.Now} Hello from the Pi!");
                System.Threading.Thread.Sleep(10000); // sleep for 10 seconds
            };
        }
    }
}
To package the app in a container, we need to create a Dockerfile that instructs Docker how to build the image that we will deploy to the RaspberryPi.
First, pull the dotnet core sdk image from the official Microsoft container registry. This image has the dotnet tools for Windows needed to compile the source code.
# use the pc version of the SDK to compile
FROM mcr.microsoft.com/dotnet/core/sdk:2.1 as build
WORKDIR /build
The next thing to do is copy over the Visual Studio project file and restore all of the application’s dependencies. I chose to do this as a separate layer, so it is only needed when the dependencies change, rather than every time the image is built.
# copy csproj and restore as distinct layers
COPY /src/*.csproj ./
RUN dotnet restore
Copy over the source code and run dotnet publish to compile the code. Notice that the release architecture is targeted at linux-arm as we’ll be running the compiled code on the RaspberryPi.
# copy & compile the source
COPY ./src ./
RUN dotnet publish -c Release -o out -r linux-arm
This is where the magic happens.
In the steps above, we used the Windows dotnet core sdk to compile the source code, however, we will be running this on ARM architecture that is native to the hardware of the RaspberryPi.
To handle this, I pull down the ARM32 image of the dotnet core sdk. This is the base image of the container running on the RaspberryPi that will execute the compiled code.
So basically:
- Build it on Windows (x86)
- Run it on Linux (arm32)
In the dockerfile, create a few directories and copy over the dll compiles from the Windows sdk in the step above.
# use the arm version of SDK to run (on the pi)
FROM mcr.microsoft.com/dotnet/core/sdk:2.1.603-stretch-arm32v7
CMD mkdir -p /root/helloworld
WORKDIR /root/helloworld
COPY --from=build /build/out/ .
And then tell the container what to run on start-up.
# Run the binary
ENTRYPOINT ["dotnet", "./raspberrypi.dll"]
The complete dockerfile looks like this:
# use the pc version of the SDK to compile
FROM mcr.microsoft.com/dotnet/core/sdk:2.1 as build
WORKDIR /build

# copy csproj and restore as distinct layers
COPY /src/*.csproj ./
RUN dotnet restore

# copy & compile the source
COPY ./src ./
RUN dotnet publish -c Release -o out -r linux-arm

# use the arm version of SDK to run (on the pi)
FROM mcr.microsoft.com/dotnet/core/sdk:2.1.603-stretch-arm32v7
CMD mkdir -p /root/helloworld
WORKDIR /root/helloworld
COPY --from=build /build/out/ .

# Run the binary
ENTRYPOINT ["dotnet", "./raspberrypi.dll"]
Finally, we need to build and tag the image with the registry and repository names.
docker build . --tag raspberrypidemo.azurecr.io/rpi:latest
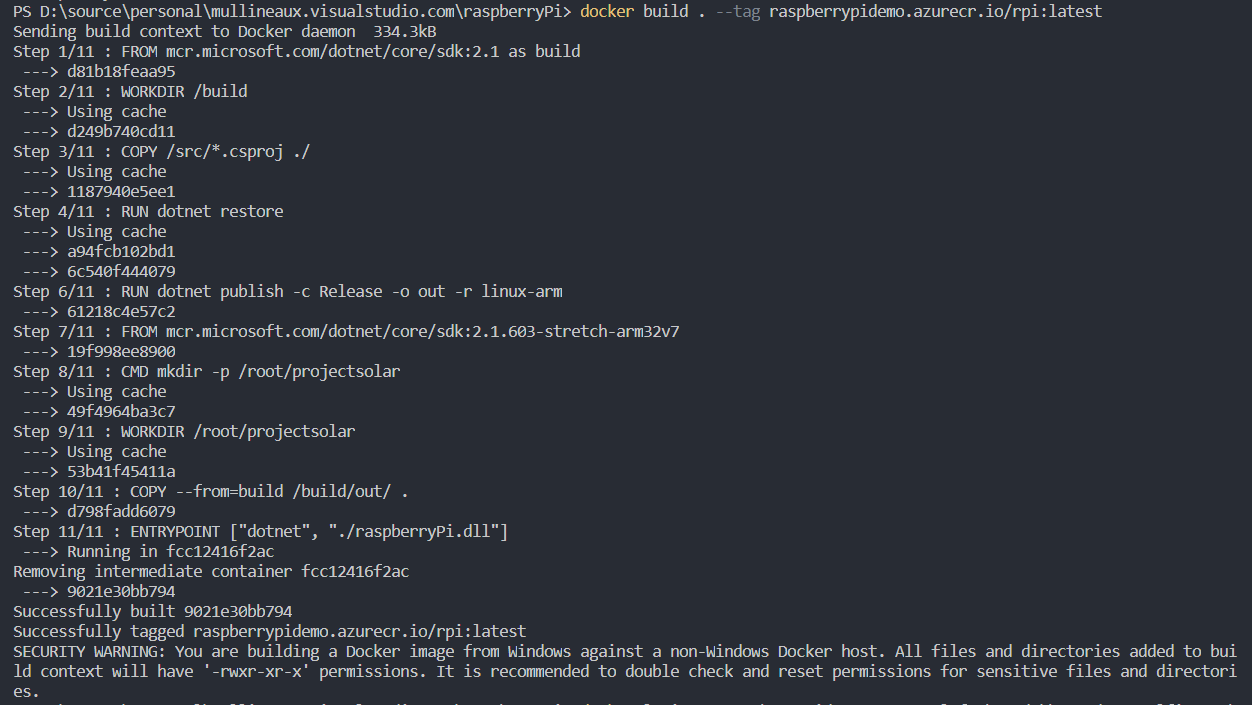
Unfortunately, since the final image is targeted at ARM architecture, we are unable to test the container from our local development machine.
Deploy an image to Azure Container Registry
Before we can pull the image down to the RaspberyPi, we first need to put the image in a location where it can be pulled from the devices that will be running it. This is where a Container Registry comes in.
Any container registry will work for this, such as DockerHub, Amazon ECR or Google Container Registry. You can even choose to host your own should you feel so inclined, but remember that you may be adding some complexity when it comes to connectivity.
I chose to use Azure Container Registry in this circumstance because I plan on expanding my project to use other Azure services, and it makes sense to me to keep everything together.
Create the registry
The first thing we need to do is create the Azure Container Registry. That can be quickly taken care of with a simple ARM template.
The two things to take note of here are:
- The registry name The name of the container registry to create. It must be all lowercase and globally unique (like a storage account), and this name is used for the public DNS endpoint that also gets created with it (more on this later).
- Resource property -
adminUserEnabled: trueCreates an admin user on the container registry that we can later use to authenticate, to push/pull images.
{
  "$schema": "https://schema.management.azure.com/schemas/2015-01-01/deploymentTemplate.json#",
  "contentVersion": "1.0.0.0",
  "parameters": {
    "registryName": {
      "type": "string",
      "metadata": {
        "description": "The name of the azure container registry to create"
      },
      "defaultValue": "raspberrypidemo"
    }
  },
  "variables": {},
  "resources": [
    {
      "name": "[parameters('registryname')]",
      "comments": "Container registry for storing docker images",
      "type": "Microsoft.ContainerRegistry/registries",
      "apiVersion": "2017-10-01",
      "location": "[resourceGroup().location]",
      "sku": {
        "name": "Basic"
      },
      "properties": {
        "adminUserEnabled": true
      }
    }
  ]
}
… and a quick deploy to Azure using the az cli
az group create raspberrypidemo --location "australia east"
az group deployment create --resource-group raspberrypidemo --template-file .\arm\deploy-acr.json
Check the Azure portal and confirm the registry has been created.
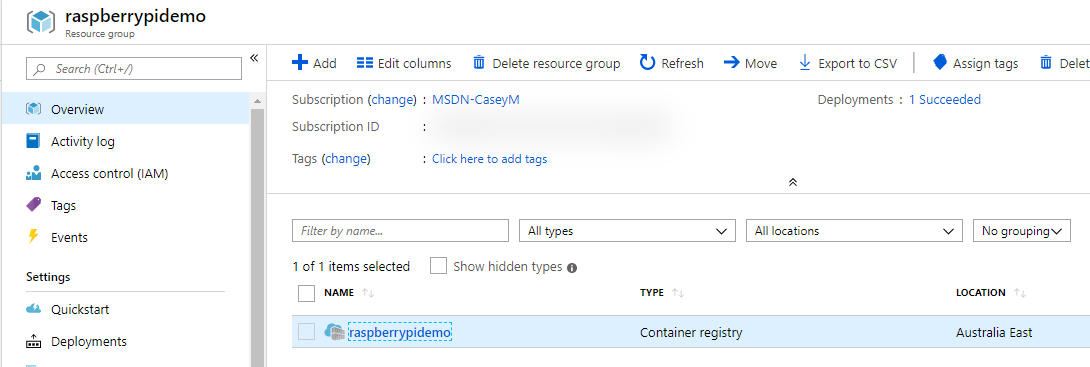
Push the image
When the container registry is created, it is a default DNS name of <registryname>.azurecr.io. This in combination with the Admin username and password, can be used to login to the container registry and push/pull images.
Lucky for us, all of this information can be conveniently viewed from the Access Keys blade of the container registry in the Azure Portal.
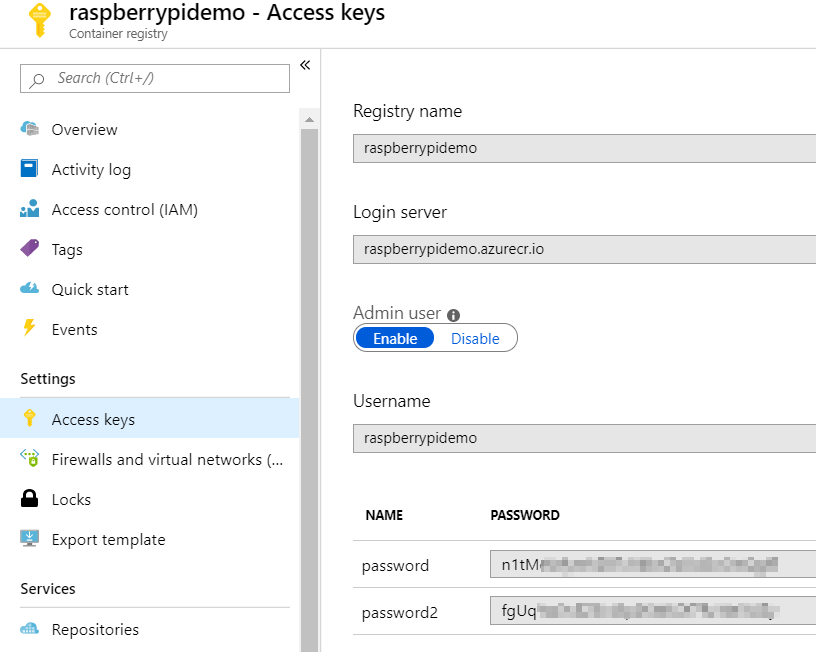
Next thing to do is to log in to the Azure Container Registry using the docker login command and push the image to the registry with docker push
docker login -u raspberrypidemo -p [REDACTED] raspberrypidemo.azurecr.io
docker push raspberrypidemo.azurecr.io/rpi:latest

Once the push has completed, I can now see the image in my repository in Azure.

Configure the RaspberryPi
The image is built and pushed to the container registry, now I need to pull it down to the RaspberryPi and run it.
RaspberryPi setup
I’m not going to go into detail about how to format the sd card and install the Raspbian OS here, but I will show you a couple of handy tips to make a new setup easier.
If you use these tips, you’ll be able to ssh into your Pi over WiFi on first boot. No need to plug in a display and keyboard to get it configured!
Auto enable SSH
You can automatically enable SSH on first boot by creating an empty text file on the root of the boot partition on sdcard called ssh (no file extension)

Auto configure WiFi
WiFi can automatically be configured similarly to the steps above.
On the root of the boot partition, create a new file called wpa_supplicant.conf with the following contents:
ctrl_interface=DIR=/var/run/wpa_supplicant GROUP=netdev
    network={
        ssid="YOUR_NETWORK_NAME"
        psk="YOUR_PASSWORD"
        key_mgmt=WPA-PSK
}
Now when you boot the Pi for the first time, it should connect to your WiFi network and enable you to SSH right in.
Optimize for headless
If you are using the Pi for a headless application, then you can reduce the memory split between the GPU and the rest of the system down to 16mb. This setting allocates more CPU resources to your application, instead of reserving a bunch to render graphics.
Edit /boot/config.txt and add this line:
gpu_mem=16
Install and configure Docker
The latest version of the Raspbian Jessie officially supports running docker.
To get it installed, just run the following command:
curl -SSL https://get.docker.com | sh
Next, allow docker to be run as non-root
sudo usermod -aG docker pi
Set docker to auto-start
sudo systemctl enable docker
And finally, give the Pi a reboot for good measure
sudo reboot
Install the Azure DevOps build agent
The build agent is the secret sauce that makes the automated deployment possible. With the build agent installed on the RaspberryPi, we can use it to execute build agent tasks from the build and release pipeline.
Create an access token
The first part of configuring a new agent is creating an access token for it to use to authenticate against Azure DevOps. The access token will determine what resources in our project the agent has access to, and what permissions it has to those resources.
-
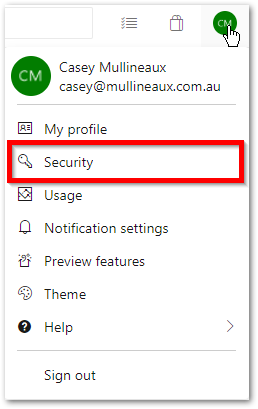
In Azure DevOps, click your profile icon –> Security
-
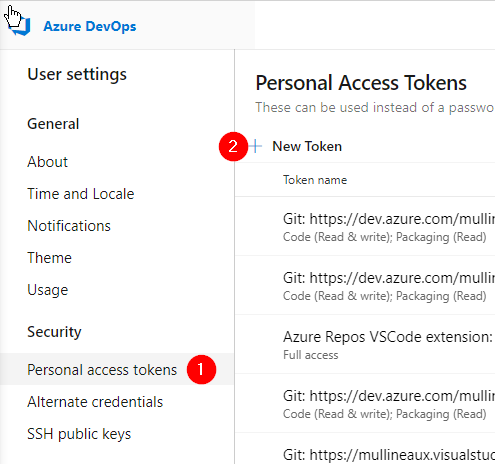
Click Personal access tokens –> New Token
-
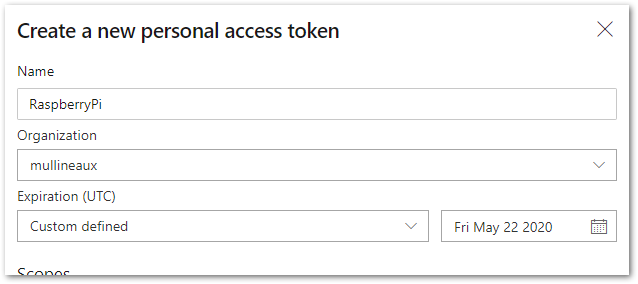
In the Create new personal access token pane, give the access token a name, and set an expiration date.
-
Under Scopes, select Custom defined. Give the access token the following permissions:
- Agent Pools: Read & Manage
- Deployment Groups: Read & Manage
- Click Create to create the new access token.
-
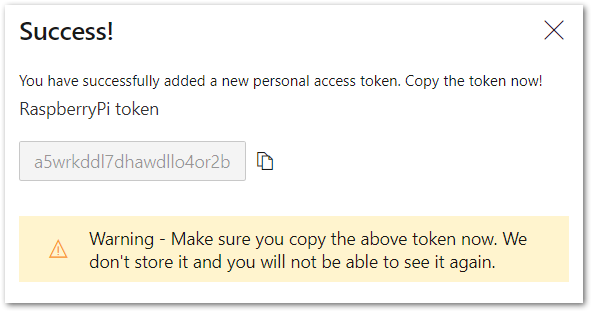
Once created, the access token is displayed on the screen. Save this token somewhere now as this is the only time it is displayed and we’re going to need it later. If you lose it, you’ll need to regenerate the token.
-
The new access token is shown in the list of all your other access tokens.

Create an agent pool
The next step is to create a new agent pool. As the name suggests, an agent pool is a pool of agents that can be targeted to execute tasks from our build/release pipelines.
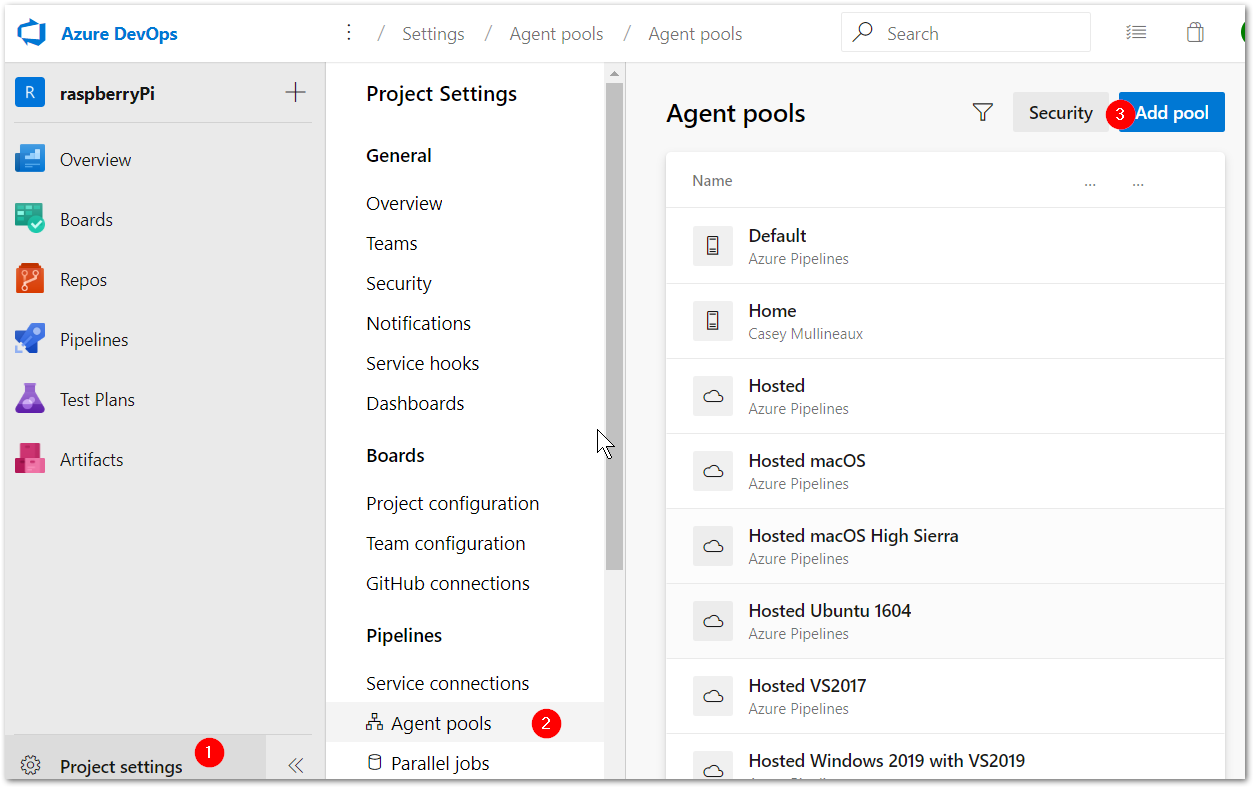
- In the Azure DevOps Project, click Project settings.h
- Under the Pipelines heading, click Agent pools.
-
Click Add pool
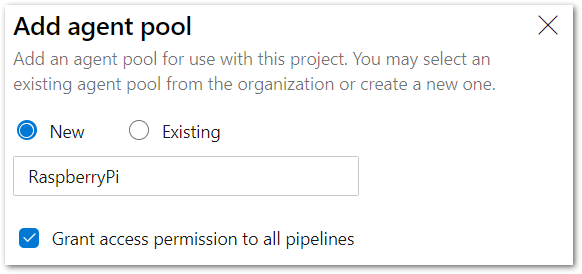
- Give the agent pool a name, and click Create
Install the build agent on the RaspberryPi
Download the agent to the raspberry pi
-
Click the agent pool, and click New agent
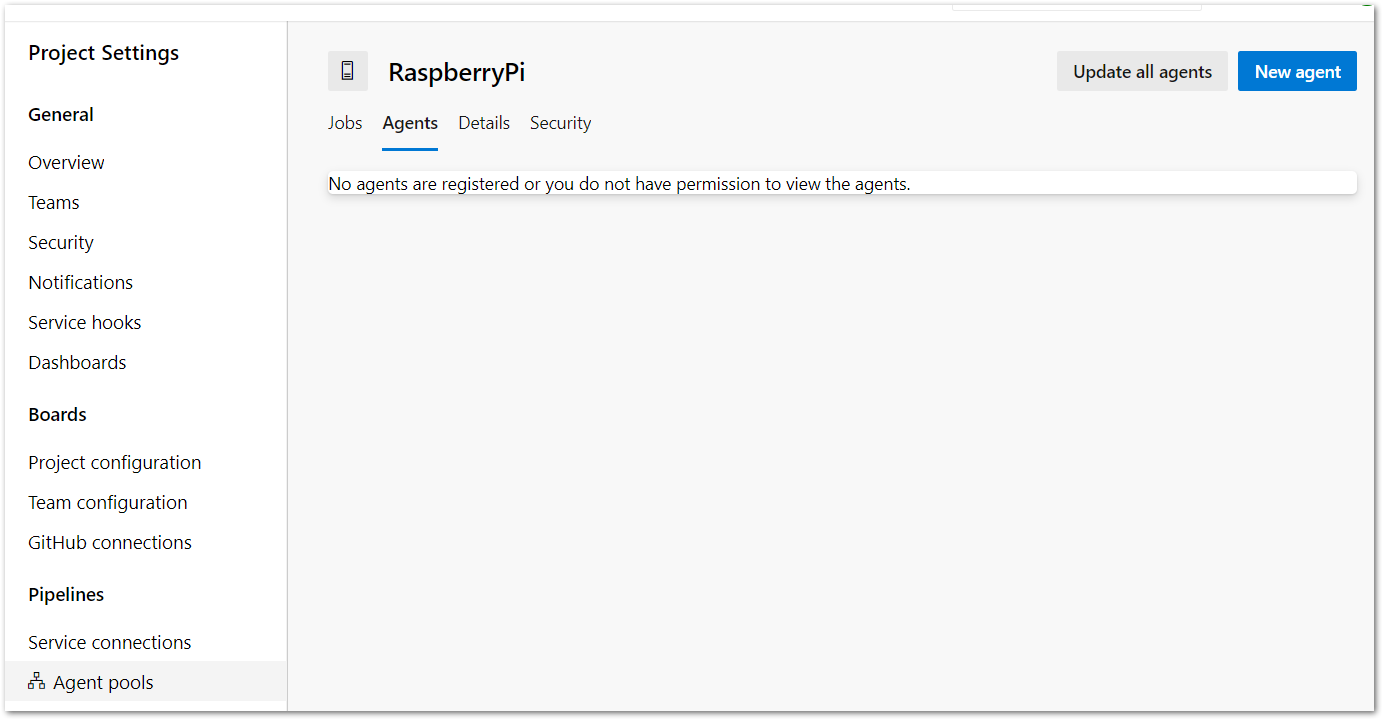 This displays the Get the agent dialog.
 -
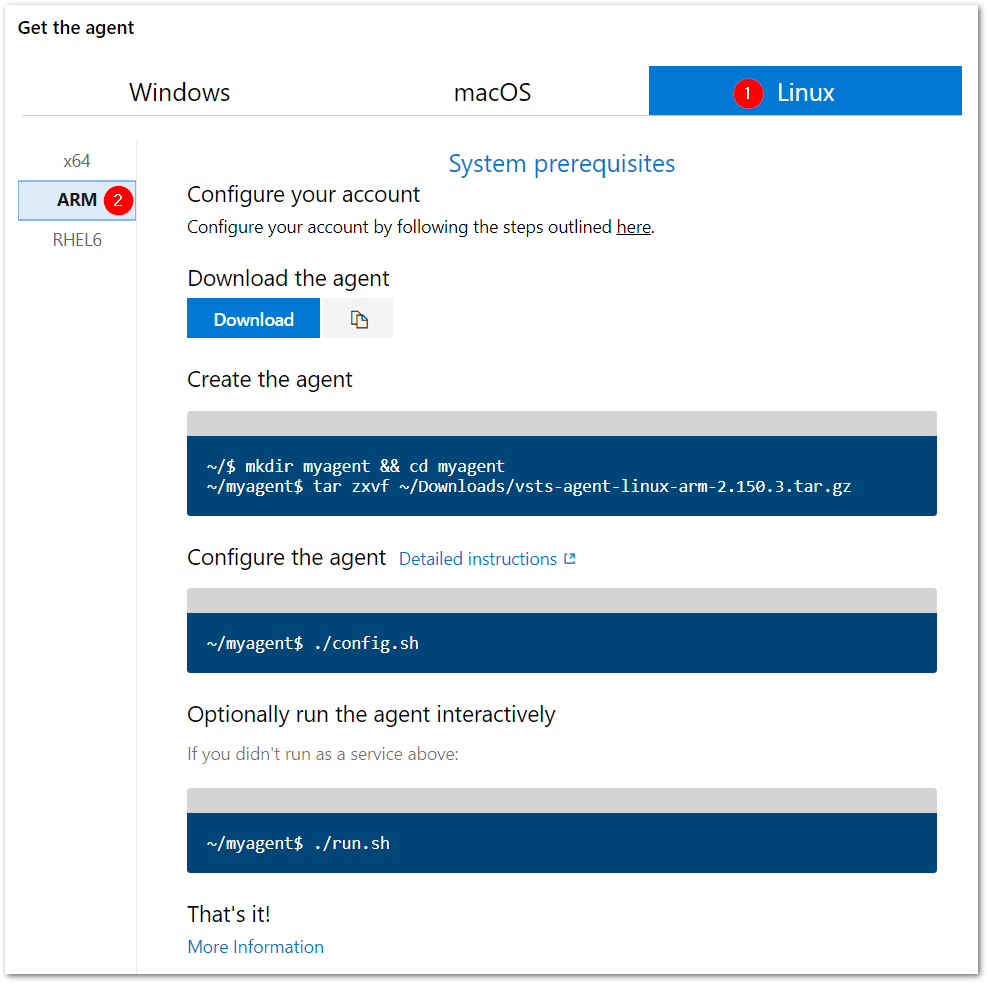
Click the Linux tab up the top, and the ARM heading on the left. This shows the download and configuration instructions for the Linux ARM build agent.
-
Click the clipboard icon next to the download button to copy the agent download URL to the clipboard
-
Download the agent on the raspberry pi
pi@raspberrypi:~ $ wget https://vstsagentpackage.azureedge.net/agent/2.150.3/vsts-agent-linux-arm-2.150.3.tar.gz
- Extract the agent into a new directory, and run the configuration script.
pi@raspberrypi:~ $ mkdir az-agent && cd az-agent
pi@raspberrypi:~/az-agent $ tar zxvf ../vsts-agent-linux-arm-2.150.3.tar.gz
pi@raspberrypi:~/az-agent $ ./config.sh
Configure the agent
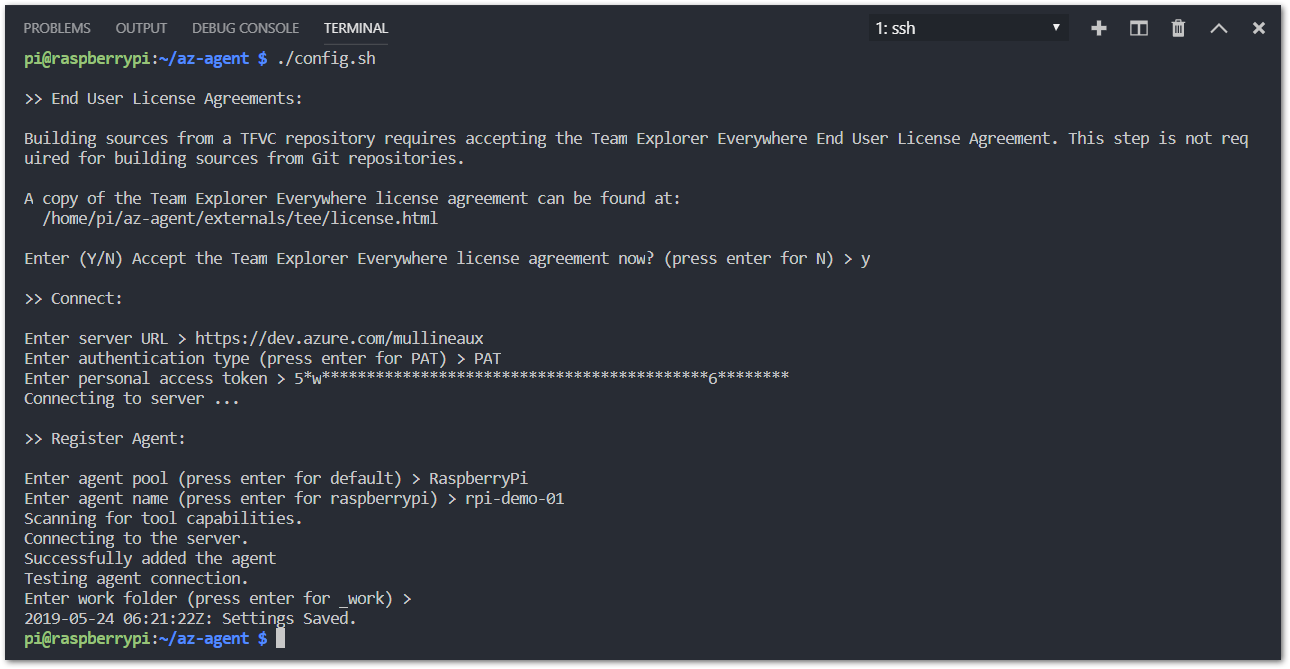
Just follow the instructions displayed on the screen from the configuration script.
- First, accept the license agreement.
Enter (Y/N) Accept the Team Explorer Everywhere license agreement now? (press enter for N) > y
- Enter the URL of your Azure DevOps organization. This is in the format of
https://dev.azure.com/<your organization name>
>> Connect:
Enter server URL > https://dev.azure.com/mullineaux
- For the authentication type, enter
PAT(Personal Access Token).
Enter authentication type (press enter for Negotiate) > PAT
- Next it’ll prompt for the token value. This is the access token we created earlier.
Enter personal access token > ****************************************************
- Enter the name of the agent pool we created
>> Register Agent:
Enter agent pool (press enter for default) > RaspberryPi
- Enter a name to give this specific agent. These should be unique so you can tell the difference between agents if you have more than one agent in an agent pool.
Enter agent name (press enter for raspberrypi) > rpi-demo-01
- It will now scan what capabilities are available to the agent, and do a quick connection test.
Scanning for tool capabilities.
Connecting to the server.
Successfully added the agent
Testing agent connection.
- Enter the location of the work folder. The
work folderis a folder on the local system that the agent uses to copy files and execute commands etc. when running build/release agent tasks. I just left mine as default.
Enter work folder (press enter for _work) >
2019-05-24 06:17:08Z: Settings Saved.
- Back in the Azure DevOps portal, confirm the agent is registered by clicking the Agents tab on the agent pool.

Configure the agent as a service
Notice the agent is registered, but it’s offline. It’s installed on the RaspberryPi and connected to our agent pool; however, the agent is not started on the Pi. To fix that, the build agent can be configured as a service.
In the agent directory on the Pi, there’s a service configuration script we can run to do this for us.
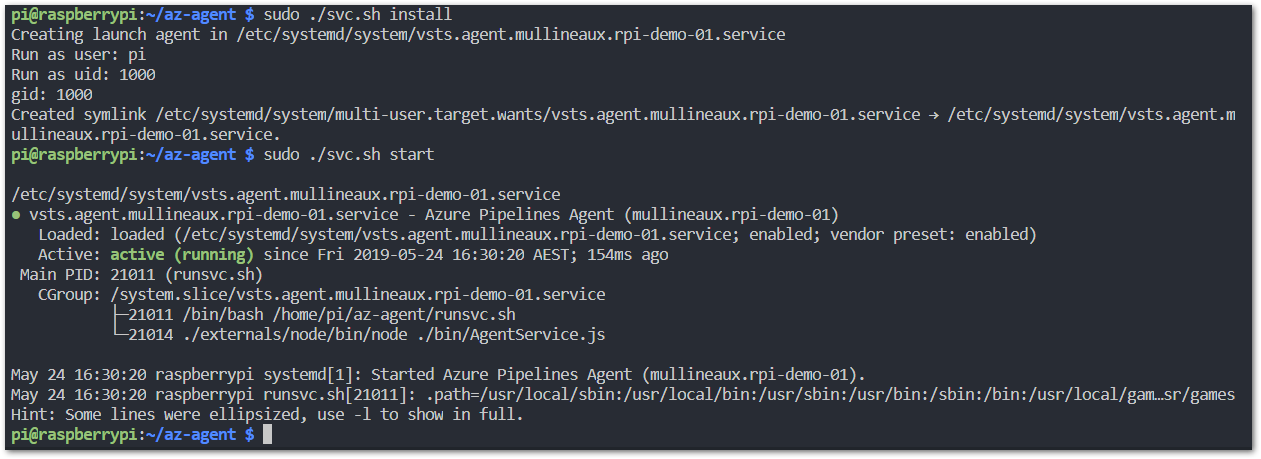
- Install the build agent as a service
sudo ./svc.sh install
- Start the service
sudo ./svc.sh start

Back in the Azure DevOps portal, the agent will show as online.

Deploy the container with Azure DevOps
All the setup, there is nothing left to do but to deploy some containers! Let’s get into it.
Create a build
The build pipeline is going to use docker build to build our image, and docker push to push it up to the image repository in Azure Container Registry.
- In Azure DevOps, create a new empty build pipeline.
- Select Hosted Ubuntu 1604 as the agent pool.
-
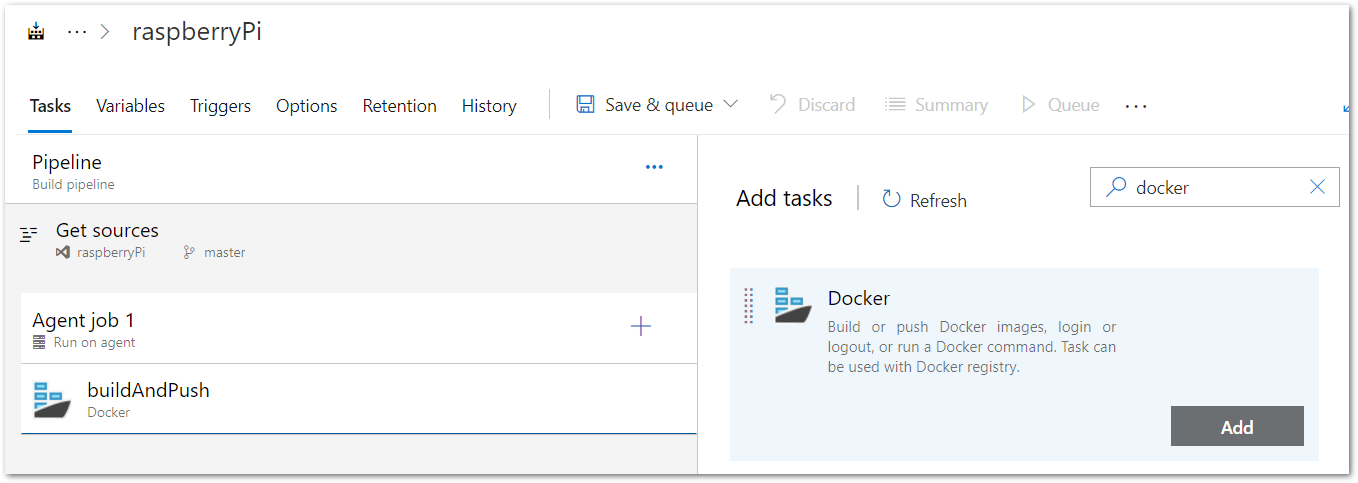
Add a new docker task
-
Click the docker task.
-
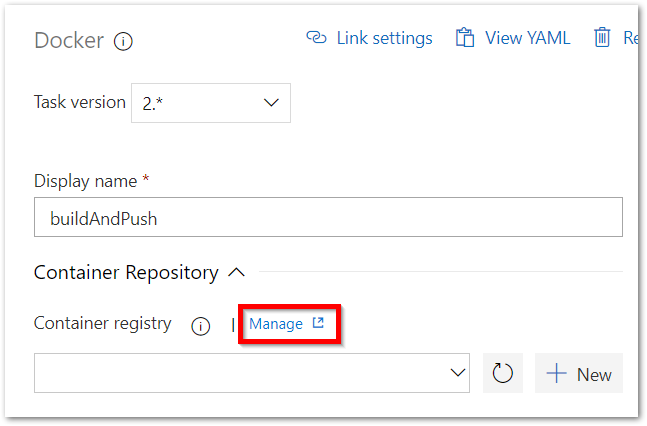
Before we can connect to the Azure Container Registry, we need to create a new service connection. Under the Container Repository heading, click Manage.
-
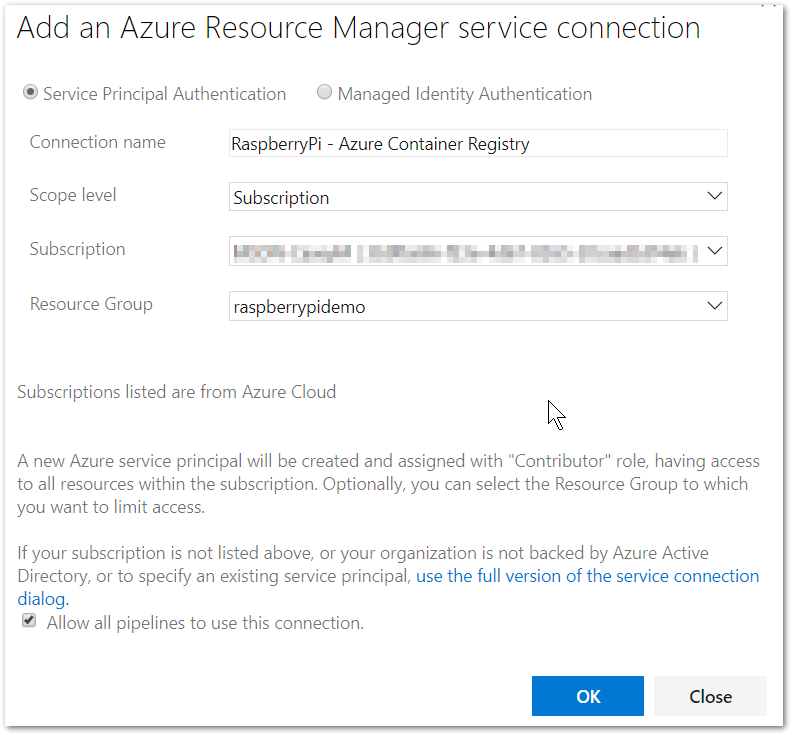
Click New service connection –> Azure Resource Manager.
-
Configure the details of the service connection, and click OK
-
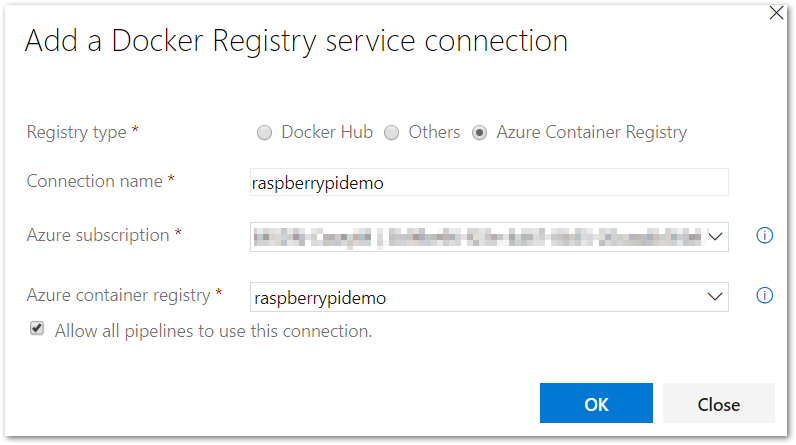
Back in the Docker build task, click the New button to configure a new container registry connection.

-
Make sure to select Azure container registry as the registry type, and configure the rest of the configuration details.
-
Enter the name of the container repository. This is the same repository name used to tag the image.
-
Click Save and Queue
- Confirm the build completed successfully

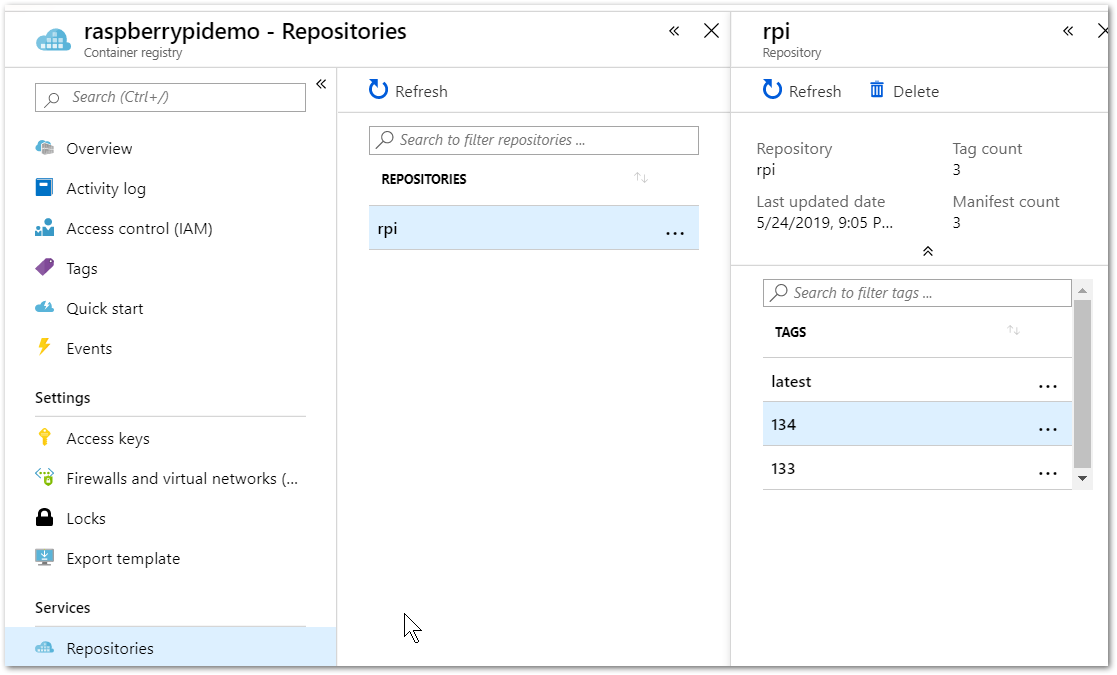
- Confirm a new image exists in the repository in Azure Container Registry with the tag of the Azure DevOps build number
Create a release
The release pipeline contains a few commands that execute on the RaspberryPi via the build agent. This method is how we deploy the image to the Pi, and create a new container from the image.
- Create a new empty release pipeline
- Create a new stage called Deploy to RaspberryPi
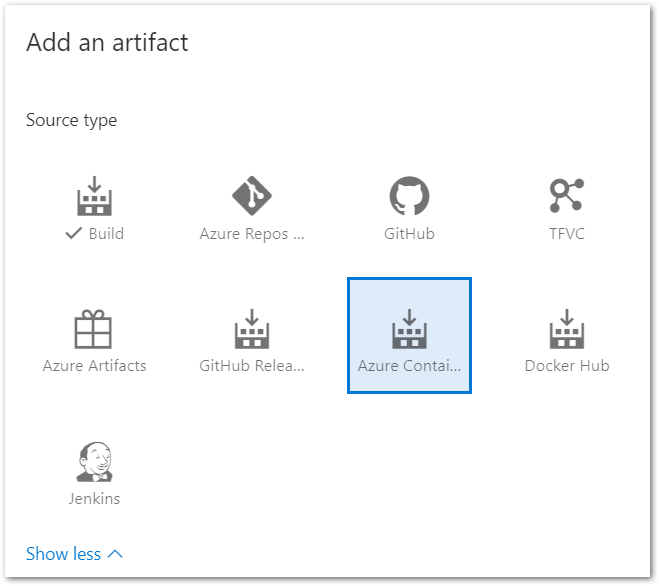
- Click Add and artifact
-
Expand the artifact types, and select Azure Container Repository
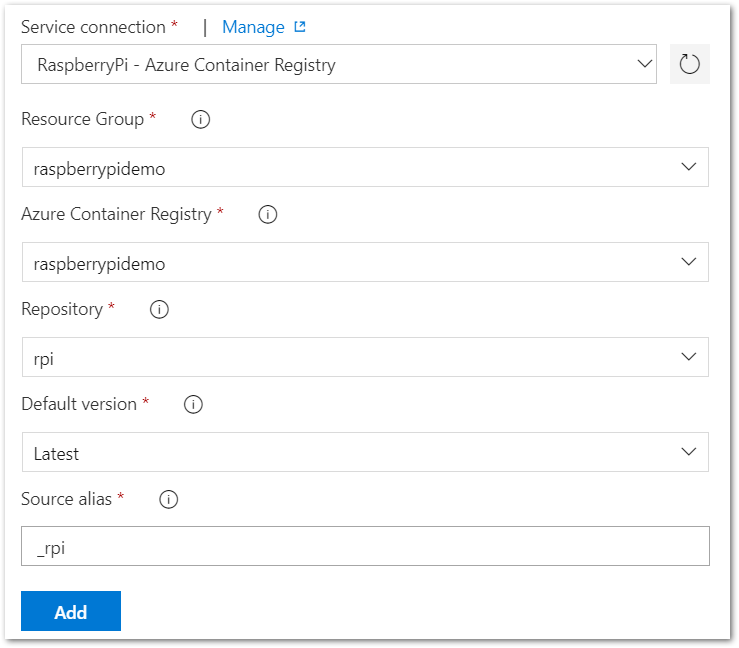
- Select the service connection to the Azure Container Registry that was created in the build pipeline
- Select the resource group from the dropdown
- Select the container registry from the dropdown
- Select the repository from the dropdown
-
Click Add
- Enable the continuous deployment trigger. This will create a new release each time a new image is uploaded to the image repository.
- Open the task configuration of the Deploy to RaspberryPi stage
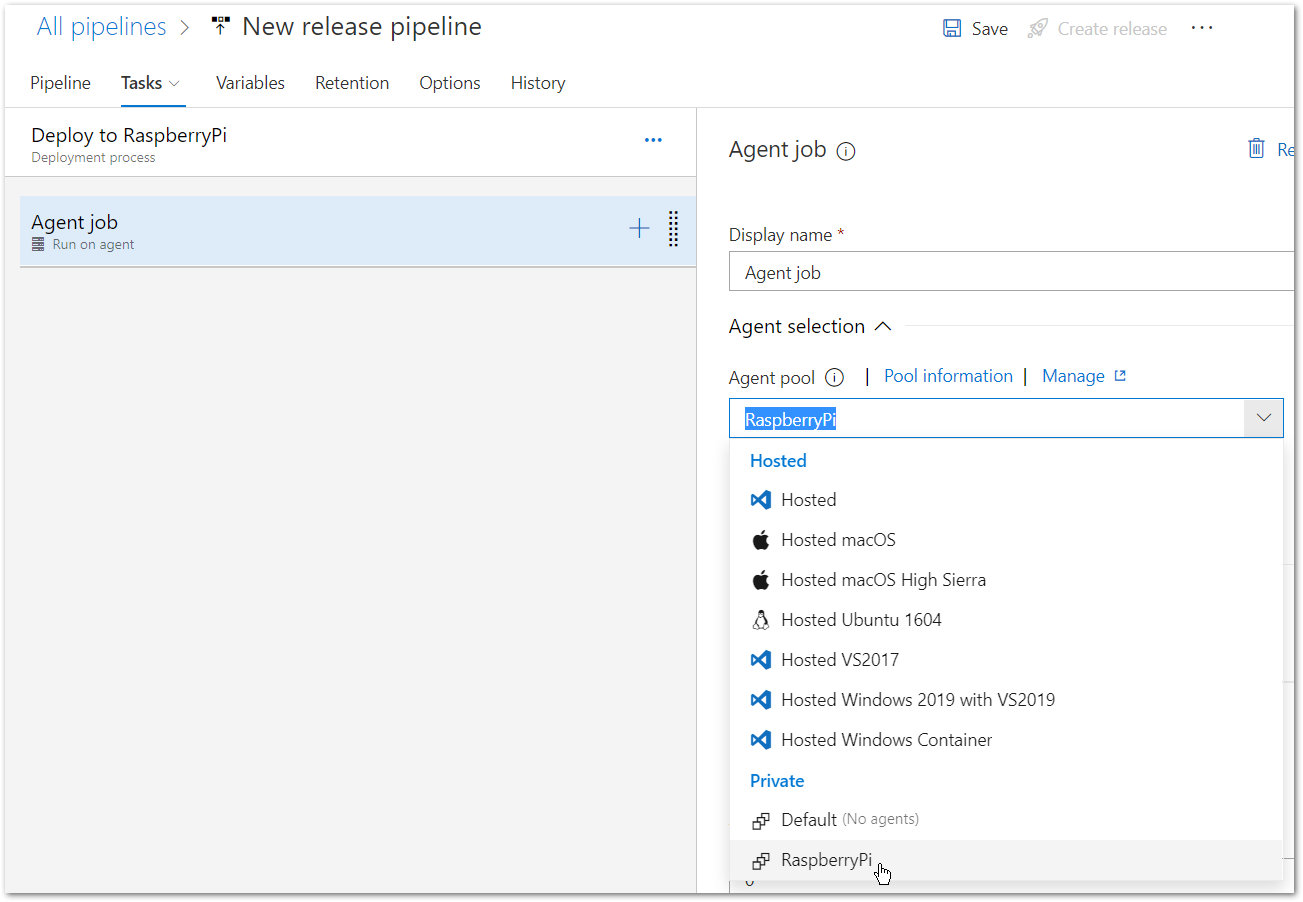
- Click the Agent Job heading, and select the RaspberryPi Agent Pool that was created earlier
- Click the Variables tab
- Create a new pipeline variable called acr_password
- Populate the value with the password of the Azure Container Registry
- Click the padlock icon to encrypt the value of the variable
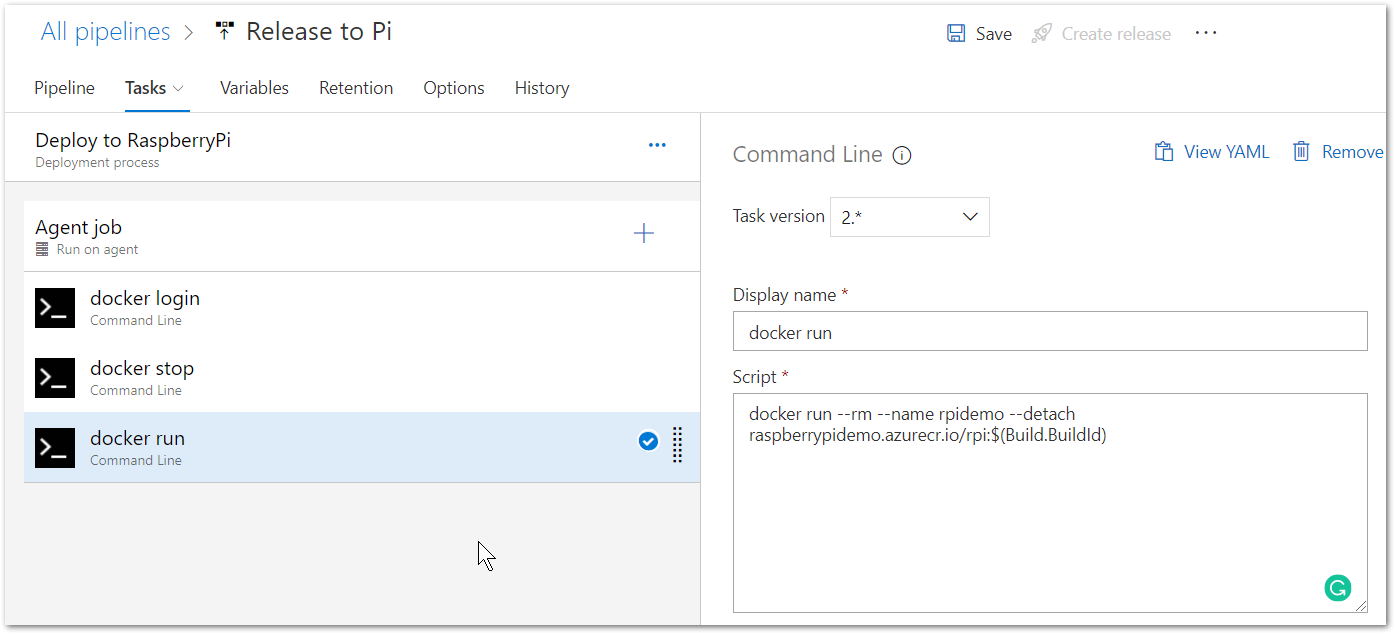
- Back in the Tasks tab, add a three new Command line script tasks
- Name the first task docker login and use the following script.
docker login raspberrypidemo.azurecr.io -u raspberrypidemo -p $(acr_password)
- Name the second task docker stop and use the following script
docker stop rpidemo
- In the control options for the second task, check continue on error
- Name the third task docker run and use the following script
docker run --rm --name rpidemo --detach raspberrypidemo.azurecr.io/rpi:$(Build.BuildId)
- Save and create a release
- Initiate a manual deployment to the Deploy to RaspberryPi stage
- Check for a successful release
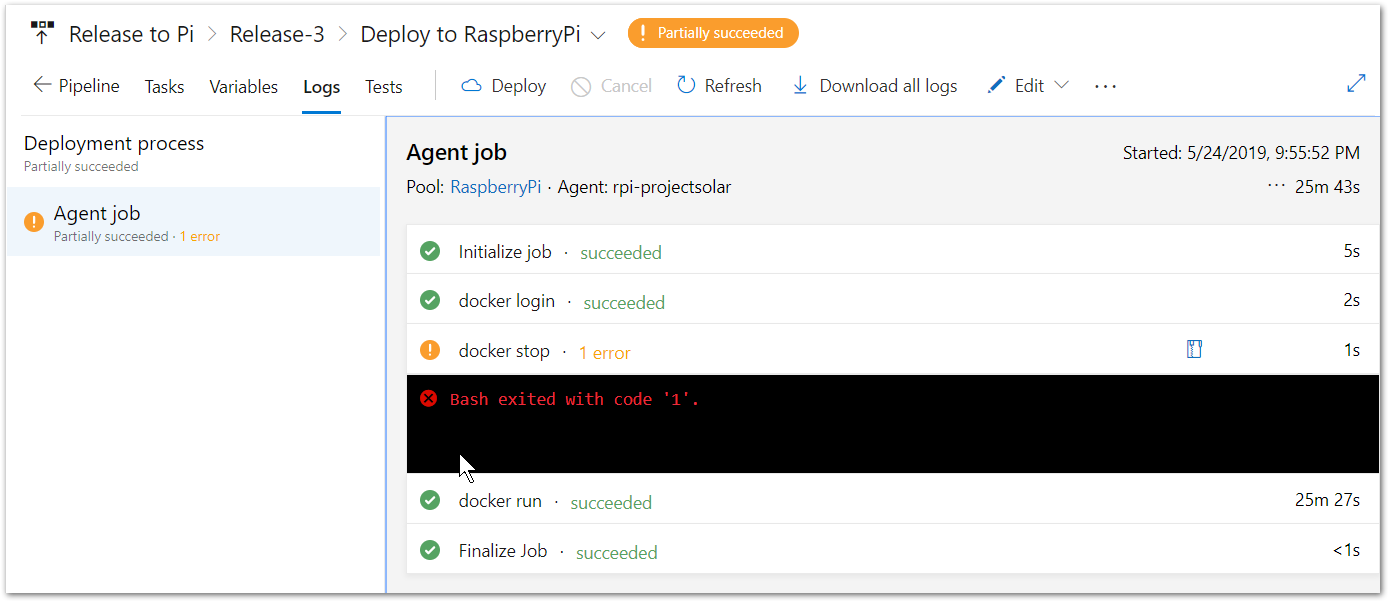
Now if we ssh into the RaspberryPi, we can see the container is started and successfully running the .net core app!

Conclusion
Having the ability to automatically push code updates to my many RaspberryPi’s is incredibly helpful every time I want to iterate on one of my personal projects. It means I can develop locally using the tools that I’m used to, instead of editing files via vim over ssh, or shifting files around via scp, which is a massive time saver.

Comments