17 min to read
Hosting a website for an entire year for less than a cup of coffee using Azure storage and Cloudflare
Why pay for servers when serverless is almost free?

When deciding which technologies to use when creating my website, I was looking for a solution that:
- is easy to manage and add content
- is highly customizable
- is as as “hands-off” as possible
- is scalable and could handle bursts of traffic
- is cheap
- supported custom domains
- supported SSL certificates
That sounds like a lot of demands! Surely I’d have to compromise on something, right?
After careful consideration and a lot of experimentation, I ended up landing on using a static site generator framework to create the content, GitHub to store and version control my files, GitHub actions to deploy, and Azure Storage to host, which I then front with Cloudflare for SSL, CDN caching, and some advanced security features (HTTP security headers).
I chose this approach because not only does it meet my requirements, but it enables me to use the same tooling and workflows that are familiar to me from my time spent with DevOps. I use VSCode to write the blog posts in markdown, and when I commit the changes to GitHub, Github Actions takes care of the rest.
And the best part? It cost’s me about $1.81 a quarter, or (at its peak) $0.06 a day. I could host the site for an entire year for less than a cup of coffee. Now that’s value for money!
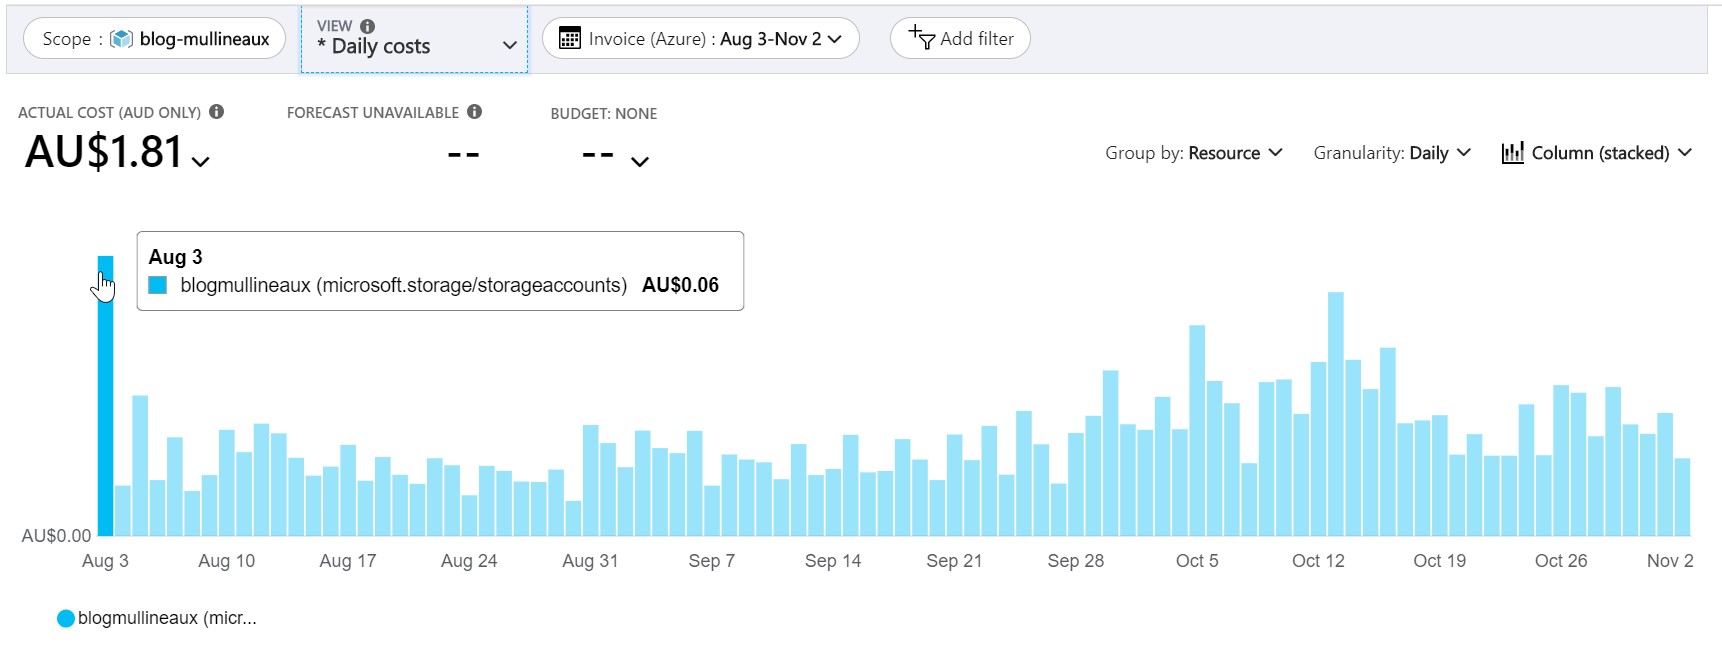 Daily website hosting costs for the past three months
How it works
This web hosting solution is made up of these components:
- Static site generator (Jekyll)
- Source control (Github)
- Storage and hosting (Azure Storage)
- Content publishing pipeline (Github Actions)
- SSL & cost reduction (Cloudflare CDN)
- Enhanced security (Cloudflare Workers)
1. Static site generator (Jekyll)
The framework I chose for my site is called Jekyll. With Jekyll, I can create the content for my pages and posts in plain text using markdown, which is very simple and easy to author.
Jekyll will then convert the markdown files into HTML and apply a theme which outputs the final product that is hosted on a webserver.
The primary benefit of a static site framework is that there’s no complicated web server components, like databases or web server infrastructure to manage and keep up to date. It’s literally just a bunch of text files in a directory. Since the “source code” is simple markdown files, I can treat them as any other kind of source code, and manage them with the tools and processes that make me productive.
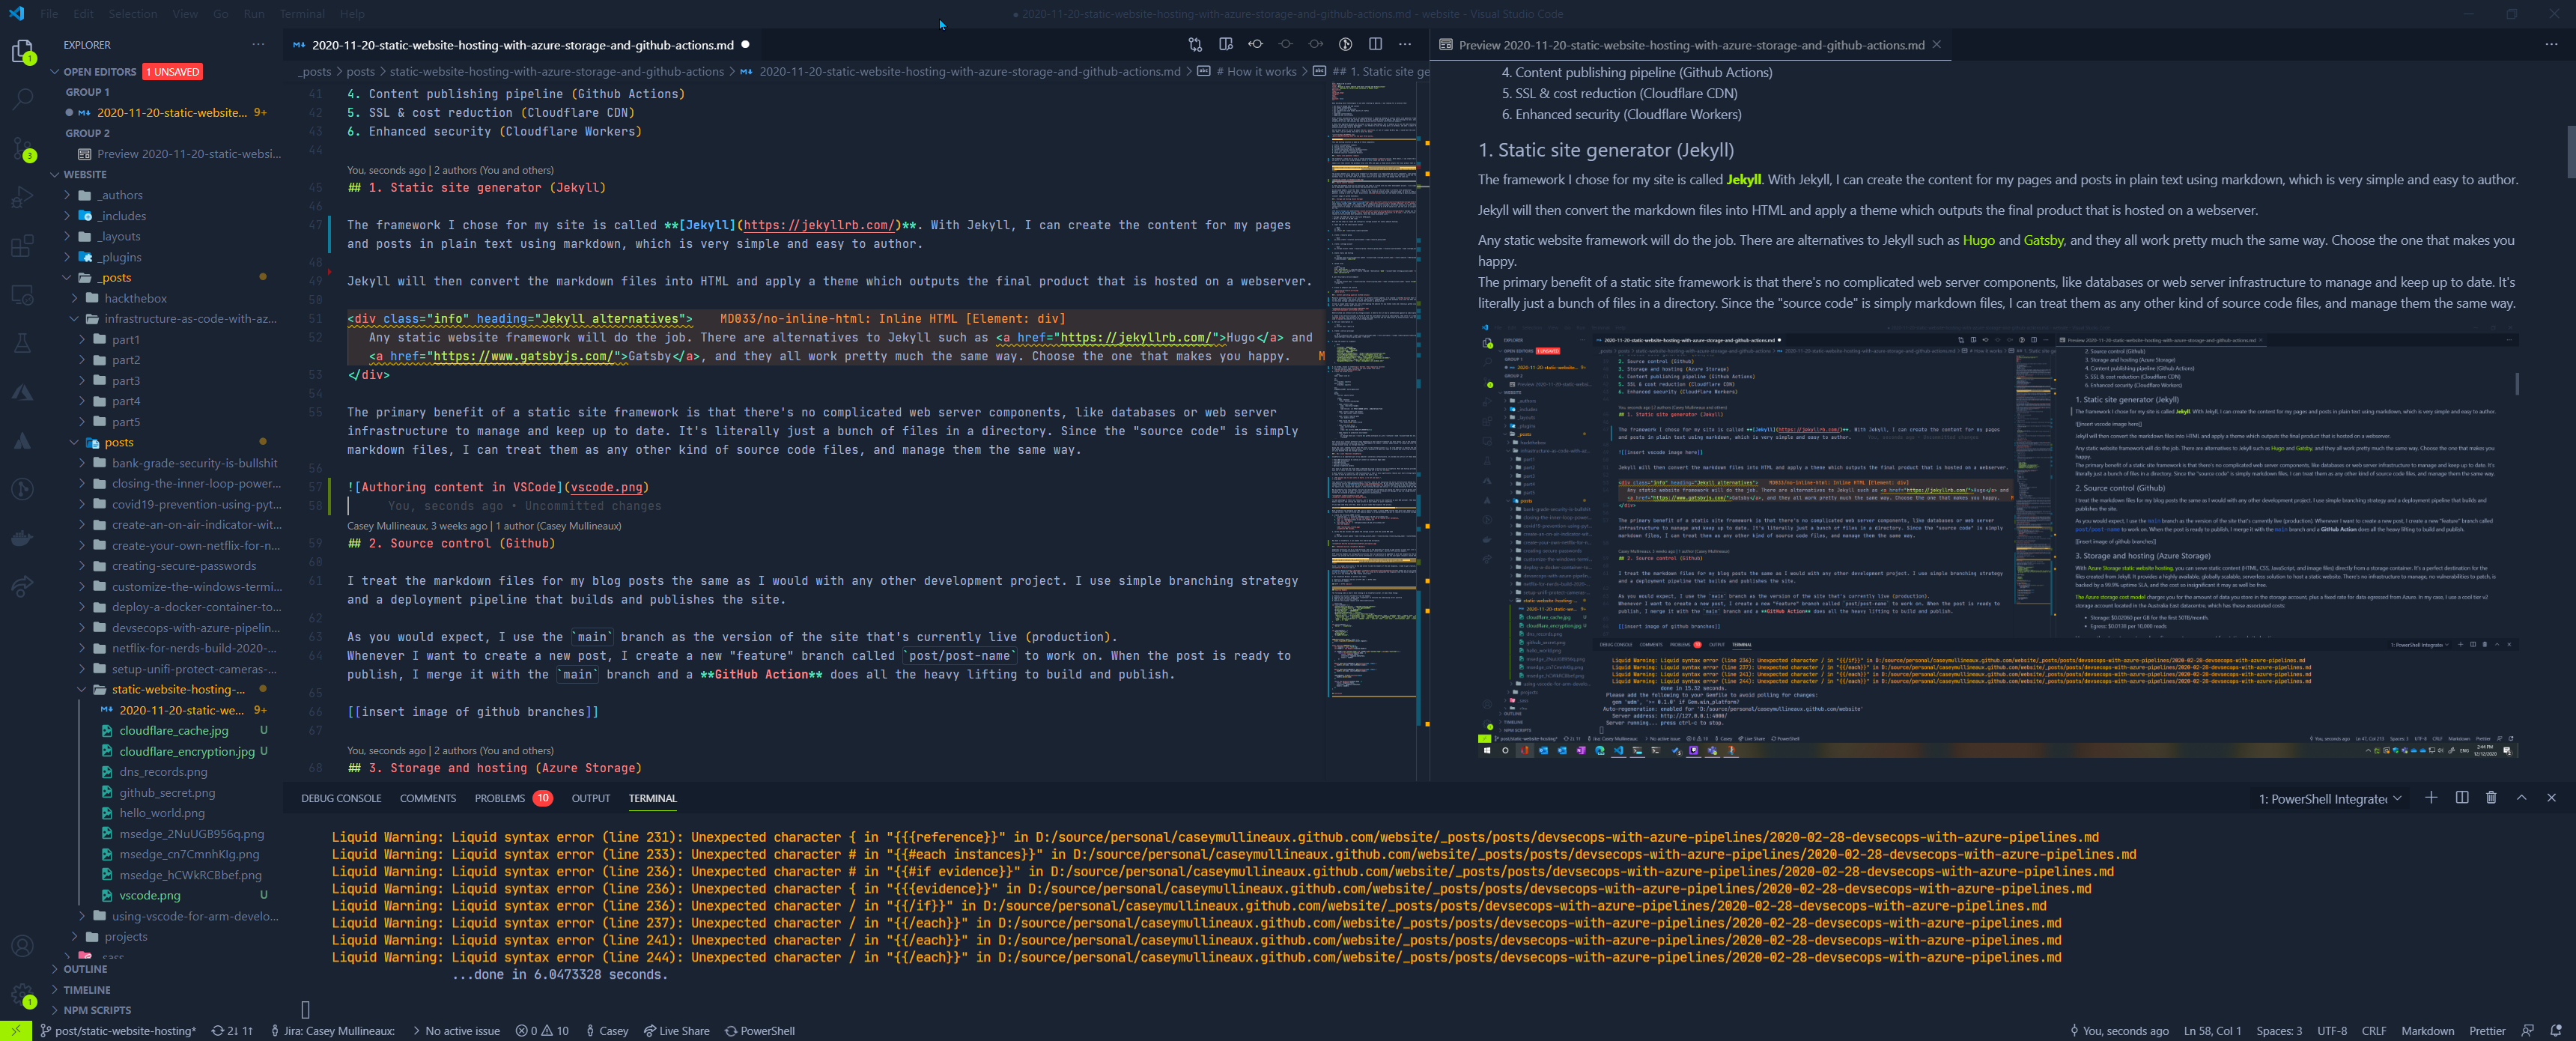 A new post is born
2. Source control (Github)
I treat the markdown files for my blog posts the same as I would with any other development project. I use a simple branching strategy and a deployment pipeline that builds and publishes the site.
As you would expect, I use the main branch as the version of the site that’s currently live (production).
Whenever I want to create a new post, I create a new “feature” branch called post/post-name to work on. When the post is ready to publish, I merge it with the main branch and a GitHub Action does all the heavy lifting to build and publish.
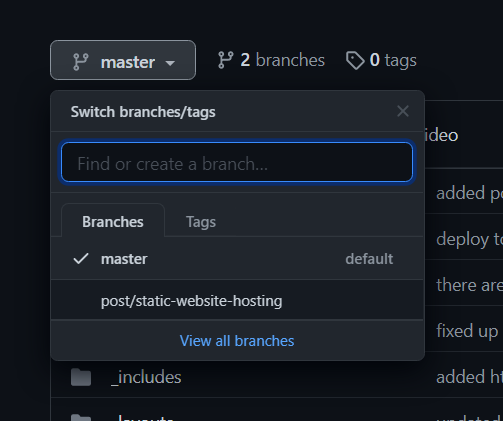 A new branch for each new post
3. Storage and hosting (Azure Storage)
With Azure Storage static website hosting, you can serve static content (HTML, CSS, JavaScript, and image files) directly from a storage container. It’s a perfect destination for the files created from Jekyll. It provides a highly available, globally scalable, serverless solution to host a static website. There’s no infrastructure to manage, no vulnerabilities to patch, is backed by a 99.9% uptime SLA, and the cost so insignificant it may as well be free. What’s not to love?
The Azure storage cost model charges you for the amount of data you store in the storage account, plus a fixed rate for data egressed from Azure. In my case, I use a cool tier v2 storage account located in the Australia East datacentre, which has these associated costs:
- Storage: $0.02060 per GB for the first 50TB/month.
- Egress: $0.0138 per 10,000 reads
Here are the steps to create and configure a storage account for static website hosting:
-
Login and set the subscription context
az login az account set --subscripton <subscriptionId> -
Create a resource group
az group create --location australiaeast --name <resource_group_name> -
Create a storage account
az storage account create --resource-group <resource_group_name> --location australiaeast --name <storage_account_name> -
Enable static web hosting on the storage account
az storage blob service-properties update --account-name <storage_account_name> --static-website --404-document '404.html' --index-document 'index.html' -
Upload a webpage
mkdir /tmp/web echo 'Hello World!' > /tmp/web/index.html az storage blob upload-batch --source /tmp/web --destination '$web' --account-name <storage_account_name> --content-type 'text/html; charset=utf-8' -
Get the primary service endpoint (public URL)
az storage account show --resource-group <resource_group_name> --name <storage_account_name> --query "primaryEndpoints.web" --output tsv -
Browse to the endpoint and confirm
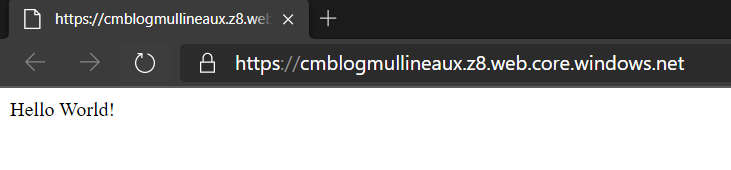 Hello world!
4. Content publishing pipeline (GitHub Actions)
Manually uploading content is for suckers!
I’ve automated content updates by creating a GitHub Action that triggers on each commit to the main branch. The action runs the jekyll build command to convert the markdown files into the HTML content, then uploads it to the Azure Storage container from which the content is being served.
My deployment pipeline does a couple of other things like interrogating the website for any broken links and creating a GitHub issue for me if it finds one. To enable that functionality, I simply used a GitHub action that was available for free in the action marketplace.
This type of thing really demonstrates the value of treating your website like code. It allows you add an unlimited number of automated steps to your deployment process, such as security scanning via DevSecOps, and it costs nothing extra. Try doing that with WordPress.
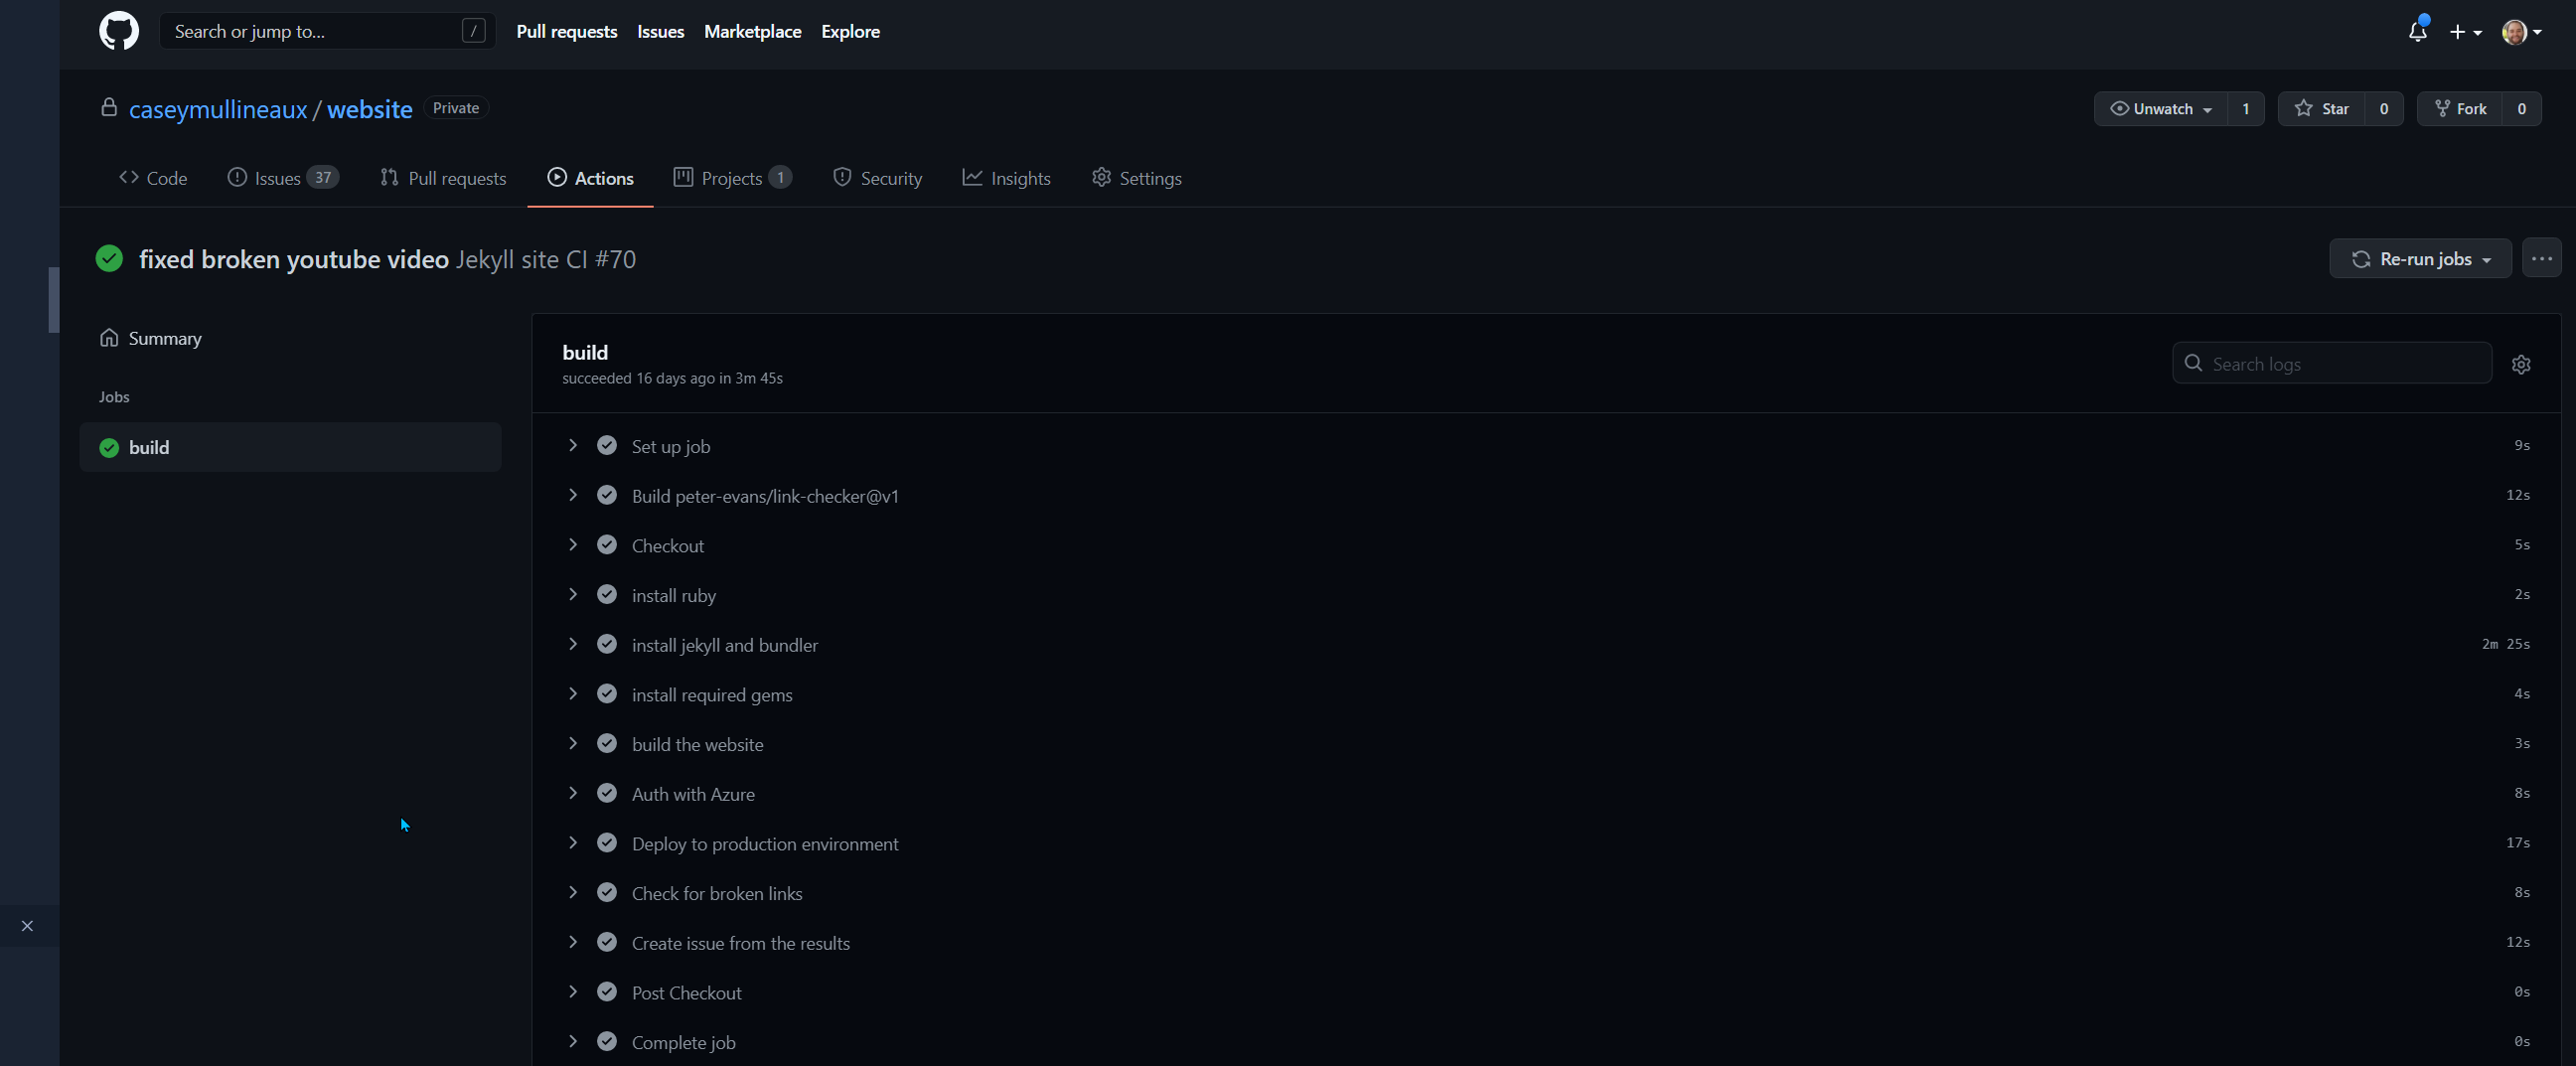 Completed deployment with Github actions
Before Github can interact with my storage account, I need to tell it how to authenticate against my subscription.
I create a new service principal in Azure AD with the contributor role on my resource group, then store its credentials in GitHub as a GitHub Secret. This allows me to store the creds securely and use them within my GitHub Actions. The service principal will be used to authenticate with Azure and upload the website files to my storage account.
-
Get your subscription id
az account show --query id -
Create a service principal
az ad sp create-for-rbac --name <service_principal_name> --role contributor --scopes /subscriptions/<subscription_id>/resourceGroups/<resource_group_name> --sdk-auth -
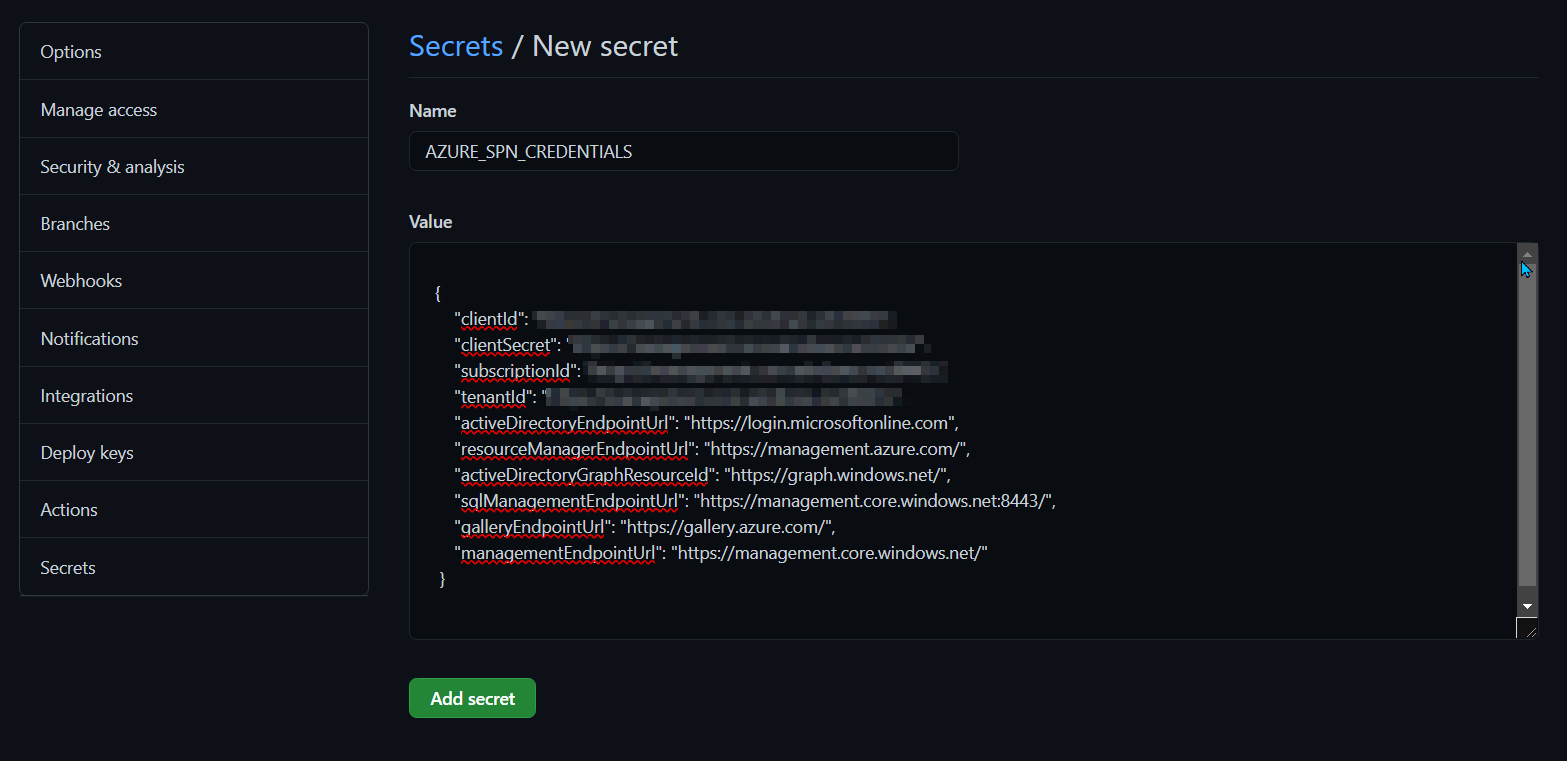
Copy the output to clipboard
{ "clientId": "REDACTED", "clientSecret": "REDACTED", "subscriptionId": "REDACTED", "tenantId": "REDACTED", "activeDirectoryEndpointUrl": "https://login.microsoftonline.com", "resourceManagerEndpointUrl": "https://management.azure.com/", "activeDirectoryGraphResourceId": "https://graph.windows.net/", "sqlManagementEndpointUrl": "https://management.core.windows.net:8443/", "galleryEndpointUrl": "https://gallery.azure.com/", "managementEndpointUrl": "https://management.core.windows.net/" } - In GitHub, browse to Settings > Secrets > New repository secret
- Give the secret a name, and paste the json output from step 3
-
Create the GitHub action
name: Jekyll site CI

on:
push:
    branches: [master]
pull_request:
    branches: [master]

env:
STORAGE_ACCOUNT: storage_account_name

jobs:
build:
    runs-on: ubuntu-latest

    steps:
    - name: Checkout
        uses: actions/checkout@v2

    - name: install ruby
        uses: ruby/setup-ruby@v1
        with:
        ruby-version: 2.6 # Not needed with a .ruby-version file

    - name: install jekyll and bundler
        run: gem install jekyll bundler

    - name: install required gems
        run: bundle install

    - name: build the website
        run: bundle exec jekyll build

    - name: Auth with Azure
        uses: azure/[email protected]
        with:
        creds: $

    - name: Deploy to production environment
        run: |
        az storage blob sync --source $/_site --container \$web --account-name $ --verbose
Your action will contain different steps depending on what website framework you have chosen, but in the example above it demonstrates how I’m downloading and installing all the requirements for jekyll, running jekyll build to create the site, then uploading to the storage account using az storage blob sync.
Using the sync command ensures that the files in the storage account are exactly the same as what has generated during the build process. This is necessary to make sure that if I delete any files from my master branch, those files are also deleted from the storage account.
5. SSL & cost reduction (Cloudflare)
Cloudflare is an important part of my website’s serverless infrastructure. It provides me with all of these benefits:
- Free CDN functionality by caching of content on Cloudflare edge nodes
- Free DDOS protection
- Free DNS hosting
- Free SSL certificates
- Optional Cloudflare workers
It’s easy to overlook the value that’s obtained by using a service such as Cloudflare. Most web hosting provides would charge you for each one of these services, but Cloudflare give them all to you for free.
A major benefit of Cloudflare’s CDN functionality is that it also significantly reduces your Azure storage egress costs. This is how I’m able to host my entire site for a measly few cents a day.
“The easiest way to save costs on Azure, is to not use Azure.” -Troy Hunt
This quote was from cybersecurity expert Troy Hunt, when he was explaining the Azure infrastructure behind his password breach notification service HaveIBeenPwnd. He was talking about how he uses Cloudflare’s CDN to serve the content from his service out of the cache of Cloudflare edge nodes. He explains that by using a CDN, he pays next to nothing for Azure for egress costs because the request is never hitting the back end service, as it’s being delivered from the CDN cache instead.
Now my website isn’t very popular, but you can see that I’m currently not paying for ~45% of my egress costs because it was delivered via the CDN instead.
 Cloudflare cached content for the past month
This could translate to thousands of dollars of savings if you run a high traffic website, which could further be increased by applying a more aggressive caching policy.
Here you can see that the most I’ve paid in a single month for bandwidth on my storage account is $0.69.
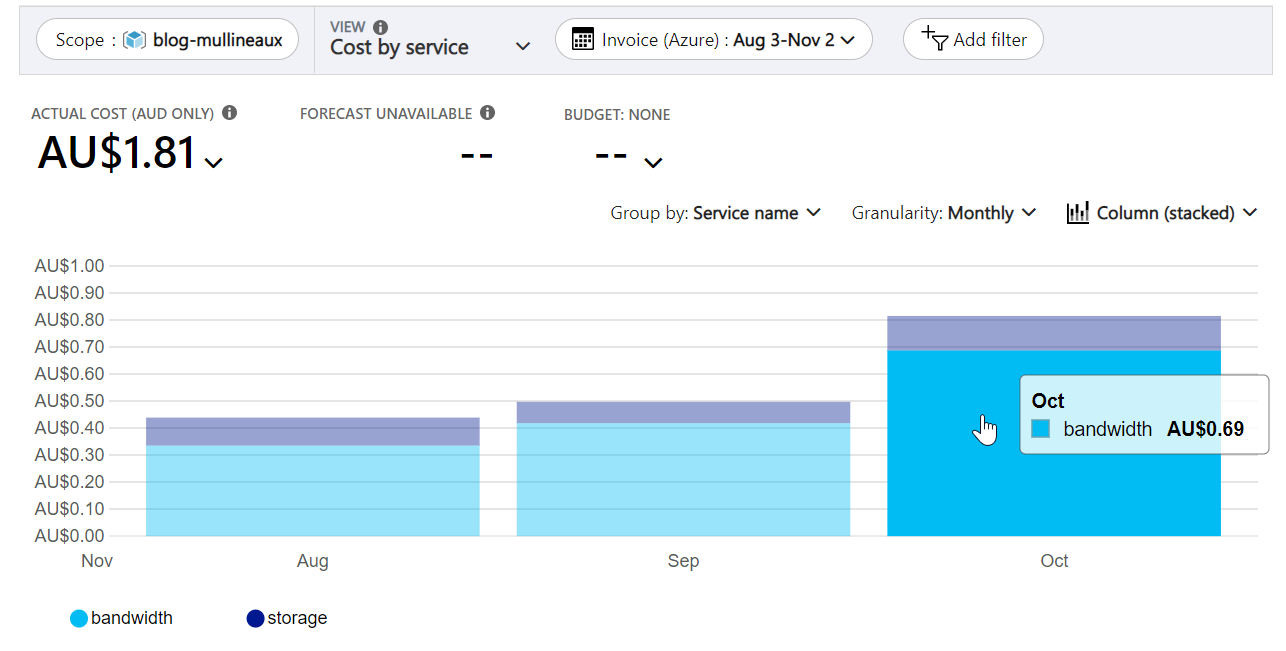 Azure bandwidth costs
Notice how the majority of my Azure storage expenses are bandwidth costs (light blue) and not the cost of storing my files (dark blue). This just goes to show that the single most impactful change you can make to reduce the cost of hosting a website is to put a CDN in front of it.
If you want to use Cloudflare’s free CDN, you’re going to need to use Cloudflare as your DNS provider. That means creating a new account with Cloudflare and setting the name servers of your domain to point Cloudflare from within your domain name registrar.
If you need some help with that, here’s a quick video that explains the process.
With Cloudflare now managing your DNS, you’ll need to create a couple CNAME records that point your domain to the primary endpoint of your storage account, and enable Cloudflare’s end-to-end encryption. This will allow your website domain (i.e www.mullineaux.com.au) to resolve to the Azure storage account and apply Cloudflare’s free SSL certificate to your site.
-
Create the following CNAME records
asverify.www->asverify.<storage_account_name>.z8.web.core.windows.netwww-><storage_account_name>.z8.web.core.windows.net<domain_name>-><storage_account_name>.z8.web.core.windows.net Cloudflare DNS records
 -
Verify the dns records and update the storage account with the custom DNS name
az storage account update --name <storage_account_name> --resource-group <resource_group_name> --custom-domain www.mullineaux.com.au -
Now back in Cloudflare, enable full end-to-end encryption.
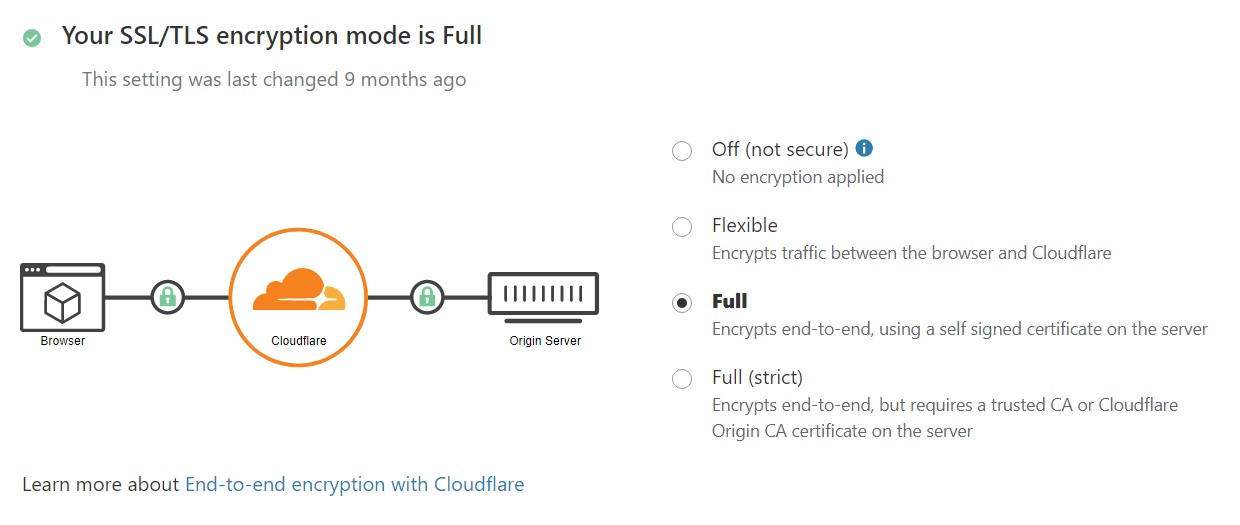 Cloudflare SSL Encryption
6. Enhanced security (Cloudflare workers & page rules)
Sometimes serverless can be a mixed blessing. One of the downsides of having no web servers to host your site is that it makes it difficult to configure anything that is typically done “server-side”, such as HTTP security headers and redirections.
Page rules
Having end-to-end encryption provided for free by Cloudflare is fantastic, but that only works my site is loaded over HTTPS. There’s nothing that stops a user from loading my site insecurely over HTTP.
In a typically hosted environment, you’d configure the redirect rule on the web server. Since I don’t have a web server, I use Cloudflare page rules to achieve the same result.
Page rules allow me to control Cloudflare settings that trigger on a given URL. I use a page rule to apply a permanent redirect (301) to force a redirection of all webpage requests to be forwarded to the HTTPS version. This rule with a few additional security headers makes it practically impossible for any of my content to be loaded insecurely.
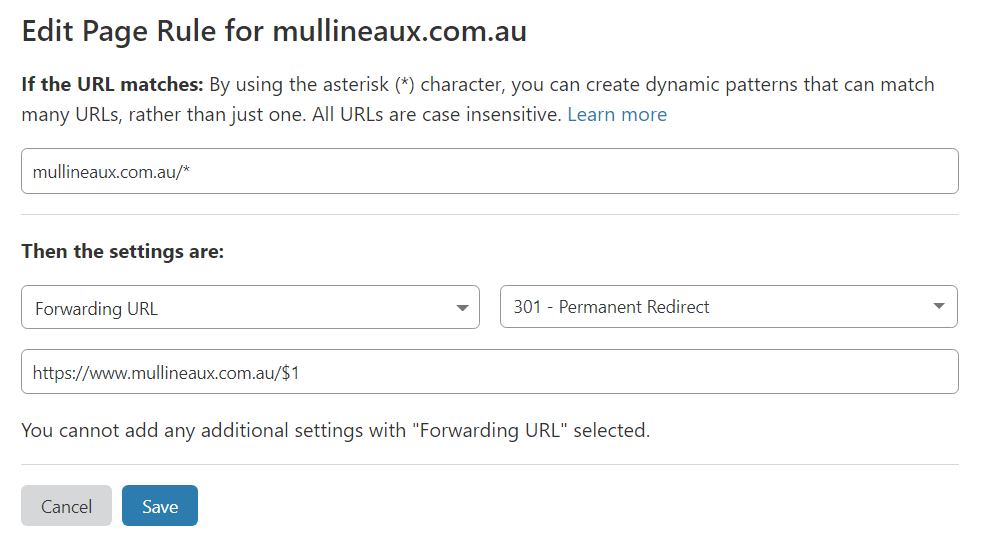 No HTTP for you!
I also have a second page rule that explicitly tells Cloudflare’s CDN to cache the content of every request for a month.
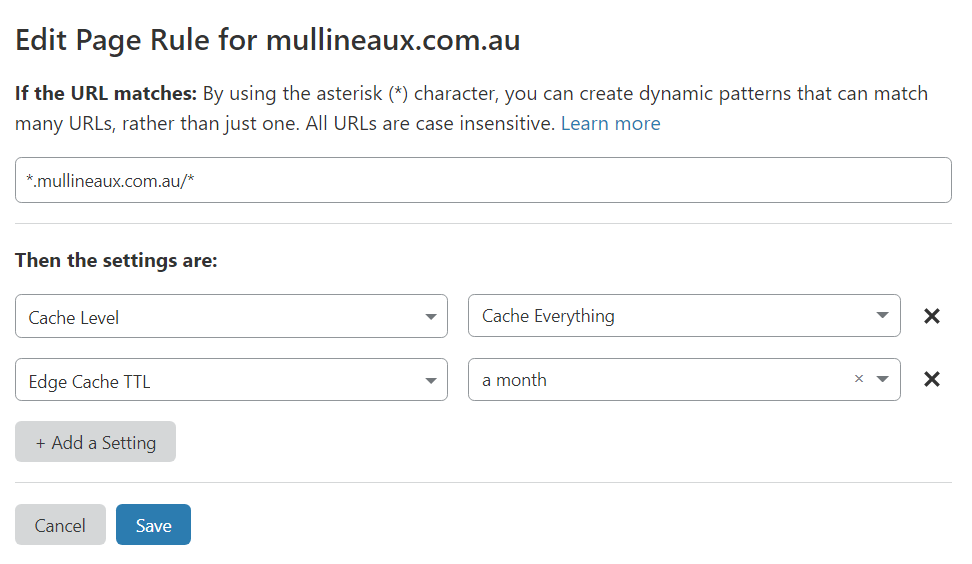 Minimize bandwidth costs
Security Headers
HTTP security headers are configurable directives that can optionally be appended to each web response by the webserver. These headers can provide the client with extra information or instructions on how the user-agent (browser) should behave.
Since I no longer have access to the webserver to add the headers of the web responses, I need to get creative. This is where Cloudflare Workers come in.
Cloudflare Workers enables you to run snippets of serverless code on each of Cloudflare’s CDN edge nodes. This will allow me to manipulate the responses that the Azure Storage account sends to the user on its way through the CDN. Pretty nifty tech!
The following code is what I have running on my Cloudflare worker. It does these things:
- Removes any back-end version information from the headers
- Replaces the “Server” header with “cloudflare” to obfuscate the underlaying server platform
- Adds a bunch of security headers
- Returns the original request with these modifications
let securityHeaders = {
   "Content-Security-Policy" : "upgrade-insecure-requests",
   "Strict-Transport-Security" : "max-age=31536000",
   "X-Xss-Protection" : "1; mode=block",
   "X-Frame-Options" : "SAMEORIGIN",
   "X-Content-Type-Options" : "nosniff",
   "Referrer-Policy" : "strict-origin-when-cross-origin",
    "Feature-Policy" : "accelerometer 'none' ; ambient-light-sensor 'none' ; autoplay 'self' ; camera 'none' ; encrypted-media 'none' ; fullscreen 'self' ; geolocation 'none' ; gyroscope 'none' ; magnetometer 'none' ; microphone 'none' ; midi 'none' ; payment 'none' ; picture-in-picture * ; speaker 'self' ; sync-xhr 'none' ; usb 'none' ; notifications 'self' ; vibrate 'none' ; push 'self' ; vr 'none'"
}

let sanitiseHeaders = {
   "Server" : "cloudflare",
}

let removeHeaders = [
   "Public-Key-Pins",
   "X-Powered-By",
   "X-AspNet-Version",
]

addEventListener('fetch', event => {
   event.respondWith(addHeaders(event.request))
})

async function addHeaders(req) {
   let response = await fetch(req)
   let newHdrs = new Headers(response.headers)

   if (newHdrs.has("Content-Type") && !newHdrs.get("Content-Type").includes("text/html")) {
        return new Response(response.body , {
            status: response.status,
            statusText: response.statusText,
            headers: newHdrs
        })
   }

   Object.keys(securityHeaders).map(function(name, index) {
      newHdrs.set(name, securityHeaders[name]);
   })

   Object.keys(sanitiseHeaders).map(function(name, index) {
      newHdrs.set(name, sanitiseHeaders[name]);
   })

   removeHeaders.forEach(function(name){
      newHdrs.delete(name)
   })

   return new Response(response.body , {
      status: response.status,
      statusText: response.statusText,
      headers: newHdrs
   })
}
Conclusion
For a hobbyist like me, my blog lets me talk about the things I enjoy and hopefully help a few people along the way. It’s fun and all, but that’s not something I want to dish out hundreds of my hard-earned dollary-doos on. I’ve got a family to feed, gadgets to buy, and Netflix to pay for!
Hopefully this post has demonstrated that with a little technical gymnastics, it isn’t necessary to pay hundreds of dollars to host a website. You can host a robust, secure, and flexible enterprise-grade website solution with no compomises for less than a cup of coffee.

Comments