15 min to read
COVID-19 prevention using python
A guaranteed way to keep your grubby mitts away from from your melon
TLDR
I wrote some python code that screams at you when you touch your face.
Introduction
We’re now two months in to the lock down restrictions brought on by the COVID-19 pandemic, and we’re all (hopefully) taking precautions to reduce our chances of contracting the coronavirus. For many of us, this means working from home, social distancing and regular hand washing.
The World Health Organization (WHO) also advises that in order to protect ourselves form infection, we should avoid touching our eyes, nose and mouth as much as possible. If our hands have come into contact with a surface contaminated with the coronavirus, touching our faces provides a way for the virus to enter our bodies through any of the aforementioned face holes.
So it’s as simple as just not touching your face, right? As it turns out, that’s easier said than done.
Most of us touch our faces way too much. Studies have shown that people touch their faces 23 times an hour - and that’s a big problem amid the pandemic. Unfortunately for us, we can’t help it!
German brain researchers have conducted a study which concluded that spontaneous face-touching helps to regulate cognitive overload and stress. This “self-stimulation”, as the researches call it, balances out the disturbances in processing information and emotional swings. This means we are physiologically programmed to touch our faces to help us deal with life.
There’s also a psychological component working against us too, known as the reactance theory. This is a motivational state where our brian wants to ensure that we’re free to do whatever we want. This is why when you label something as forbidden and tell someone they can’t have it, you ultimately make them want it even though they might not have wanted it to begin with.
“Reactance theory states that people will often resent the loss of a freedom and will rebel by doing the opposite of what they’re told.”
This psychological impulse is used against us whenever we see a click-baity title in videos (or blog posts). Each time you see a title that challenges your intelligence by using words like “you won’t believe” or “you don’t know”, your brain is automatically challenged to say otherwise, and this makes you want to watch the video even more, just to prove it wrong.
With both our physiology and psychology working against us, what are we supposed to do? I’m glad you asked.
How it works
I started this project as a fun way to learn more about python and image recognition.
I had three main objectives:
- Detect faces
- Detect fingers
- Do something when they come close to one another
1. Face detection
Using the opencv python module, I use a pre-defined haar-cascade classifier to detect faces from the video source of my webcam. This works by looking at the video source frame by frame, and using the classifier to detect features within the image.
Haar Cascade is a machine learning object detection algorithm used to identify objects in an image or video.
I start out by loading the face classifier and connecting to the default video capture device (my webcam).
# load classifier
face_cascade = cv2.CascadeClassifier(
    './haarcascades/haarcascade_frontalface.xml')

# connect to webcam
cap = cv2.VideoCapture(0)
I then capture a single frame from the video feed. By using an infinite loop I can execute code against every single frame for as long as the video feed is active.
while (True):
    # capture frame by frame
    ret, frame = cap.read()
Next I convert the image to grayscale. This is an important step as it drastically speeds up image processing and is less computationally intensive.
In a colour picture, each pixel is represented by a value ranging from 0-255 across three colour channels - red, green, and blue. The combination of the values across these three channels gives us the resultant colour of the pixel.
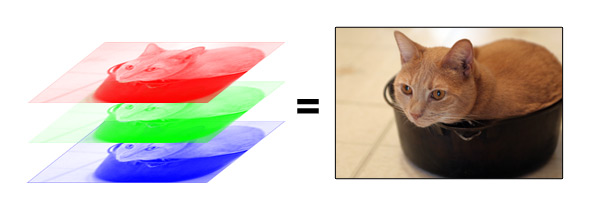
By converting the image to greyscale, there’s only a single channel to process (black/white). A value of 0 represents black, 255 represents white, and everything in between is varying shades of grey.
# convert the video frame into grayscale
gray_frame = cv2.cvtColor(frame, cv2.COLOR_BGR2GRAY)
Now I can use the face cascade to detect faces.
# detect faces in the frame using cascade
faces = face_cascade.detectMultiScale(gray_frame, 1.3, 5)
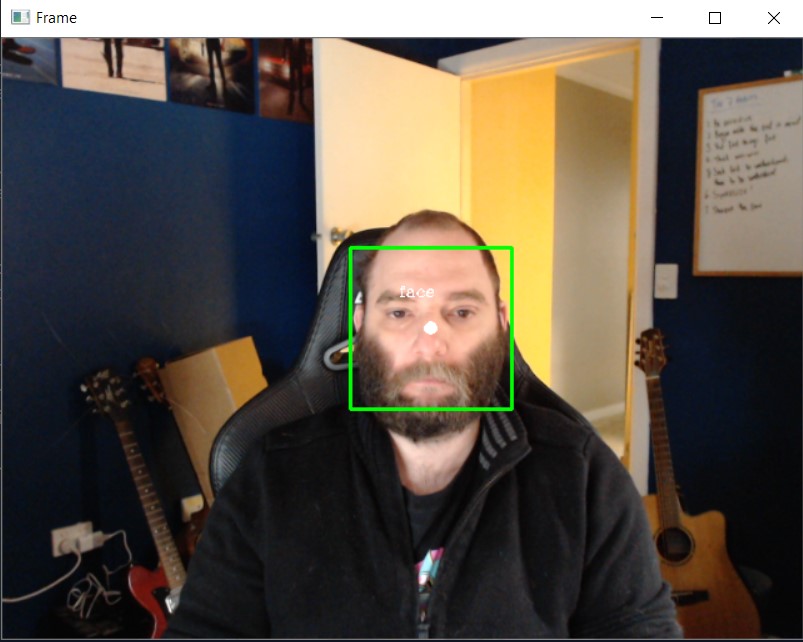
When the classifier detects a face in the frame image, I keep track of x/y coordinates of the center of the face. This will be used later to calculate the distance between a face and fingers.
Lastly, I draw a rectangle around the face, add a dot to the center, and add some text indicating it’s a face.
# draw a rectangles around faces
center_face = ()
for (x, y, w, h) in faces:
    cv2.rectangle(frame, (x, y), (x+w, y+h), (0, 255, 0), 2)

    cX = np.int(x + (w / 2))
    cY = np.int(y + (h / 2))
    cv2.circle(frame, (cX, cY), 5, (255, 255, 255), -1, 1)
    cv2.putText(frame, "face", (cX - 25, cY - 25),
                cv2.FONT_HERSHEY_COMPLEX, 0.4, (255, 255, 255), 1)
    center_face = (cX, cY)
2. Hand detection
I started out using a haar-cascade model to detect hands the same way I did the face, but quickly ran into my first problem.
The definition of a hand as it relates to the model, is the same as what you would imagine one to look like - an open palm with five fingers. Unfortunately, that’s not what a hand looks like during the course of regular use. In the real world, a hand is either curved, fingers bent, facing the camera side on etc - never does it form the shape of what the classifier is trained to recognize.
My simple solution to this problem was to place some blue masking tape around my fingers, and use python to detect the colour of the tape.
To achieve this, I first took a copy of each frame and converted the colour representation from RGB (red, green, blue) to HSV (hue, saturation, value) - which is a better for colour detection in images.
hsv_frame = cv2.cvtColor(frame, cv2.COLOR_BGR2HSV)
Next I created an image mask. An image mask is a binary representation of of the image. The value of each pixel is either 0 (black) or 1 (white).
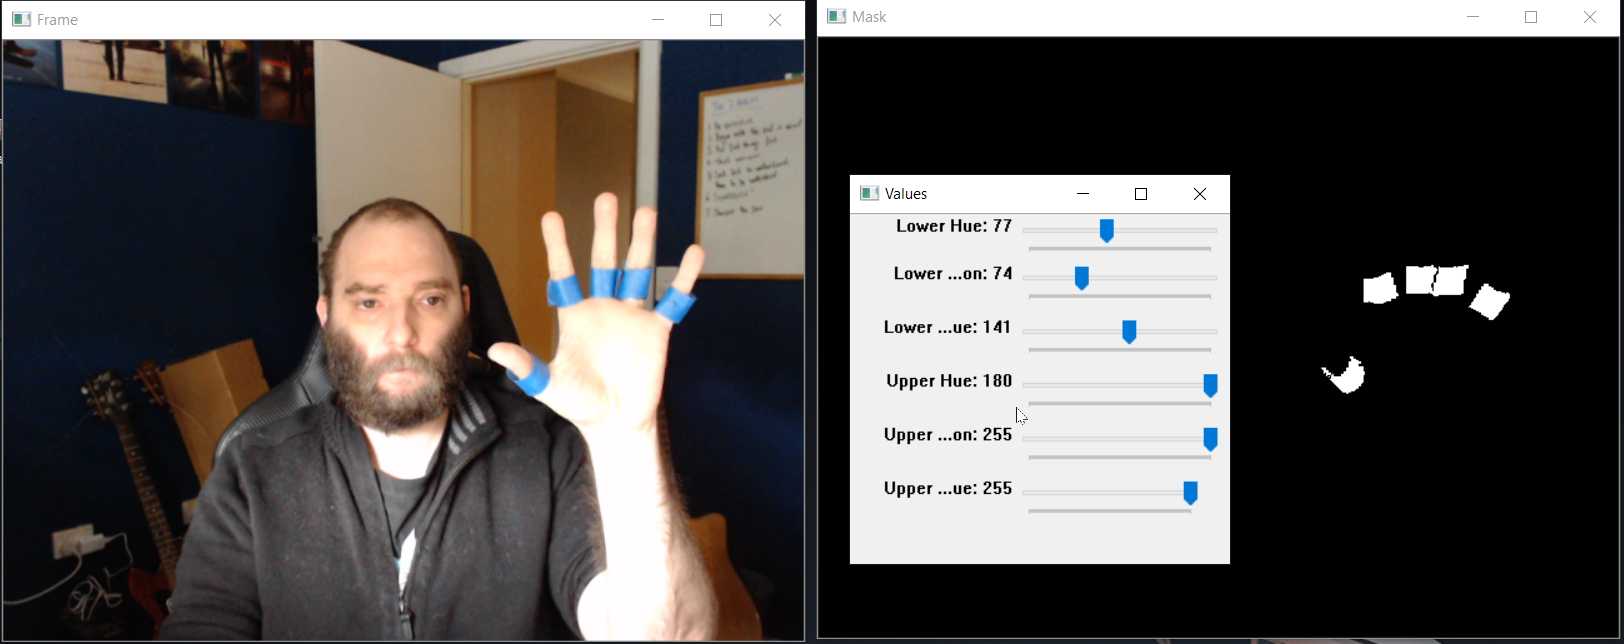
To create the image mask of the blue tape, I need to find range of values on the HSV spectrum that represented the colour blue. I just went with some example values I found online as a place to start.
min_blue = np.array([37,51,51])
max_blue = np.array([180,255,255])
Using the range of blue HSV values, the image mask is created by turning all the pixels that are matched to be within the blue colour range to white, and everything else black.
mask = cv2.inRange(hsv_frame, min_blue, max_blue)
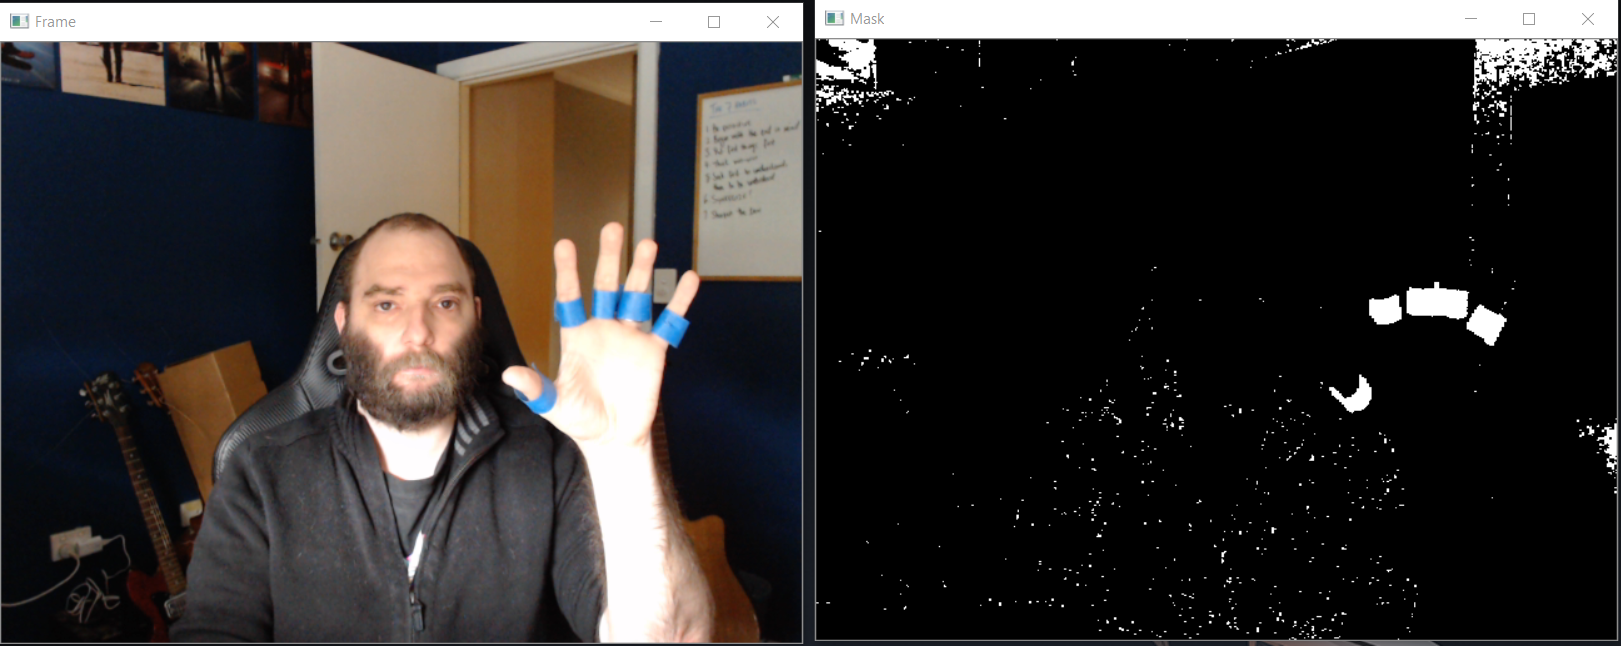
As you can see, the min/max values for the HSV colour range aren’t quite right and I’m getting a lot of noise in the image mask. To help me more accurately find the min and max HSV values for the colour detection, I created a slider that changes each of the values. Using the slider, I can find the values I need with some degree of precision.
Next I applied the bitwise_and operation to cut out everything in the frame that’s not represented in the mask. This results in my fingers being isolated from the image frame.
result = cv2.bitwise_and(frame, frame, mask=mask)
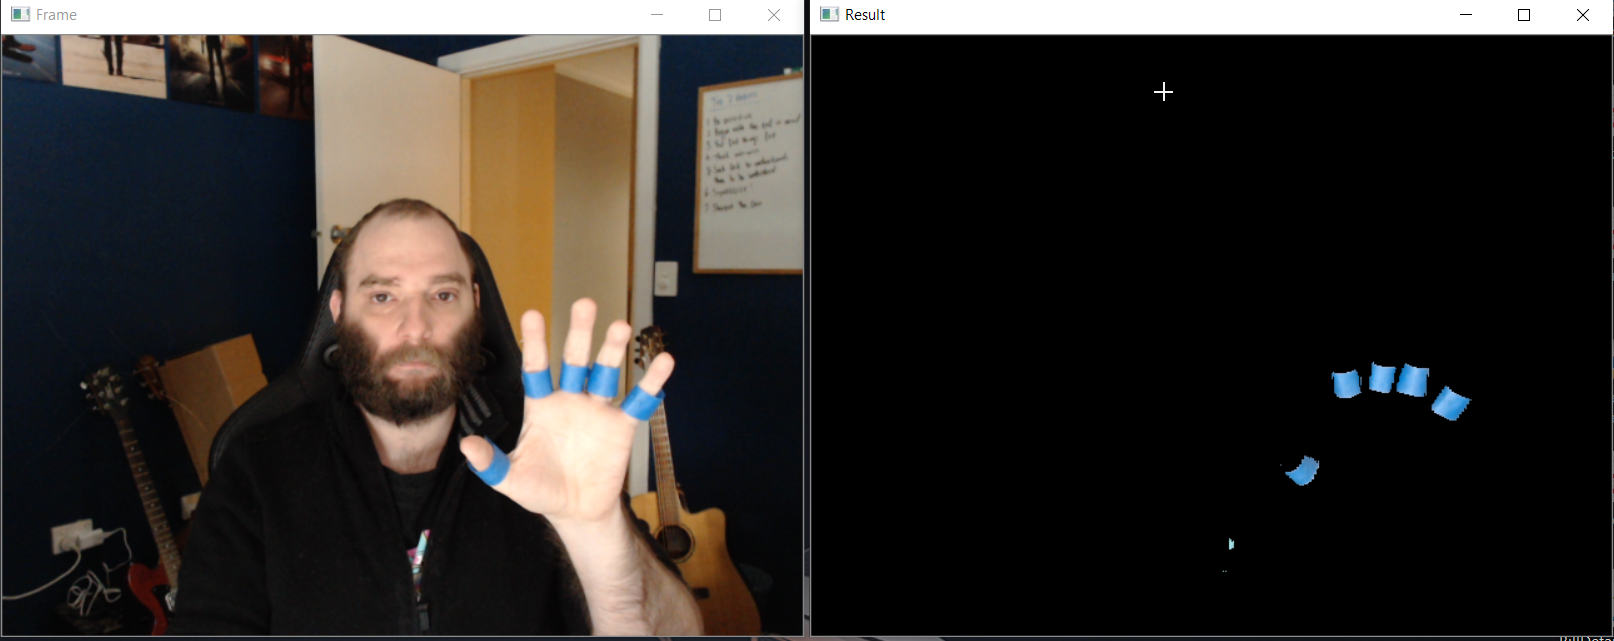
With the location of the fingers now successfully extracted from the source image frame, I detect the contours of the objects and draw a yellow line around them to add visibility to what’s been detected.
# detect contours
contours, hierarchy = cv2.findContours(mask, cv2.RETR_TREE, cv2.CHAIN_APPROX_SIMPLE)

# draw outlines on all the contours
cv2.drawContours(result, contours, -1, (0, 255, 0), 3)
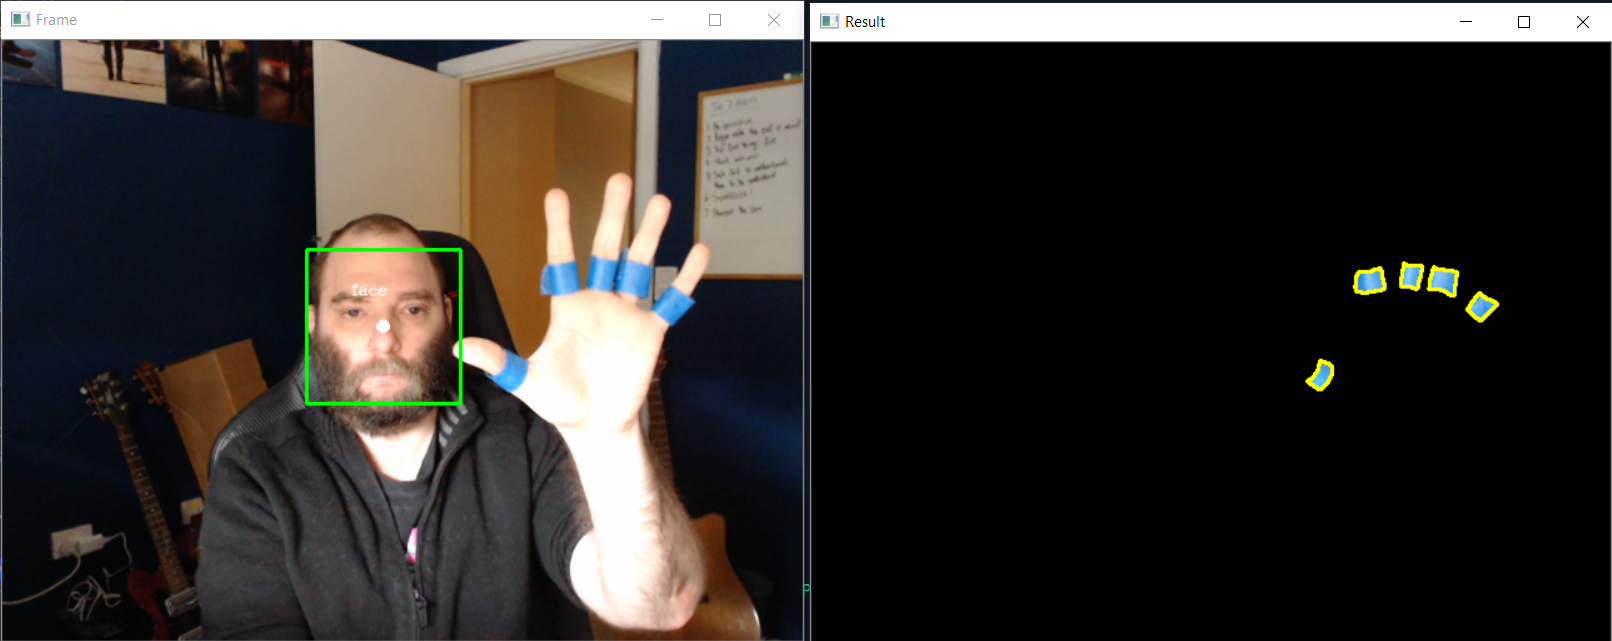
Each of the items in the contour array now represents the location of one of my fingers.
3. Trigger an event
For each of the fingers I draw a rectangle, add some text, calculate the center and store it in an array.
# create a bounding rectangle for the contours
center_fingers = []  # array for center points of the fingers
for contour in contours:
    # create a bounding rectangle for the contour
    (x, y, w, h) = cv2.boundingRect(contour)

    # draw a rectangle around the contours
    cv2.rectangle(frame, (x, y), (x+w, y+h), (0, 0, 255), 2)

    # put a dot in the middle
    cX = np.int(x + (w/2))
    cY = np.int(y + (h/2))
    cv2.circle(frame, (cX, cY), 5, (255, 255, 255), -1, 1)

    # add the center point of each contour to the array
    center_fingers.append([cX, cY])

    # add some text for flavor
    cv2.putText(frame, "finger", (cX - 25, cY - 25),
                cv2.FONT_HERSHEY_SIMPLEX, 0.4, (255, 255, 255), 1)
Now that I have the x/y coordinates of both the face, and all of the fingers, I calculate the distance between them and draw a line and values on the frame.
# find the distance (D) between center of fingers and center of face
if len(center_face) > 0 and len(center_fingers) > 0:

    for idx, finger in enumerate(center_fingers):

        dx = center_face[0] - finger[0]
        dy = center_face[1] - finger[1]

        D = np.sqrt(dx*dx+dy*dy)  # pythagoras

        # draw a line between the finger and the face
        cv2.line(frame, center_face,
                  (finger[0], finger[1]), (255, 255, 255), 1)

        # write the distance from the face
        cv2.putText(frame, str(D), (finger[0] + 25, finger[1] + 25),
                    cv2.FONT_HERSHEY_SIMPLEX, 0.4, (255, 255, 255), 1)
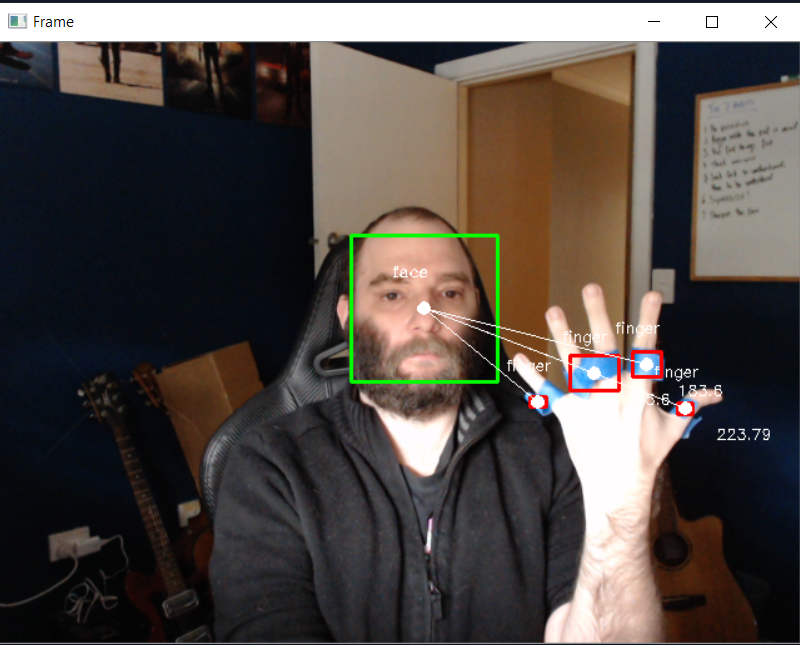
Lastly, if the distance between the centres of a finger and face is below a pre-defined threshold, take a screenshot and play a random audio file.
if D <= finger_distance:
    playsound(
        f"./audio/{random.choice(os.listdir('./audio/'))}", block=False)
    cv2.imwrite(
        f'./face_touches/face_touch_{dt.datetime.now().strftime("%Y%m%d%h%M%S")}.jpg', frame)
What I learned
When I embarked on this experiment, I thought it would be nothing more than a fun way to learn the basics of image classification, but to my surprise it was a rather effective way of keeping my hands away from my face.
If you’re in a state of deep focus and your concentration is shockingly interrupted by something reminiscent of a pop-up scare, it turns out that it doesn’t take long for your brain to realize it doesn’t want to experience that again.
I also discovered that the “shock factor” is only effective when you don’t know that it’s there. I found that I adapted incredibly quickly to the stimuli and it became ever-present in the forefront of my thoughts. If I had an itch, wanted to take a drink of water, or any other action that may otherwise bring my fingers in close proximity to a head vents, I would avoid a “pant changing scenario” by cheating and turning my head away from the camera so the software was unable to detect my face.
On the topic of discovery, throughout this experiment I also unexpectedly discovered other motivators to keep my fingers clear of my head.
While this greatly amplified my awareness of my hands coming in close proximity to my face, the irony is not lost on me that it caused me to touch my face even more.
“There can be no progress, no achievement, without sacrifice, and a man’s worldly success will be in the measure that he sacrifices.” - James Allen, As a Man Thinketh
Conclusion
All in all, it was a fun little project which met the desired outcome. I have now trained a positive habit of keeping my hands well away from all of my cranial apertures.
If you want to give it a try yourself, you can download the code from my github.
Have fun!


Comments