11 min to read
Create an on-air indicator with LIFX and Microsoft Power Automate
Never let a good crisis go to waste

With COVID-19 forcing us all to adjust to remote working, it can be difficult to avoid constant interruptions. When everyone is at home and the kids are being home schooled, it can be near impossible to get some quality focus time. There’s also the ever looming risk of spontaneous embarrassment when your partner draws the attention of everyone on that important video call.
The best tool in your arsenal to combat this problem is to set clear expectations and boundaries with those that occupy your home. It’ll require discussion and commitment from all involved, but if you can, try and work out a system that let’s you get some “Do Not Disturb” time where you can focus or attend a meeting.
A few suggestions are:
- Set a schedule. Plan a few hours every day where everyone knows you’re not to be disturbed, and schedule your meetings or cognitively intensive work at that time.
For me, I take advantage of the MyAnalytics Focus Plan feature of Microsoft365. It automatically blocks out a few hours each day in my calendar with an event called “Focus Time”.
- Create a system. This can be as simple as when the door to the office is closed, don’t go in.
Here’s the system I created in my home using LIFX smart lights, and Microsoft Power Automate (a. k. a Microsoft Flow).
How it works
The setup is pretty simple. It consists three main components.
- The hardware (lights)
- The LIFX API
- Microsoft Power Automate
All I am doing is using Microsoft Power Automate to look at my Outlook calendar, and hit the API to control my lights whenever I have an event scheduled.

My “on-air” indicator will have three coloured states:
- Green: it’s okay to come in and interrupt
- Red: in a meeting - do not disturb.
- Blue: trying to focus. It’s okay to interrupt, but please try to avoid it.
Hardware
The first thing you’re going to need is a light to control. You can pick any brand of smart light that tickles your pickle, but for this post I’ll be demonstrating LIFX.
In my home, just outside the door to my office I have a LIFX down light which I’ll be configuring as my on-air indicator.
If you don’t want the hassle of switching out light bulbs, you can pick yourself up a LIFX Z LED Strip and throw together a pretty sweet alternative.

LIFX API
Create a personal access token
In order to control the lights programmatically via the API, we first need to create a Personal Access Token (PAT). The PAT is used to authenticate against the API and grant access to all of your cloud synched lights.
Once the token has been generated, make sure to copy it somewhere as this will be the only time it is displayed. If you lose it, you’ll need to generate a new one.
Test the API
To confirm that we have everything we need, lets just do a simple test and list all the available lights. After taking a look at the API documentation, I find that the endpoint needed looks like this.
https://api.lifx.com/v1/lights/all
When exploring new APIs, I like to do that visually with Postman (as opposed to using curl or python ) as it allows me to alter parameters and try new things quickly.
- Set the request method to GET
- Enter the API endpoint (
https://api.lifx.com/v1/lights/all) - Click the Authorization tab
- Set the authentication type to Bearer Token
- Enter the Personal Access Token you created earlier
- Hit Send and view the results
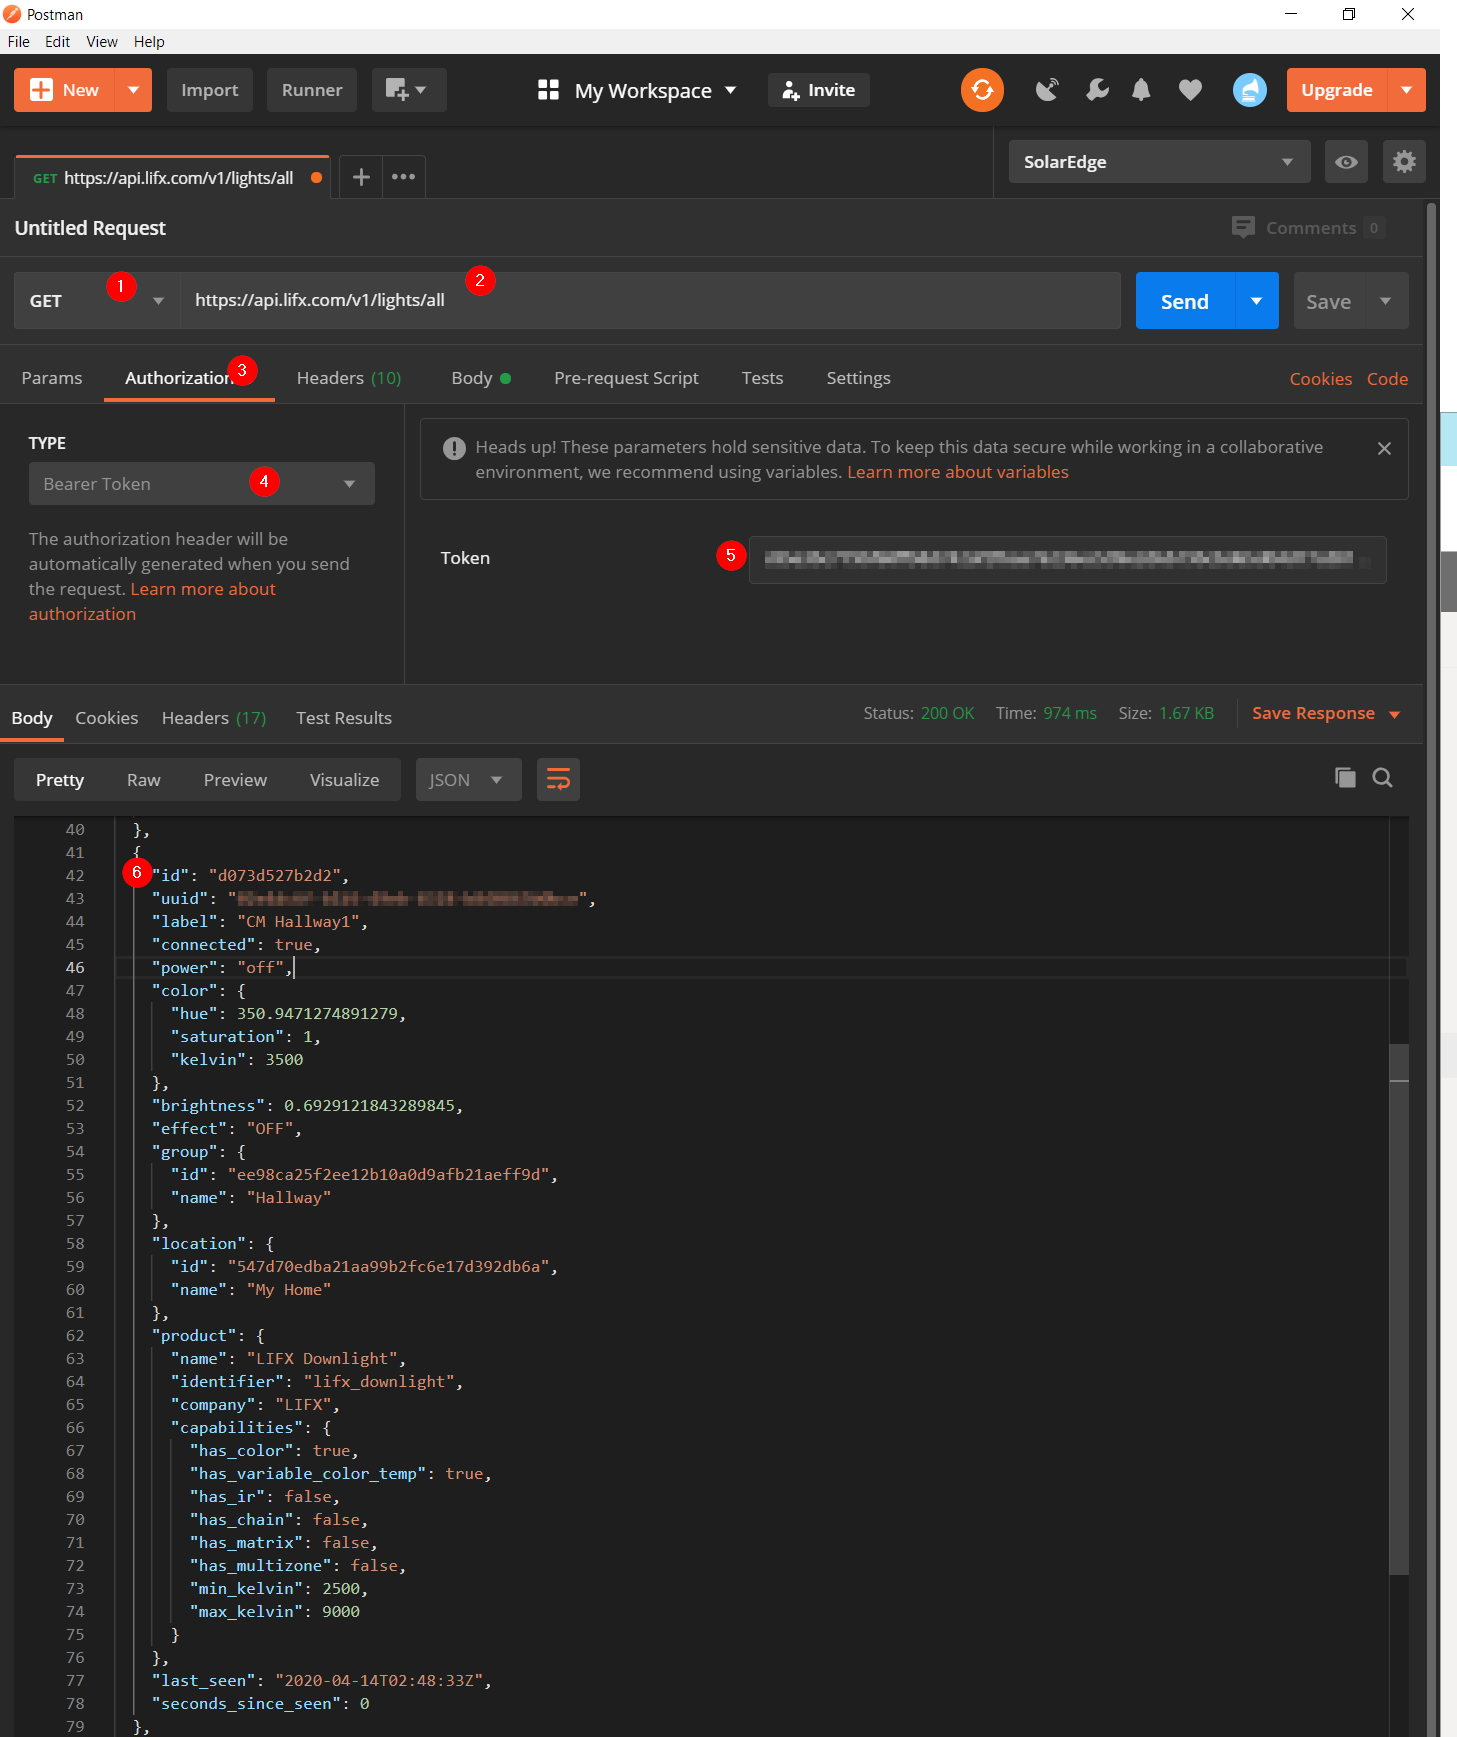
The response should show a JSON representation of the details about all the cloud connected lights.
Next locate the light that you want to configure as your on-air indicator. For me, it’s my hallway light.
{
  "id": "d073d527b2d2",
  "uuid": "REDACTED",
  "label": "Hallway",
  "connected": true,
  "power": "off",
  "color": {
    "hue": 120,
    "saturation": 1,
    "kelvin": 3500
  },
  "brightness": 0.9998168917372396,
  "effect": "OFF",
  "group": {
    "id": "ee98ca25f2ee12b10a0d9afb21aeff9d",
    "name": "Hallway"
  },
  "location": {
    "id": "547d70edba21aa99b2fc6e17d392db6a",
    "name": "My Home"
  },
  "product": {
    "name": "LIFX Downlight",
    "identifier": "lifx_downlight",
    "company": "LIFX",
    "capabilities": {
      "has_color": true,
      "has_variable_color_temp": true,
      "has_ir": false,
      "has_chain": false,
      "has_matrix": false,
      "has_multizone": false,
      "min_kelvin": 2500,
      "max_kelvin": 9000
    }
  },
  "last_seen": "2020-04-16T08:21:45Z",
  "seconds_since_seen": 0
}
Make note of the id value. This is how we reference the light that we want to control. As you can see from above, the id for my hallway light is d073d527b2d2 .
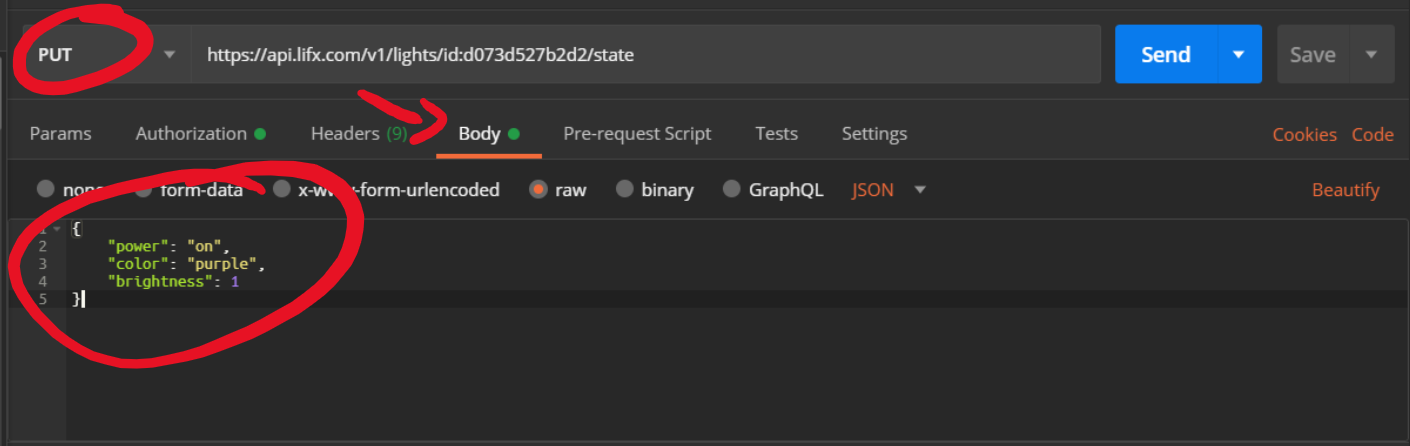
Finally, lets confirm that we can control the light by turning it on and setting the color to purple.
To do that, we need to issue a PUT request to state endpoint and reference the light by using the id selector.
https://api.lifx.com/v1/lights/id:d073d527b2d2/state
In the body of the request, we tell the API that we want the light to turn on, set the brightness to 100%, and set the color to purple.
{
  "power": "on",
  "color": "purple",
  "brightness": 1
}
Microsoft Power Automate
Now that we can control the lights, lets look at turning them on whenever we have an event in our calendar. Here’s how it works.
Trigger: Schedule
Steps:
- Get the events with a start time of now
- If number of events > 0
- For each event, get the subject
- Turn the light on and set the color based on subject
- If number of events = 0
- Turn the light off
Create the flow
Login to Microsoft Power Automate and create a new scheduled flow
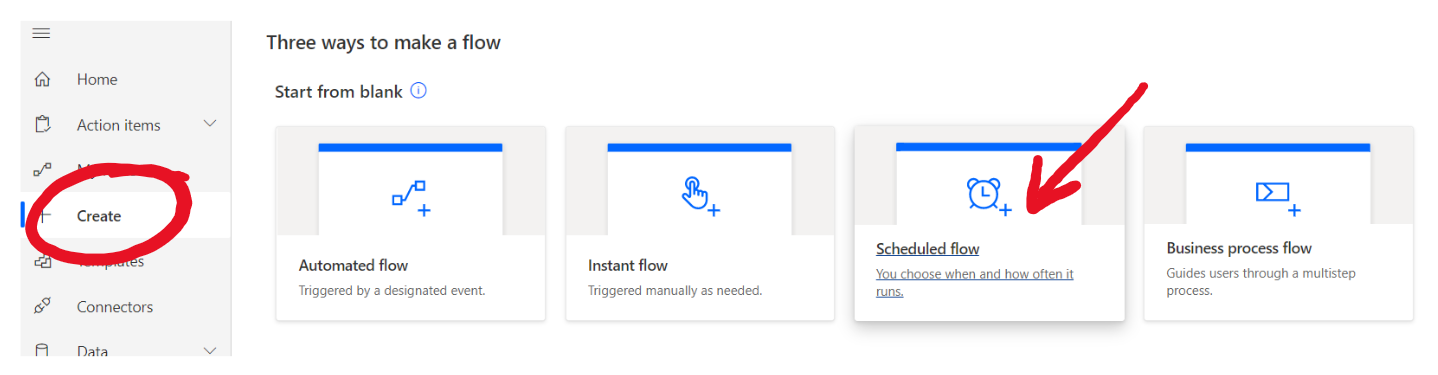
Give it a name and click Create. (Leave other settings as default. We’ll change them later)
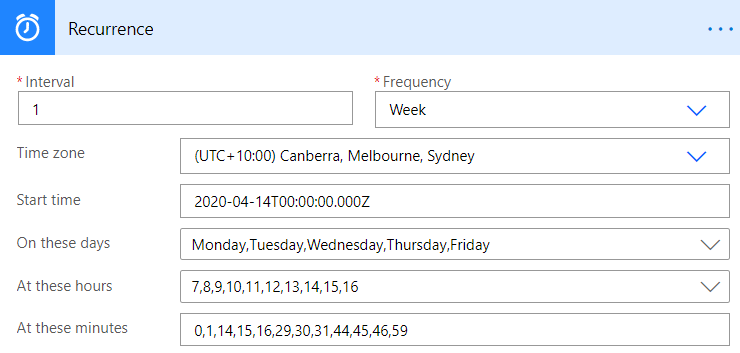
Expand the Recurrence step and show the Advanced Options.
- Interval: 1
- Start Time: Default value
- Frequency: Week
-
On these days:
Monday, Tuesday, Wednesday, Thursday, Friday
-
At these hours:
9, 10, 11, 12, 13, 14, 15, 16
-
At these minutes:
0, 1, 14, 15, 16, 29, 30, 31, 44, 45, 46, 59
Add a new step of type Initialize variable. We’ll use this variable to store our LIFX API token.
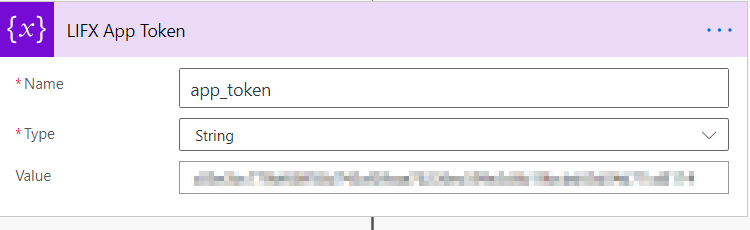
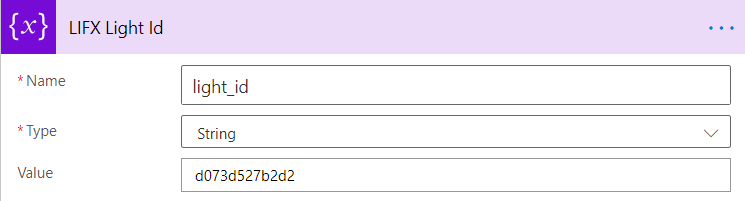
Add another Initialize variable step to use for the Id of the light to control.
- Name: light_id
- Type: String
- Value:
<your light id>
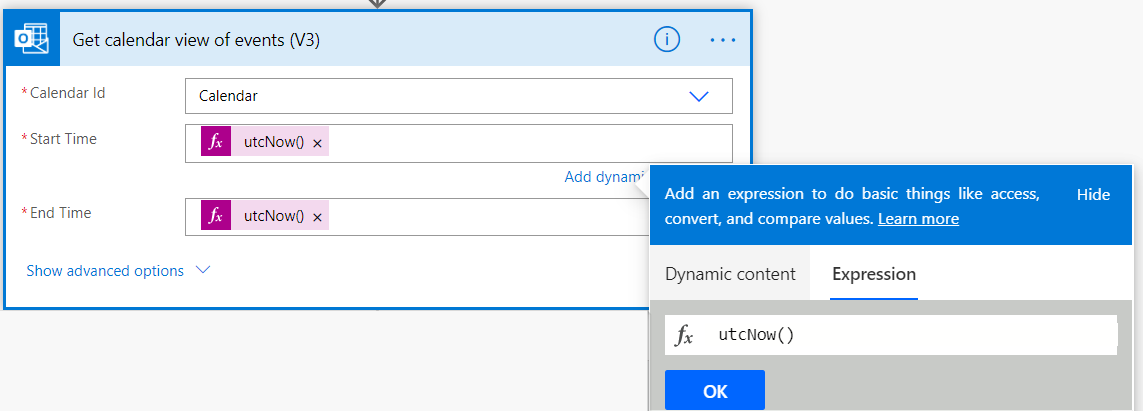
Add a new step of type Get calendar view of events (V3).
Set the Start Time and End Time fields to the expression utcNow() .
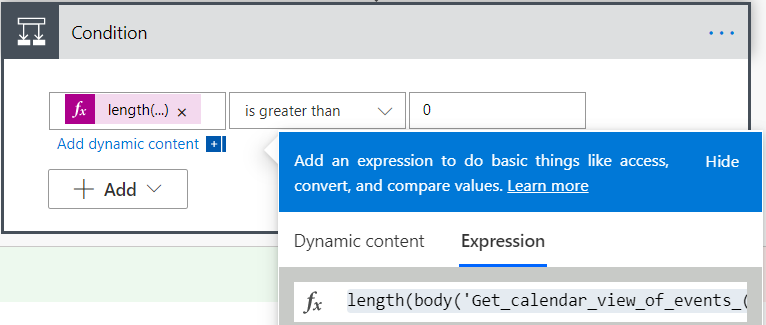
Add a new step of type Condition. Set the condition to:
length(body('Get_calendar_view_of_events_(V3)')?['value'])- is greater than
- 0
At this stage, we’ve got a branch in the logic flow. “If yes” represents that an event is scheduled for right now, and “If no” means exactly what you think it does.
Let’s take care of the easy bit first. In the If no branch, add a HTTP action and click Show advanced options.
- Method: PUT
- URI:
https://api.lifx.com/v1/lights/id:<light_id>/state -
Headers:
Authorization : Bearer
app_token - Body:
  {
    "power": "on",
    "color": "green"
  }

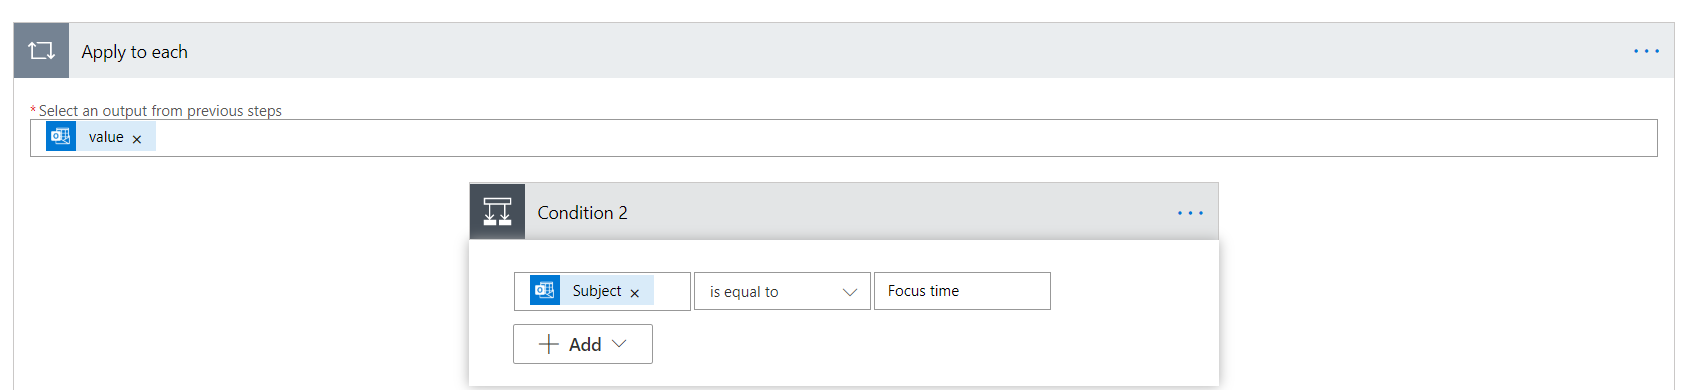
Next we’ll move on to the “If yes” branch. The first thing I want to check if the subject is “Focus time”, and if it is, set the light to blue.
Add a new Condition and select Subject from the dynamic content list to represent the value.
- Set the condition:
Subject is equal to Focus time .
The comparison field is case sensitive!
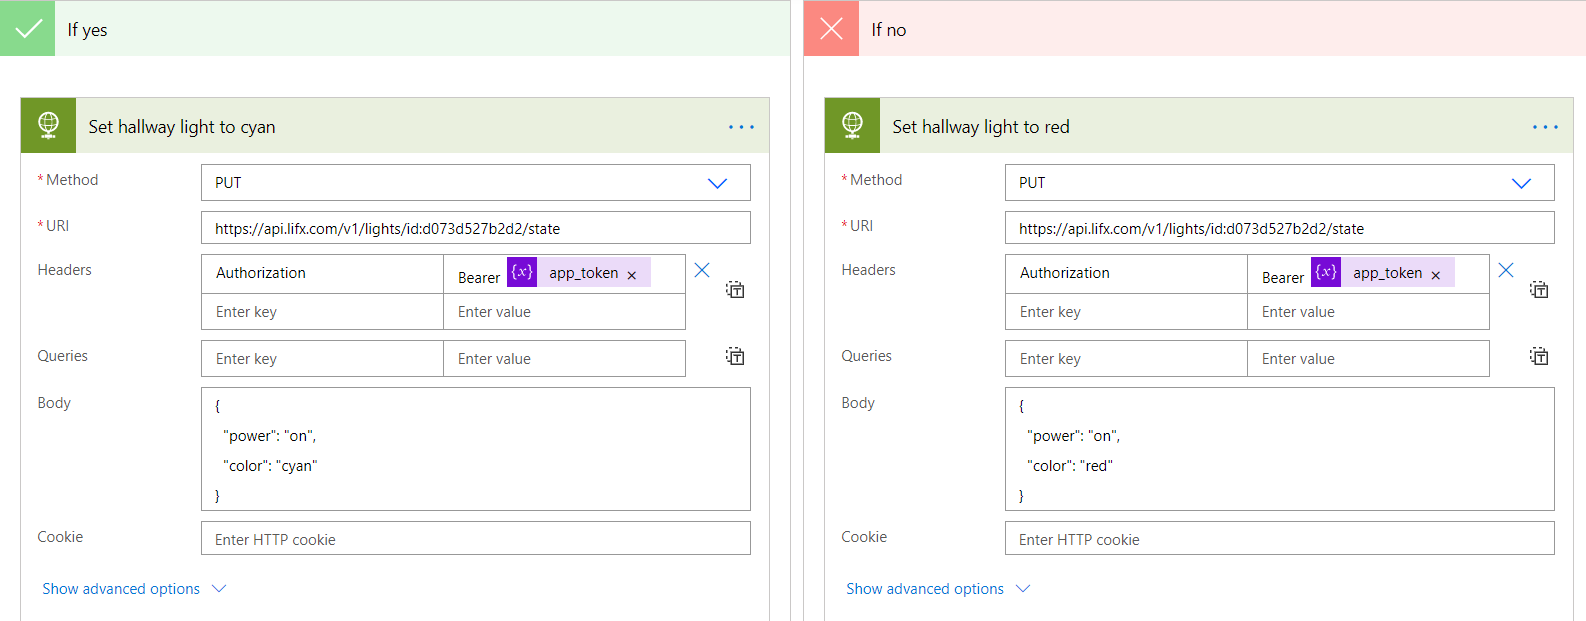
Now we just need to replicate the HTTP post we created earlier, but substituting the color for the appropriate value. In this example, if the subject is “Focus time” I want the light to turn blue, or if it’s not (i. e. anything else) it’ll turn red.
Conclusion
And there you have it! A rather cost effective and simple way to keep yourself focused amidst the distractions of a busy home.
| Outside looking in | Inside looking out |
|---|---|
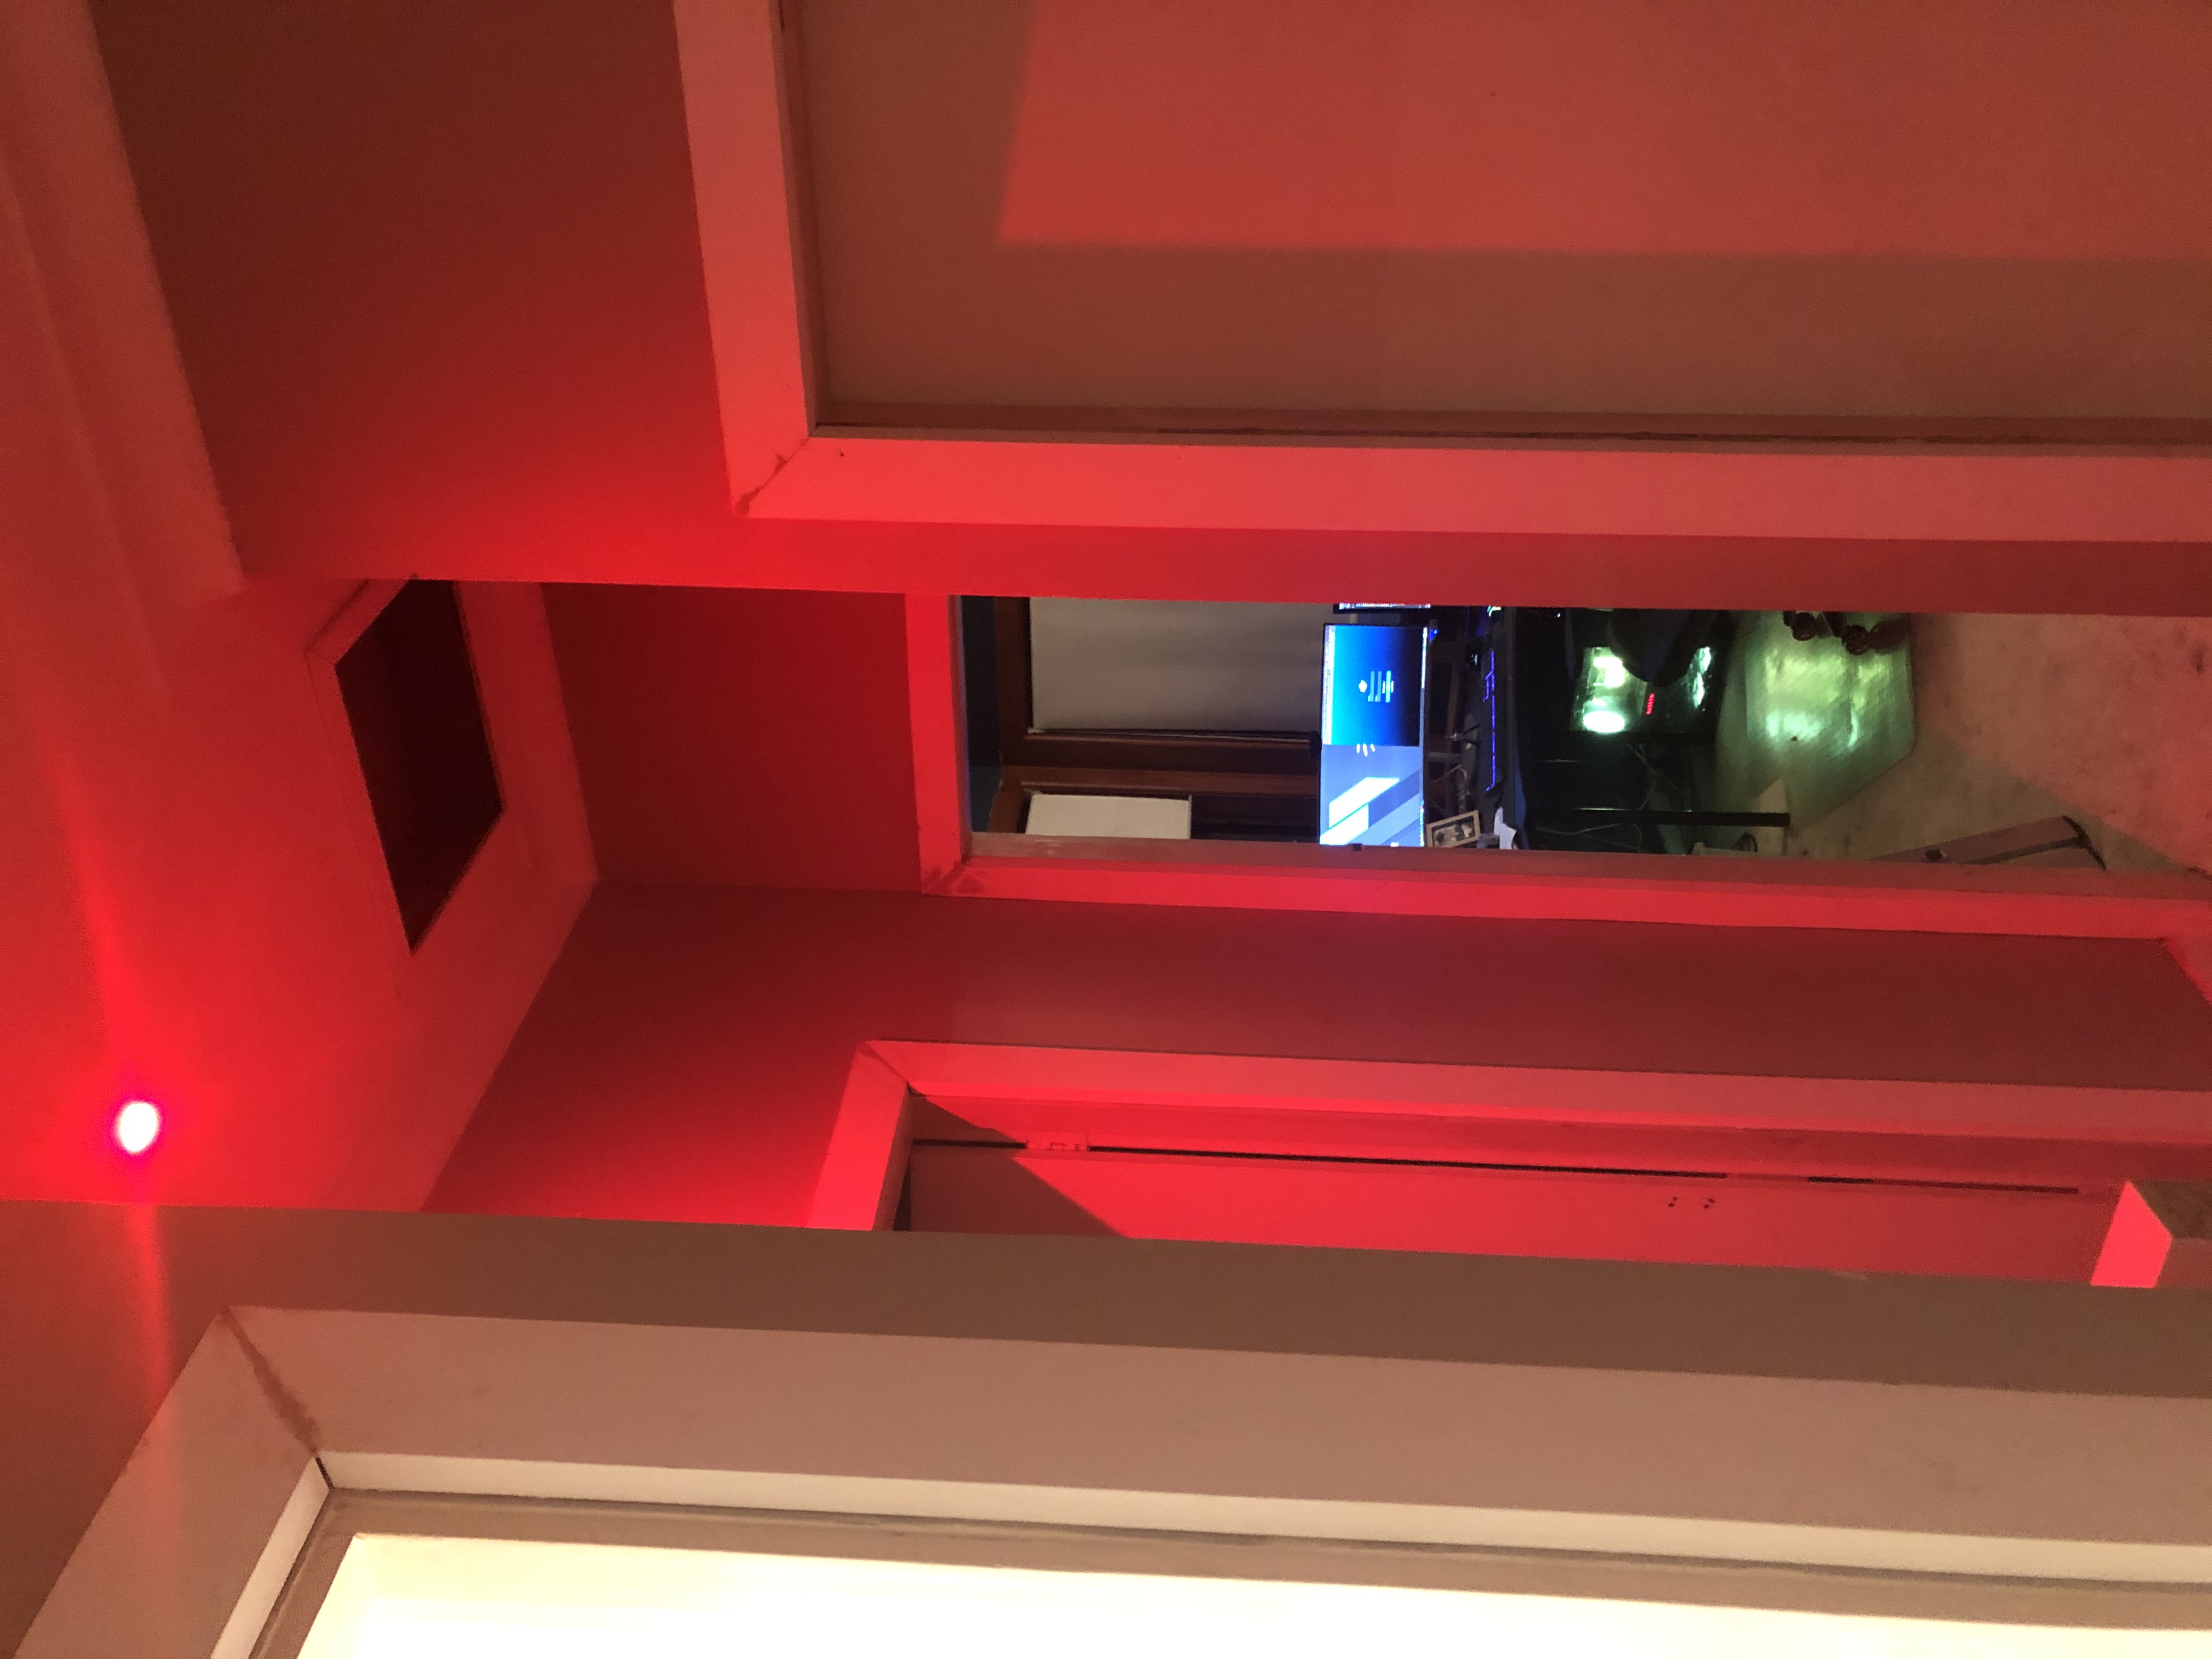 |
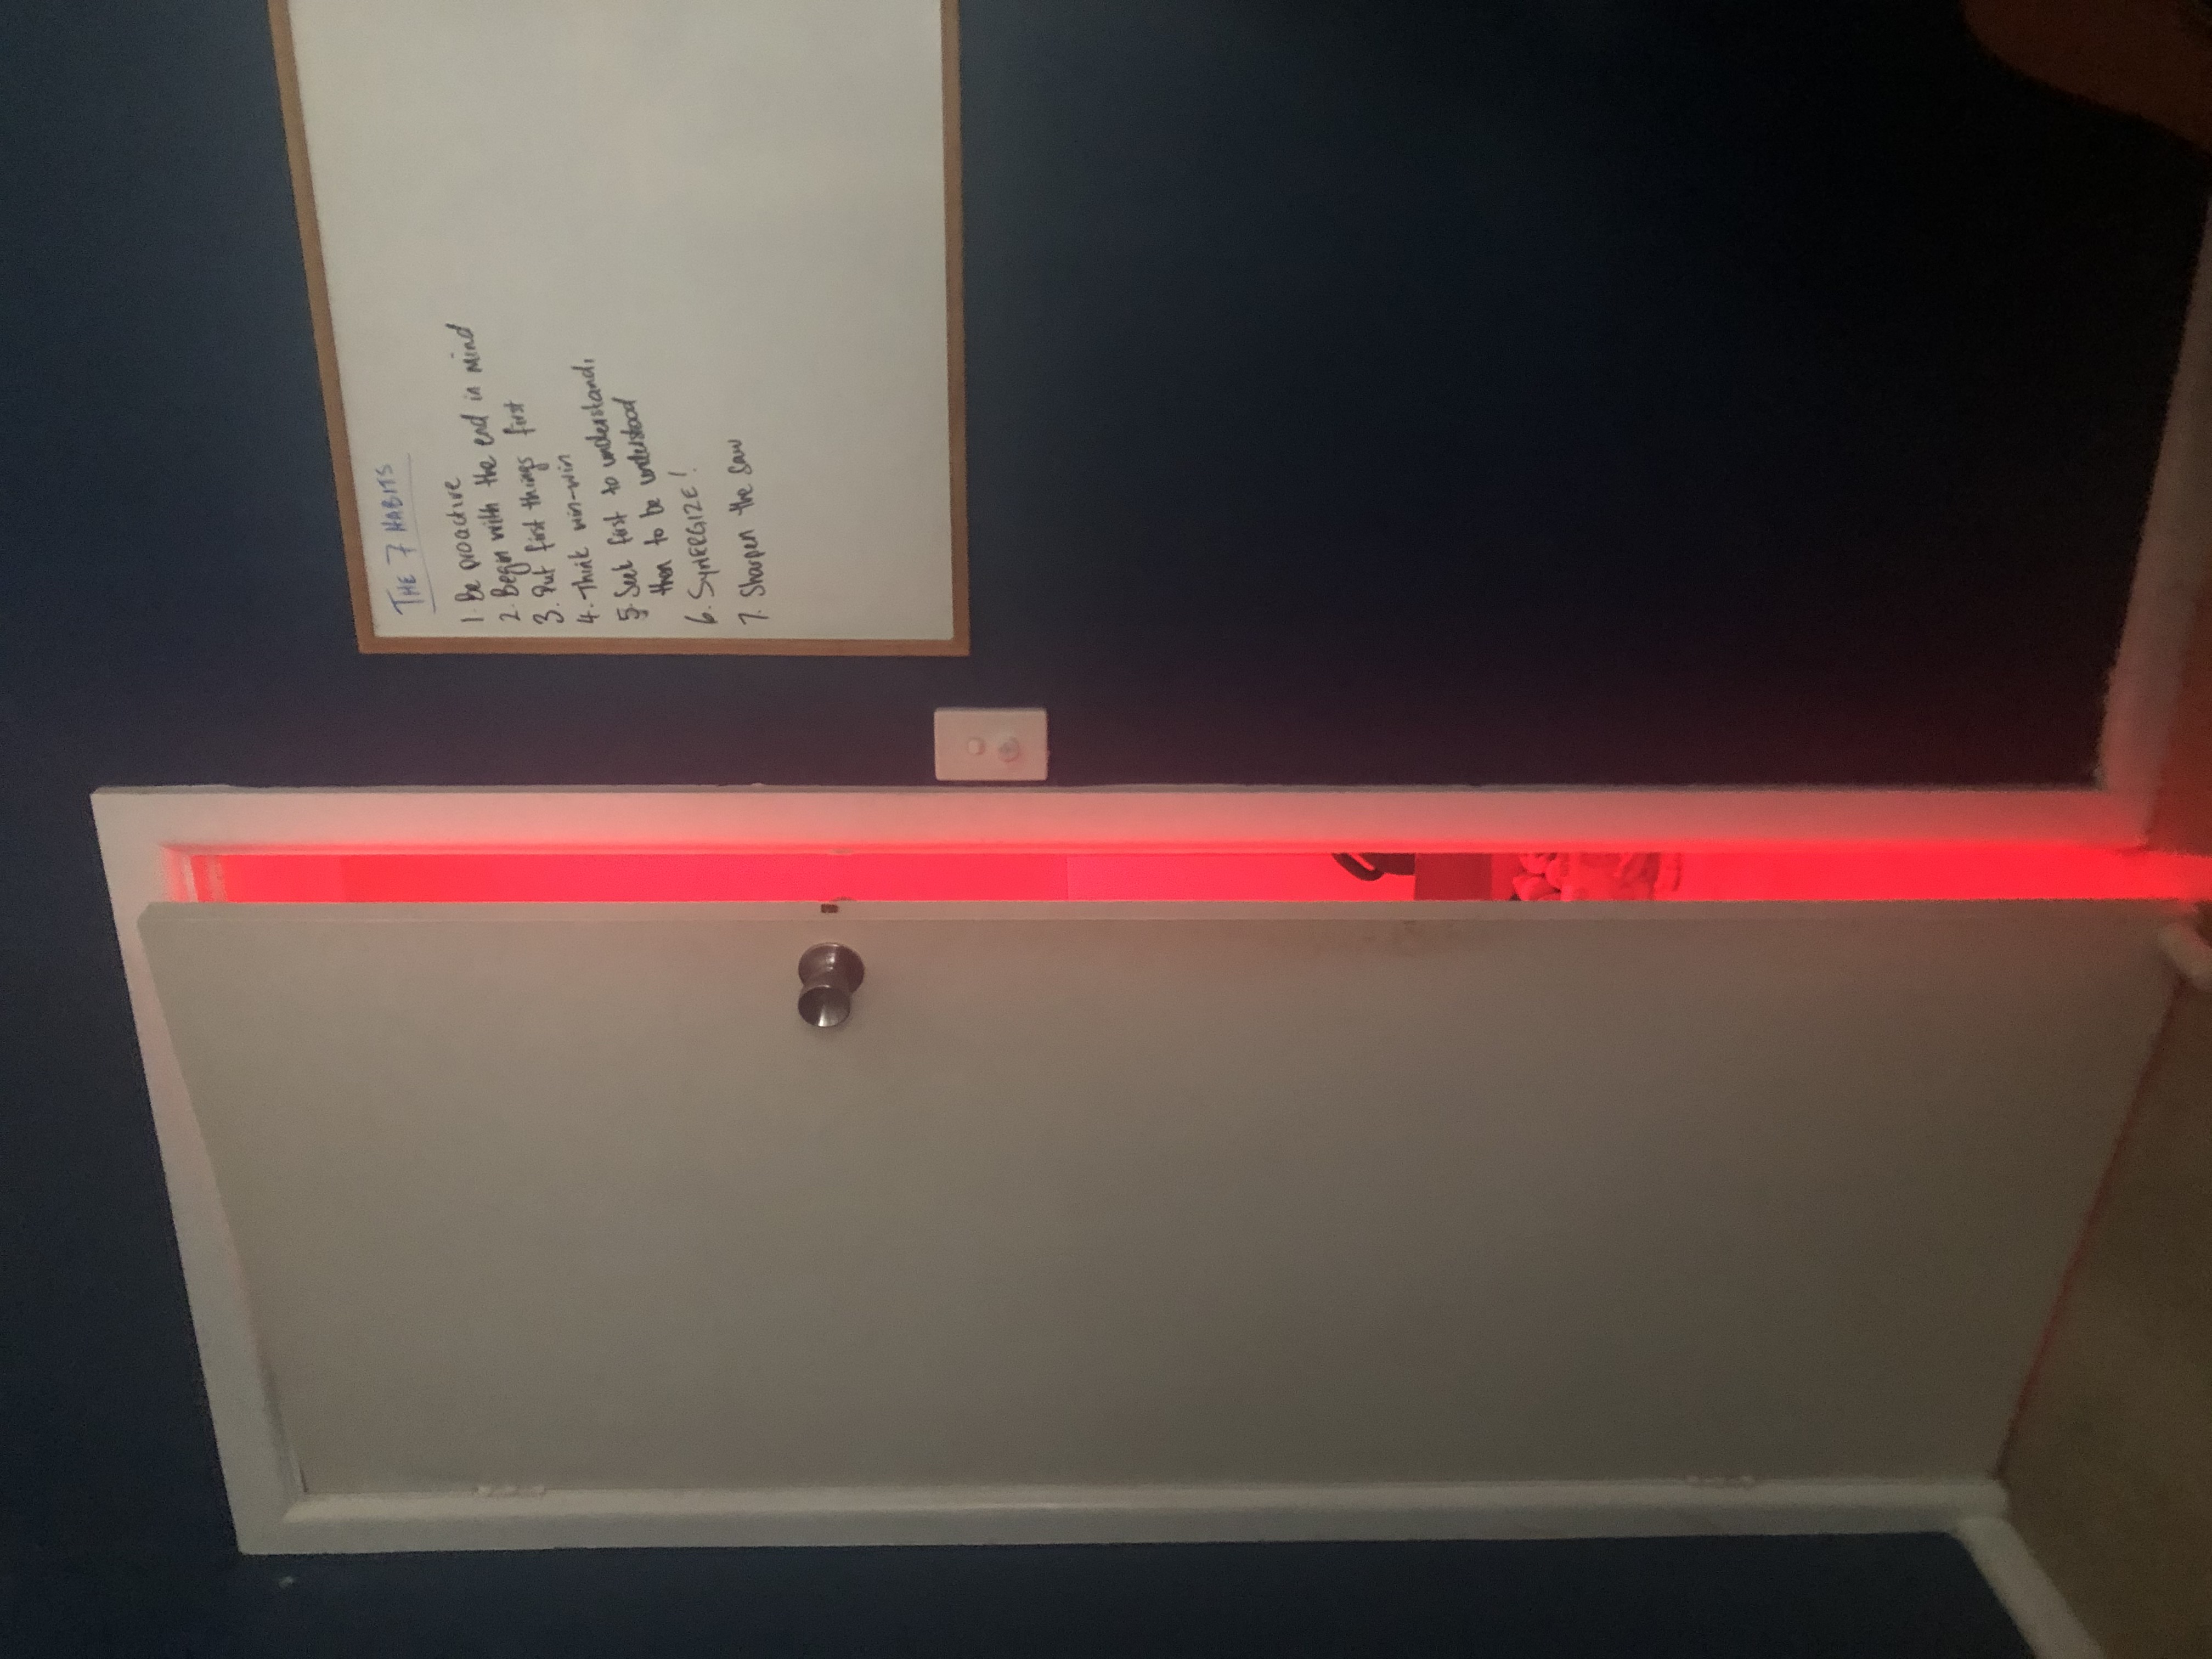 |
If you like this idea and want to take it a bit further, here’s a few other things I’ve configured:
- Flash the lights in my office to remind me to take a break
- Turn off all notifications (to maximize focus) and flash the lights when I get a high priority email, an email from my boss or an @mention in a Teams chat.
- Set lights to orange when a Azure DevOps build is in progress, then flash green/red on success/failure
Good luck!

Comments